daily- blog项目 快速搭建项目 创建完数据库对应的表 等操作之后,进入idea
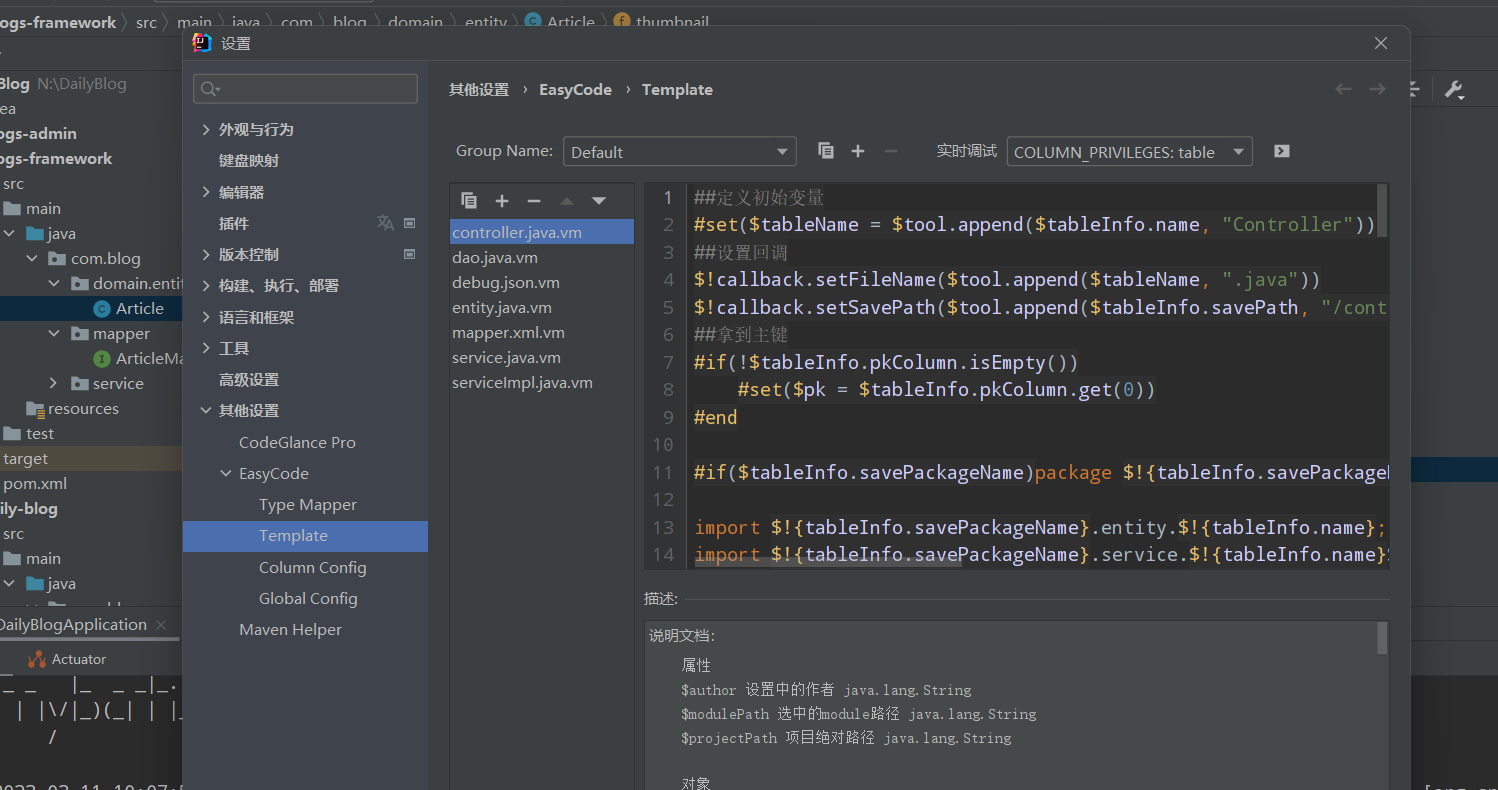
使用EasyCode快速创建工程
首先连接数据库
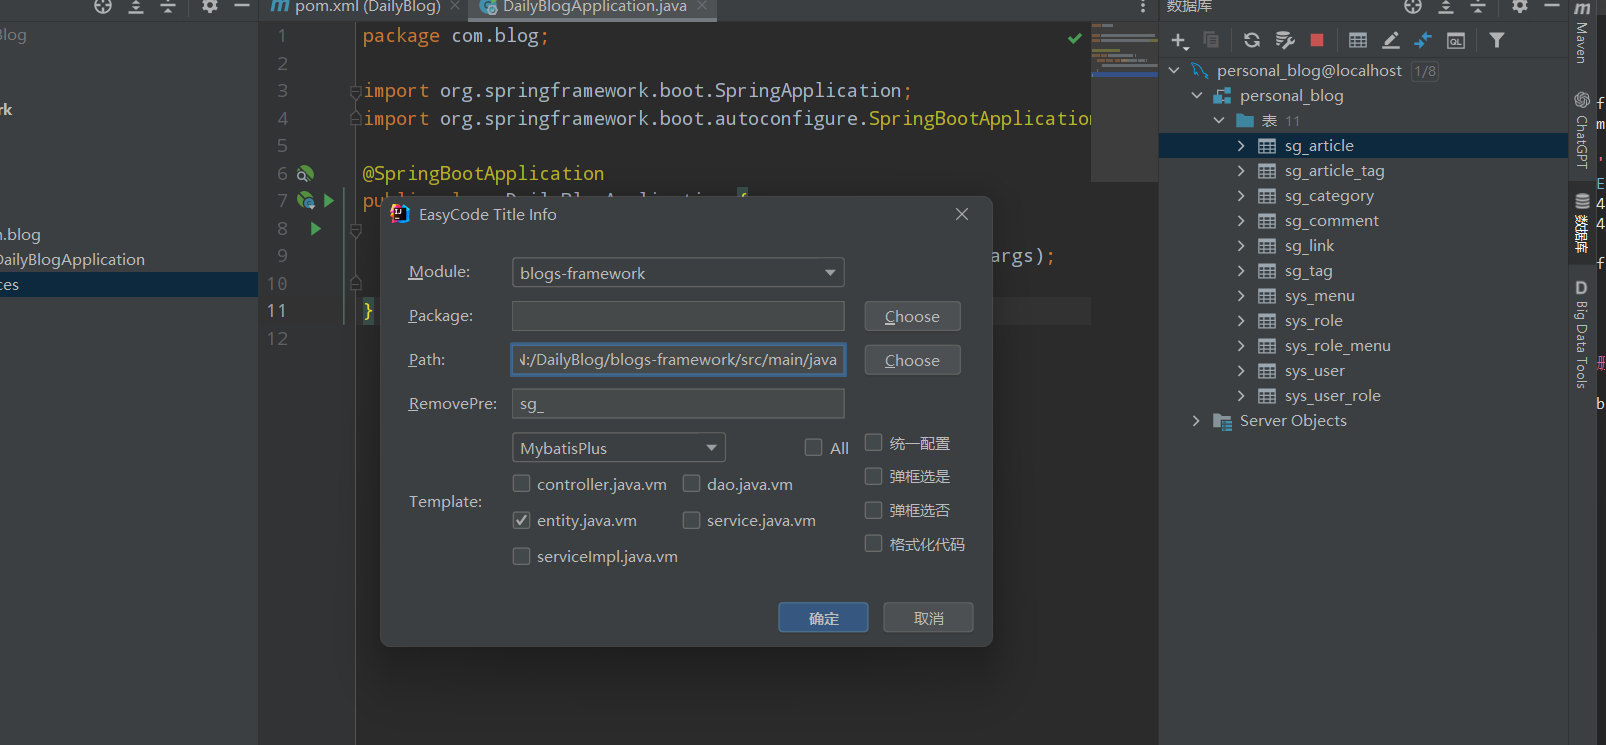
然后在对应的表上点击,然后GeneraleCode
如果想要删除表名中的前缀 ,就可以使用removePre
创建包、实体类、dao等都可以自动生成
自动生成的代码修改 根据自己的需求,修改相应的代码 比如 : 删除其中的继承东西等
我们这里暂时不做任何修改
接下来就是修改实体类对应的信息
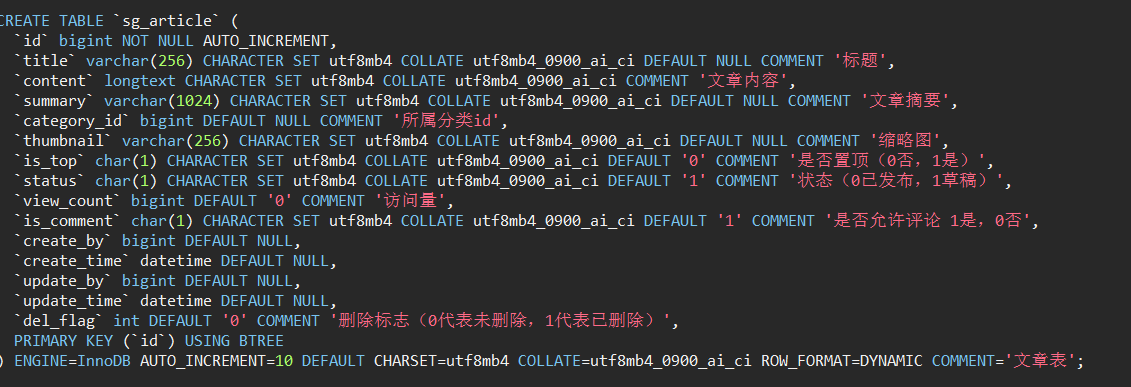
比如: 我们需要添加实体类与数据库中表的对应关系用 @TableName("sg_article") , 对于主键自增的字段使用@TableId等
1 2 3 4 5 6 7 8 9 10 11 12 13 14 15 16 17 18 19 20 21 22 23 24 25 26 27 28 29 30 31 32 33 34 35 36 37 38 39 40 41 @SuppressWarnings("serial") @TableName("sg_article") public class Article { @TableId private Long id; private String title; private String content; private String summary; private Long categoryId; private String thumbnail; private String isTop; private String status; private Long viewCount; private String isComment; private Long createBy; private Date createTime; private Long updateBy; private Date updateTime; private Integer delFlag; }
修改service、dao等层 对于Mapper层 ,因为使用的是Mybatis-plus,所以使用的Mapper就方便很多
1
2
public interface ArticleMapper extends BaseMapper <Article> {}
service层
1
2
public interface ArticleService extends IService <Article> {}
impl实现类上加注解
1
2
3
4
@Service public class ArticleServiceImpl extends ServiceImpl <ArticleMapper, Article> implements ArticleService {}
配置Controller及其注意事项 Controller层
1
2
3
4
5
6
7
8
9
10
11
12
@RestController @RequestMapping("/article") public class ArticleController { @Resource private ArticleService articleService; @GetMapping("/list") public List<Article> test () { List<Article> list = articleService.list(); return list; } }
注意事项:
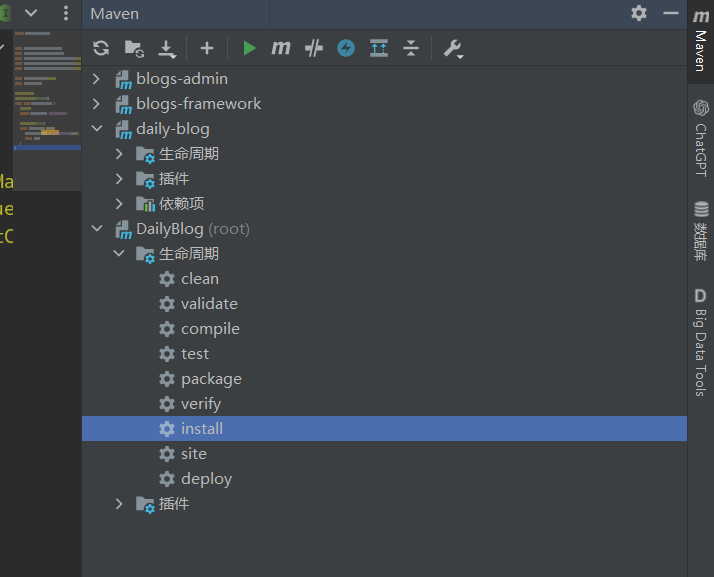
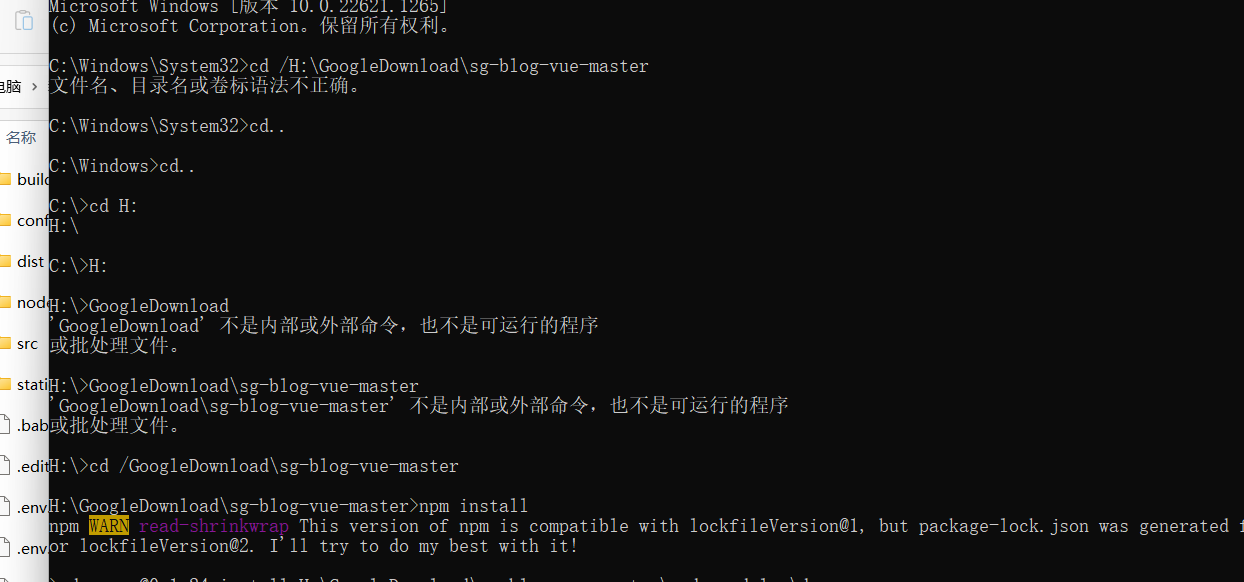
对于使用模块化项目,我们再配置完成后需要重新install项目,这样不同模块配置的内容才会加载出来
表的设计分析
通用的响应实体类 和 响应枚举 1 2 3 4 5 6 7 8 9 10 11 12 13 14 15 16 17 18 19 20 21 22 23 24 25 26 27 28 29 30 31 32 33 34 35 36 37 38 39 40 41 42 43 44 45 46 47 48 49 50 51 52 53 54 55 56 57 58 59 60 61 62 63 64 65 66 67 68 69 70 71 72 73 74 75 76 77 78 79 80 81 82 83 84 85 86 87 88 89 90 91 92 93 94 95 96 97 98 99 100 101 102 103 104 105 106 107 108 109 110 111 112 113 114 115 116 117 118 119 120 121 122 123 124 125 126 127 package com.blog.domain;import com.blog.enums.AppHttpCodeEnum;import com.fasterxml.jackson.annotation.JsonInclude;import java.io.Serializable;@JsonInclude(JsonInclude.Include.NON_NULL) public class ResponseResult <T> implements Serializable { private Integer code; private String msg; private T data; public ResponseResult () { this .code = AppHttpCodeEnum.SUCCESS.getCode(); this .msg = AppHttpCodeEnum.SUCCESS.getMsg(); } public ResponseResult (Integer code, T data) { this .code = code; this .data = data; } public ResponseResult (Integer code, String msg, T data) { this .code = code; this .msg = msg; this .data = data; } public ResponseResult (Integer code, String msg) { this .code = code; this .msg = msg; } public static ResponseResult errorResult (int code, String msg) { ResponseResult result = new ResponseResult (); return result.error(code, msg); } public static ResponseResult okResult () { ResponseResult result = new ResponseResult (); return result; } public static ResponseResult okResult (int code, String msg) { ResponseResult result = new ResponseResult (); return result.ok(code, null , msg); } public static ResponseResult okResult (Object data) { ResponseResult result = setAppHttpCodeEnum(AppHttpCodeEnum.SUCCESS, AppHttpCodeEnum.SUCCESS.getMsg()); if (data!=null ) { result.setData(data); } return result; } public static ResponseResult errorResult (AppHttpCodeEnum enums) { return setAppHttpCodeEnum(enums,enums.getMsg()); } public static ResponseResult errorResult (AppHttpCodeEnum enums, String msg) { return setAppHttpCodeEnum(enums,msg); } public static ResponseResult setAppHttpCodeEnum (AppHttpCodeEnum enums) { return okResult(enums.getCode(),enums.getMsg()); } private static ResponseResult setAppHttpCodeEnum (AppHttpCodeEnum enums, String msg) { return okResult(enums.getCode(),msg); } public ResponseResult<?> error(Integer code, String msg) { this .code = code; this .msg = msg; return this ; } public ResponseResult<?> ok(Integer code, T data) { this .code = code; this .data = data; return this ; } public ResponseResult<?> ok(Integer code, T data, String msg) { this .code = code; this .data = data; this .msg = msg; return this ; } public ResponseResult<?> ok(T data) { this .data = data; return this ; } public Integer getCode () { return code; } public void setCode (Integer code) { this .code = code; } public String getMsg () { return msg; } public void setMsg (String msg) { this .msg = msg; } public T getData () { return data; } public void setData (T data) { this .data = data; } }
1
2
3
4
5
6
7
8
9
10
11
12
13
14
15
16
17
18
19
20
21
22
23
24
25
26
27
28
29
30
31
32
33
34
35
36
37
38
39
package com.blog.enums;public enum AppHttpCodeEnum { SUCCESS(200 ,"操作成功" ), NEED_LOGIN(401 ,"需要登录后操作" ), NO_OPERATOR_AUTH(403 ,"无权限操作" ), SYSTEM_ERROR(500 ,"出现错误" ), USERNAME_EXIST(501 ,"用户名已存在" ), PHONENUMBER_EXIST(502 ,"手机号已存在" ), EMAIL_EXIST(503 , "邮箱已存在" ), REQUIRE_USERNAME(504 , "必需填写用户名" ), CONTENT_NOT_NULL(506 , "评论内容不能为空" ), FILE_TYPE_ERROR(507 , "文件类型错误,请上传png文件" ), USERNAME_NOT_NULL(508 , "用户名不能为空" ), NICKNAME_NOT_NULL(509 , "昵称不能为空" ), PASSWORD_NOT_NULL(510 , "密码不能为空" ), EMAIL_NOT_NULL(511 , "邮箱不能为空" ), NICKNAME_EXIST(512 , "昵称已存在" ), LOGIN_ERROR(505 ,"用户名或密码错误" ); int code; String msg; AppHttpCodeEnum(int code, String errorMessage){ this .code = code; this .msg = errorMessage; } public int getCode () { return code; } public String getMsg () { return msg; } }
调用前端接口时出现权限不够
同时会出现无法显示的问题, 那是因为我们前后端不在同一个域中,需要在mvc配置文件中配置跨域连调
1
2
3
4
5
6
7
8
9
10
11
12
13
14
15
16
17
18
19
20
21
22
23
24
@Configuration public class WebConfig implements WebMvcConfigurer { @Override public void addCorsMappings (CorsRegistry registry) { registry.addMapping("/**" ) .allowedOriginPatterns("*" ) .allowCredentials(true ) .allowedMethods("GET" , "POST" , "DELETE" , "PUT" ) .allowedHeaders("*" ) .maxAge(3600 ); } }
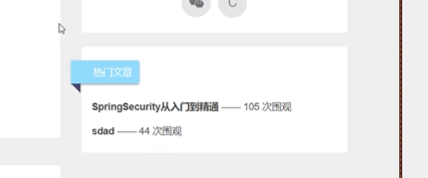
博客前台 热门文章列表
需求 查询出浏览量最高的前10篇文章的信息。 要求展示文章标题和浏览量。八能够让用户自己点击跳转到具体的文章详请进行浏览
注意 : 不要把草稿展示出来 ,不要把删除的文章查询出来
接口设计 将返回值使用 通用的返回响应
controller层
1 2 3 4 5 6 @GetMapping("/hotArticleList") public ResponseResult hotArticleList () { return articleService.hotArticleList(); }
service层实现
1
2
3
4
5
6
7
8
9
10
11
12
13
14
15
16
17
18
19
20
21
22
23
24
25
26
27
@Service public class ArticleServiceImpl extends ServiceImpl <ArticleMapper, Article> implements ArticleService { @Override public ResponseResult hotArticleList () { LambdaQueryWrapper<Article> queryWrapper = new LambdaQueryWrapper <>(); queryWrapper.eq(Article::getStatus,0 ); queryWrapper.orderByDesc(Article::getViewCount); Page<Article> page = new Page (1 ,10 ); if (ObjectUtils.isEmpty(page)){ return ResponseResult.errorResult(AppHttpCodeEnum.valueOf("暂无热门文章" )); } page(page,queryWrapper); List<Article> articles = page.getRecords(); return ResponseResult.okResult(articles); } }
这里老师的代码有错误,分页没有被加进去 ,我们自己需要修改
使用VO优化
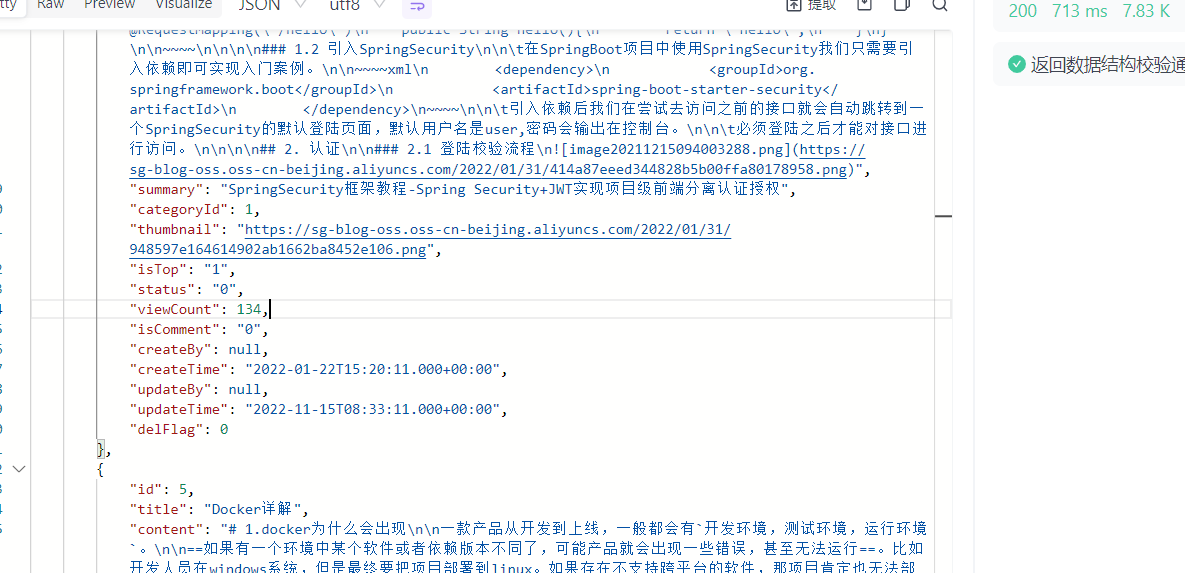
需求 : 从我们的出的接口的返回值我们就可以看出,我们需要的只是博客内容的访问量 以及 博客名 而不是所有的内容都返回。这样不仅会造成信息泄露 ,如果文章字数过多,还会造成内存额外消耗。所以我们需要进行优化
经过处理的类我们叫做 VO类型的类
1 2 3 4 5 6 7 8 9 10 11 12 13 14 @Data @AllArgsConstructor @NoArgsConstructor public class HotArticle { private Long id; private String title; private Long viewCount; }
然后再通过类型拷贝,就可以将我们需要的数据返回,而不是返回所有【拷贝的原理是两个类的属性相同】
1
2
3
4
5
6
7
8
9
10
List<Article> articles = page.getRecords(); List<HotArticle> hotArticles = new ArrayList <>(); for (Article article : articles){ HotArticle vo = new HotArticle (); BeanUtils.copyProperties(article,vo); hotArticles.add(vo); } return ResponseResult.okResult(hotArticles);
封装Bean拷贝工具类 1 2 3 4 5 6 7 8 9 10 11 12 13 14 15 16 17 18 19 20 21 22 23 24 25 26 27 28 29 30 31 32 33 34 35 36 37 38 39 40 41 42 43 public class BeanCopyUtils { private BeanCopyUtils () { } public static <V> V copyBean (Object source,Class<V> clazz) { V result = null ; try { result = clazz.newInstance(); BeanUtils.copyProperties(source,result); } catch (Exception e) { e.printStackTrace(); } return result; } public static <O,V> List<V> copyBeanList (List<O> list , Class<V> clazz ) { List<V> collect = list.stream() .map(o -> copyBean(o, clazz)) .collect(Collectors.toList()); return collect; } }
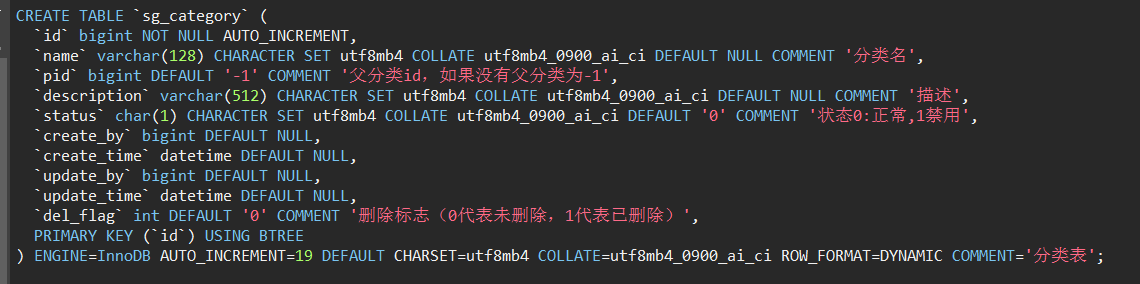
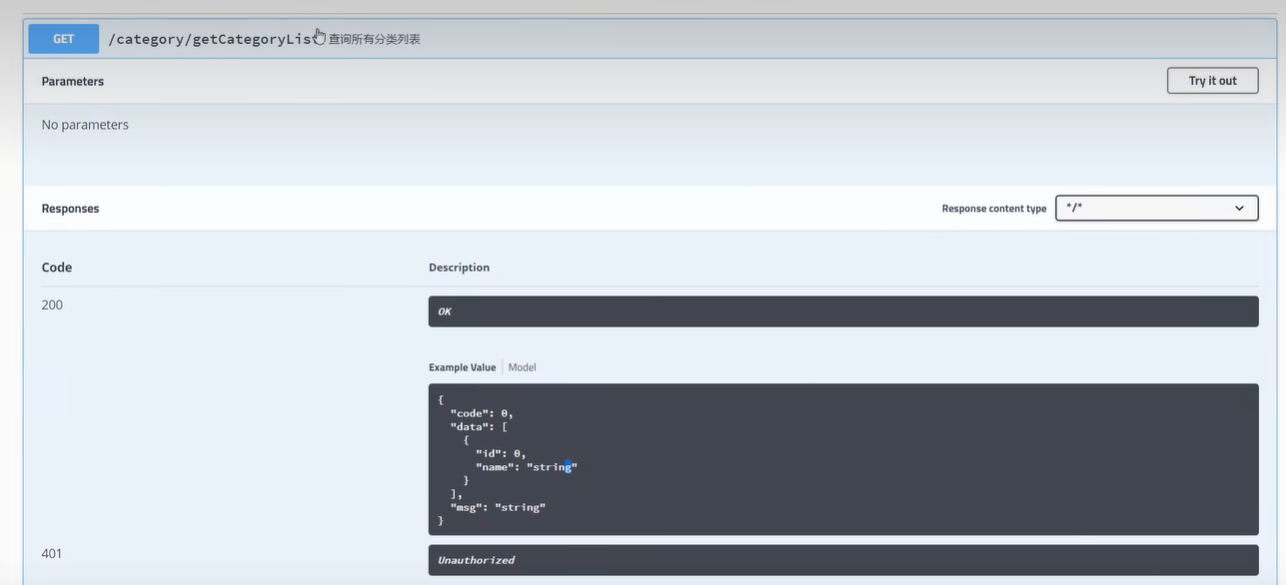
分类列表需求
需求 页面上需要展示分类列表, 用户可以通过点击具体的分类查看该分类下的文章列表。
注意: 1. 要求只展示有发布展示文章的分类 。 2. 必须是正常状态的分类
表信息
接口设计
1 2 3 4 5 6 7 8 9 10 11 12 13 @RequestMapping("/category") @RestController public class CategoryController { @Resource private CategoryService categoryService; @GetMapping("/getCategoryList") public ResponseResult getCategoryList () { return categoryService.getCategoryList(); } }
思路:
先在文章表中查询 status(文章发布or未发布)为 0 的,也就是发布了的 。还有就是未删除的
查出上一步的之后只需要查分类id就可以了(category_id)
然后再到category表中查出对应的名称即可
实现 首先我们使用EasyCode生成对应的mapper、pojo实体类等
完成service层等的代码实现
1 2 3 4 5 6 7 8 9 10 11 12 13 14 15 16 17 18 19 20 21 22 23 24 25 26 27 28 29 30 31 32 33 @Service public class CategoryServiceImpl extends ServiceImpl <CategoryMapper, Category> implements CategoryService { @Resource private ArticleService articleService; @Override public ResponseResult getCategoryList () { LambdaQueryWrapper<Article> queryWrapper = new LambdaQueryWrapper <>(); queryWrapper.eq(Article::getStatus, SystemConstants.ARTICLE_STATUS_PUT); List<Article> articles = articleService.list(queryWrapper); Set<Long> categoryIds = articles.stream() .map(new Function <Article, Long>() { @Override public Long apply (Article article) { return article.getCategoryId(); } }).collect(Collectors.toSet()); List<Category> categories = listByIds(categoryIds); List<Category> collect = categories.stream().filter(category -> category.getStatus().equals(SystemConstants.ARTICLE_CATEGORY_STATUS)).collect(Collectors.toList()); List<CategoryVo> categoryVoList = BeanCopyUtils.copyBeanList(collect, CategoryVo.class); return ResponseResult.okResult(categoryVoList); } }
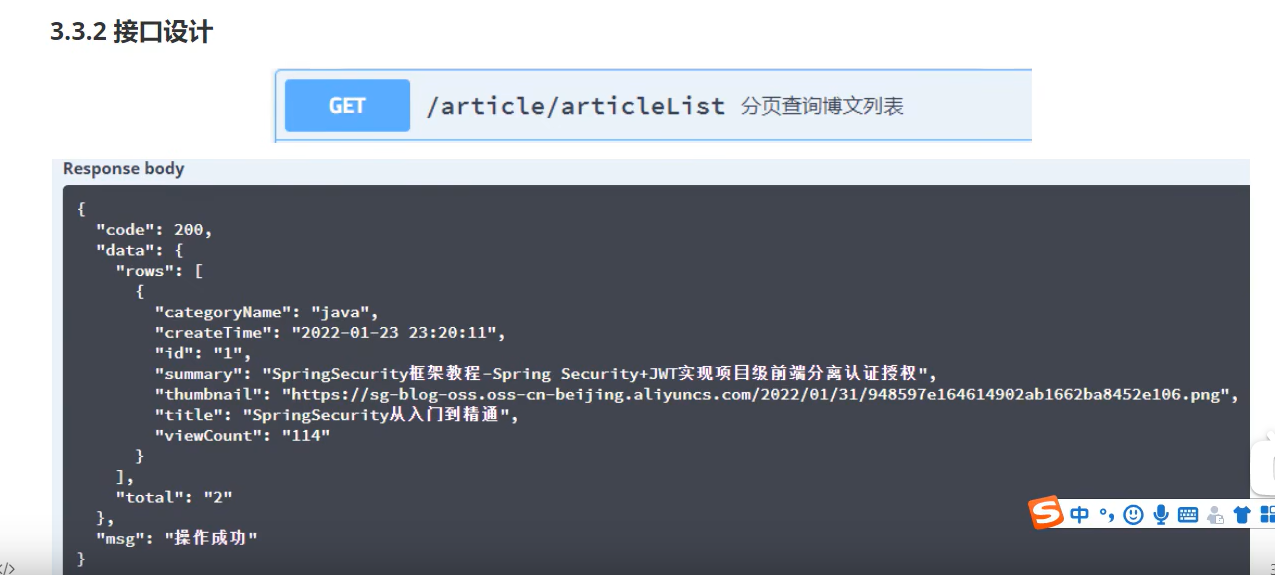
注意点: 了解函数式编程 分页查询文章列表 需求 在首页查询文章页面都有文章列表 ,首页 :查询所有文章
分类页面: 查询对应分类的文章列表
要求 ::1. 只能查询正式发布的文章 2. 置顶文章要显示在最前面
接口设计
实现 1 2 3 4 5 6 7 8 @GetMapping("/articleList") public ResponseResult articleList (Integer pageNum, Integer pageSize, Long categoryId) { return articleService.articleList(pageNum,pageSize,categoryId); }
按照要求 ,我们需要将查询到的信息传入前端, 但是 不能将全部信息传入 ,所以就需要将查询到的信息进行封装
List<ArticleListVo> articleListVo = BeanCopyUtils.copyBeanList(page.getRecords(), ArticleListVo.class);
1 2 3 4 5 6 7 8 9 10 11 12 13 14 15 16 17 18 19 20 21 22 23 24 @Override public ResponseResult articleList (Integer pageNum, Integer pageSize, Long categoryId) { LambdaQueryWrapper<Article> queryWrapper = new LambdaQueryWrapper (); queryWrapper.eq(Objects.nonNull(categoryId) && categoryId > 0 ,Article::getCategoryId,categoryId); queryWrapper.eq(Article::getStatus, SystemConstants.ARTICLE_STATUS_PUT); queryWrapper.orderByDesc(Article::getIsTop); Page<Article> pageN = new Page <>(pageNum,pageSize); Page<Article> page = page(pageN, queryWrapper); List<ArticleListVo> articleListVo = BeanCopyUtils.copyBeanList(page.getRecords(), ArticleListVo.class); PageVo pageVo = new PageVo (articleListVo, page.getTotal()); return ResponseResult.okResult(pageVo); }
因为我们封装的是categoryName,但是查询出来的确实categoryId,所以需要在查询后进行给categoryName赋值
1 2 3 4 for (Article article : records){ Category category = categoryService.getById(article.getCategoryId()); article.setCategoryName(category.getName()); }
分页配置 1 2 3 4 5 6 7 8 9 10 11 12 13 @Configuration public class MyBatisPlusConfig { @Bean public MybatisPlusInterceptor mybatisPlusInterceptor () { MybatisPlusInterceptor mb = new MybatisPlusInterceptor (); mb.addInnerInterceptor(new PaginationInnerInterceptor ()); return mb; } }
修改时间格式配置 在WebConfig中
1 2 3 4 5 6 7 8 9 10 11 12 13 14 15 16 17 18 19 20 21 22 23 24 @Bean public HttpMessageConverter fastJsonHttpMessageConverters () { FastJsonHttpMessageConverter fastConverter = new FastJsonHttpMessageConverter (); FastJsonConfig fastJsonConfig = new FastJsonConfig (); fastJsonConfig.setSerializerFeatures(SerializerFeature.PrettyFormat); fastJsonConfig.setDateFormat("yyyy-MM-dd HH:mm:ss" ); fastJsonConfig.setSerializeConfig(SerializeConfig.globalInstance); fastConverter.setFastJsonConfig(fastJsonConfig); HttpMessageConverter<?> converter = fastConverter; return converter; } @Override public void configureMessageConverters (List<HttpMessageConverter<?>> converters) { converters.add(fastJsonHttpMessageConverters()); }
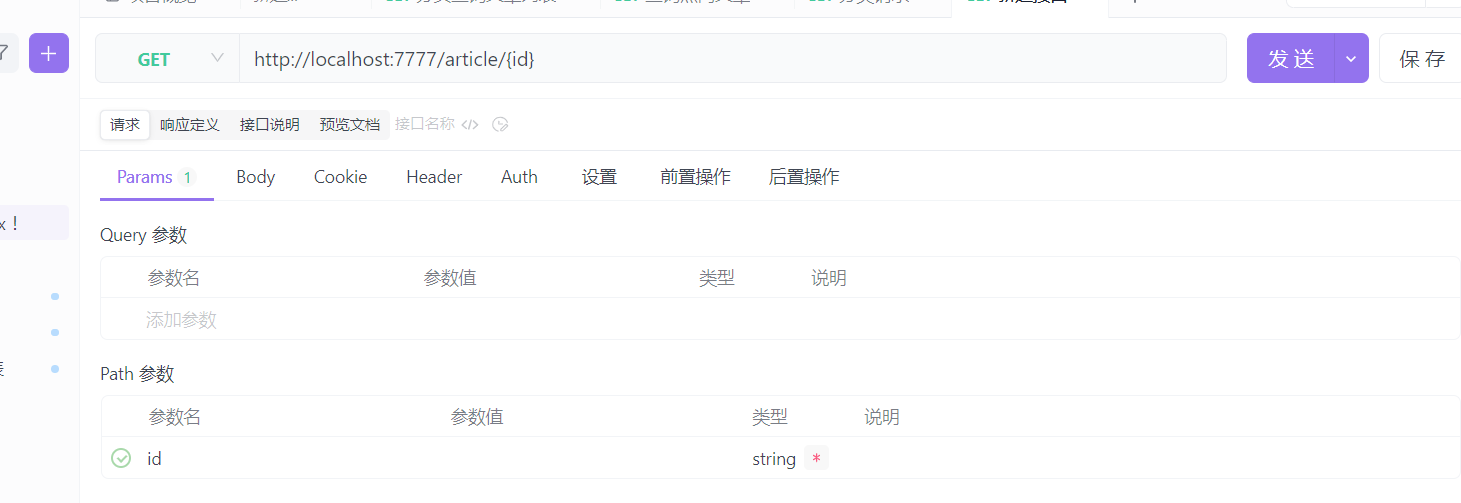
文章详情接口 需求 要在文章列表页面点击阅读全文时能够跳转到文章详情页面 ,可以让用户阅读文章正文
要求: 1. 要在文章详情中展示其分类名
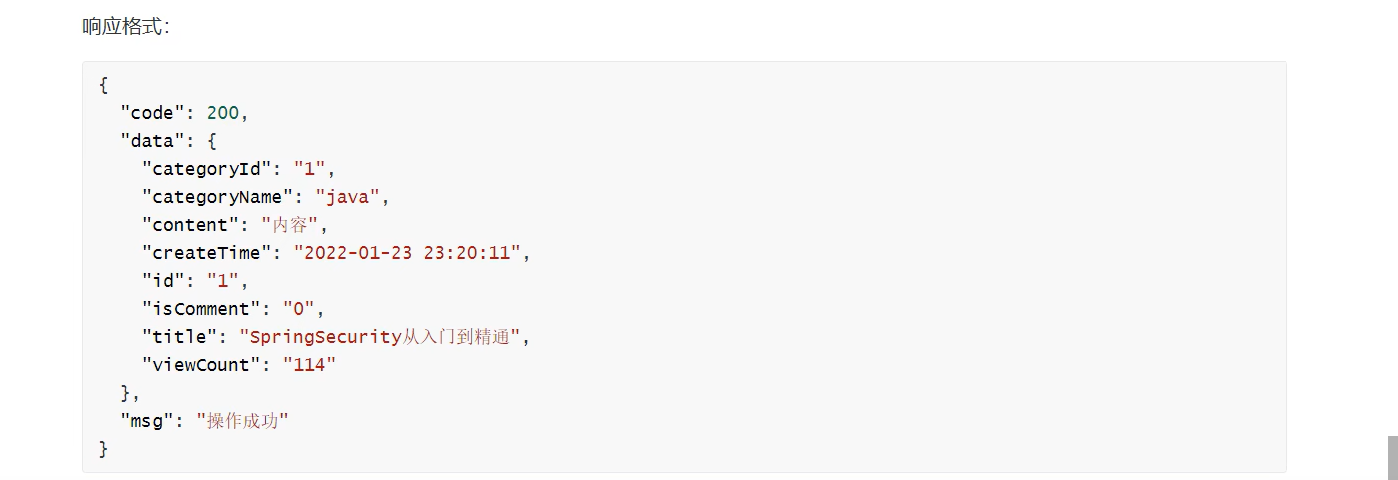
接口信息
响应格式
实现 1 2 3 4 5 6 @GetMapping("/{id}") public ResponseResult getArticleDetails (@PathVariable("id") Long id) { return articleService.getArticleDetails(id); }
1 2 3 4 5 6 7 8 9 10 11 12 13 14 15 16 17 18 19 20 21 @Override public ResponseResult getArticleDetails (Long id) { Article article = getById(id); ArticleDetailVo articleDetailVo = BeanCopyUtils.copyBean(article, ArticleDetailVo.class); Long categoryId = articleDetailVo.getCategoryId(); Category category = categoryService.getById(categoryId); if (category == null ){ return ResponseResult.okResult(articleDetailVo); } articleDetailVo.setCategoryName(category.getName()); return ResponseResult.okResult(articleDetailVo); }
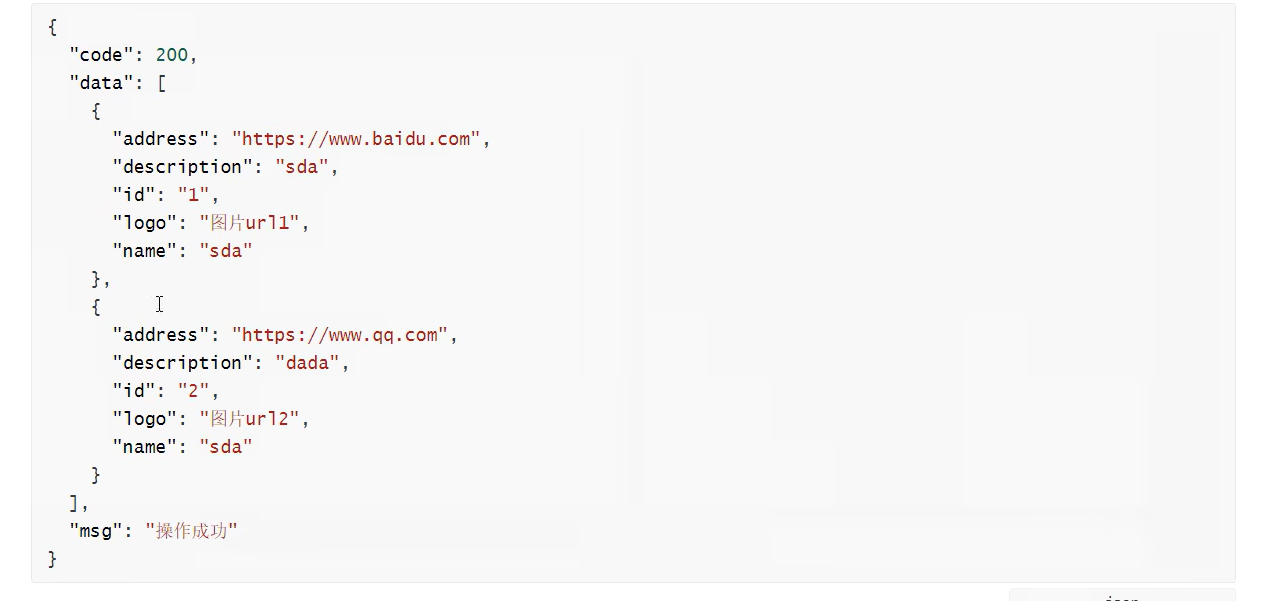
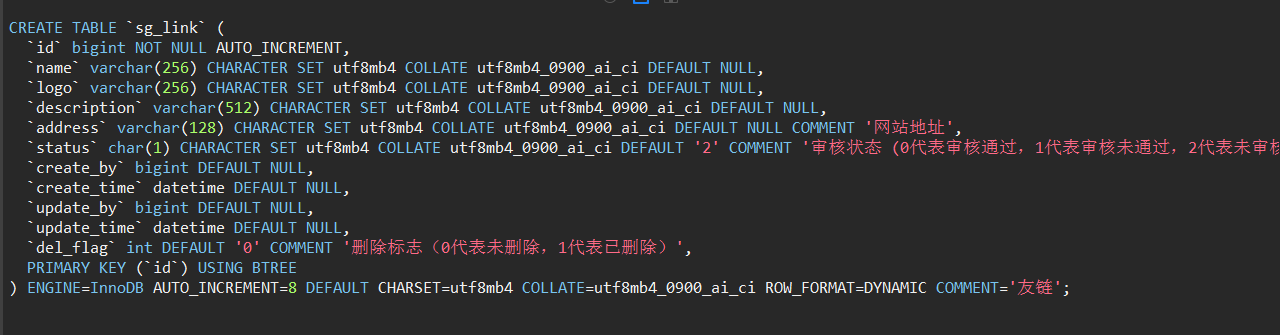
友链查询 需求 如果进行评论 ,那么就可以将用户的网站名、地址、描述、logo放上去
接口设计
响应格式
表信息
实现 1 2 3 4 5 6 7 8 9 10 11 12 13 @RestController @RequestMapping("/link") public class LinkController { @Resource private LinkService linkService; @GetMapping("/getAllLink") public ResponseResult getAllLink () { return linkService.getAllLink(); } }
1 2 3 4 5 6 7 8 9 10 11 12 13 14 15 16 17 18 @Service("linkService") public class LinkServiceImpl extends ServiceImpl <LinkMapper, Link> implements LinkService { @Override public ResponseResult getAllLink () { LambdaQueryWrapper<Link> queryWrapper = new LambdaQueryWrapper (); queryWrapper.eq(Link::getStatus, SystemConstants.LINK_STATUS_NORMAL); List<Link> links = list(queryWrapper); List<LinkVo> linkVos = BeanCopyUtils.copyBeanList(links, LinkVo.class); return ResponseResult.okResult(linkVos); } }
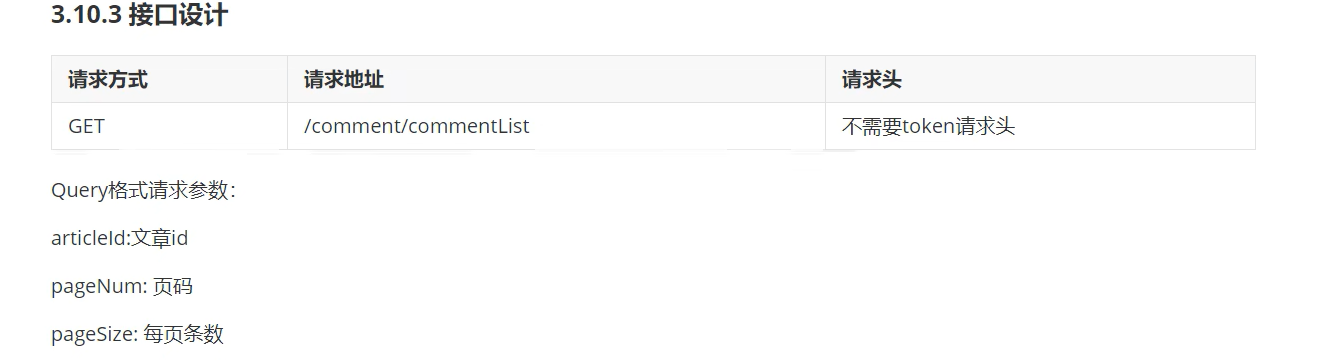
评论列表 接口
响应
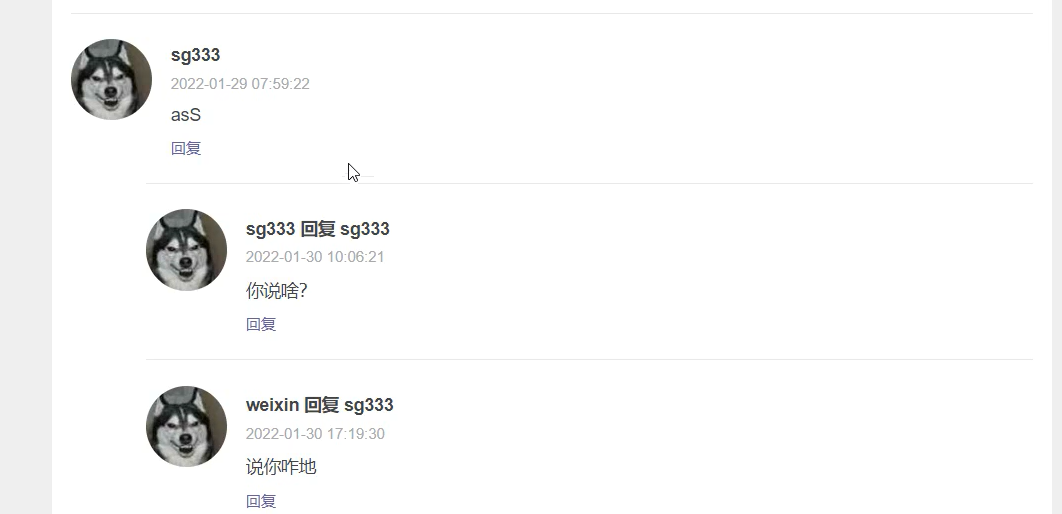
需求 不仅需要实现评论 ,还要实现”父子评论“
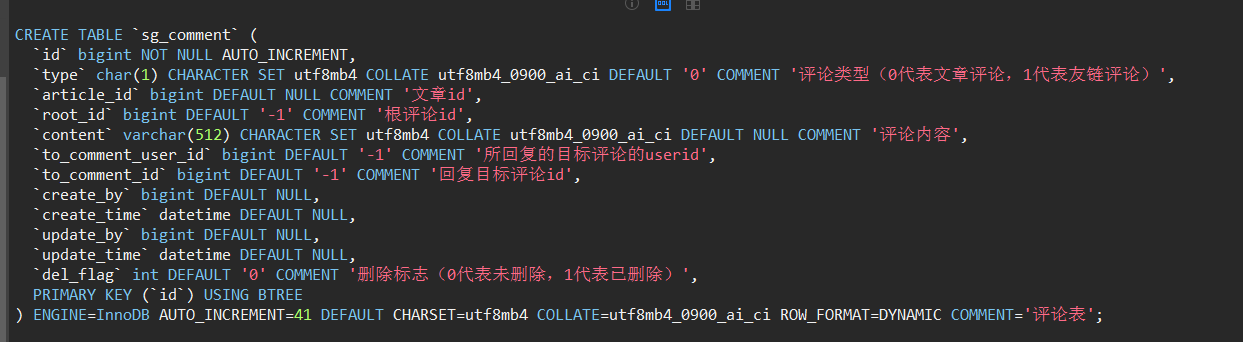
表分析
实现 1 2 3 4 5 6 7 8 9 10 11 12 13 14 15 @RestController @RequestMapping("/comment") public class CommentController { @Autowired private CommentService commentService; @GetMapping("/commentList") public ResponseResult commentList (Long articleId ,Integer pageNum , Integer pageSize) { return commentService.commentList(articleId,pageNum,pageSize); } }
service层
1 2 3 4 5 6 7 8 9 10 11 12 13 14 15 16 17 18 19 20 21 22 23 24 25 26 27 28 29 30 31 32 33 34 35 36 37 38 39 40 41 @Service public class CommentServiceImpl extends ServiceImpl <CommentMapper, Comment> implements CommentService { @Resource private UserService userService; @Override public ResponseResult commentList (Long articleId, Integer pageNum, Integer pageSize) { LambdaQueryWrapper<Comment> queryWrapper = new LambdaQueryWrapper <>(); queryWrapper.eq(Comment::getArticleId,articleId); queryWrapper.eq(Comment::getRootId, SystemConstants.ARTICLE_ROOT_COMMENT); Page<Comment> pageN = new Page <>(pageNum,pageSize); Page<Comment> page = page(pageN, queryWrapper); List<CommentVo> list = toCommentVoList(page.getRecords()); return ResponseResult.okResult(new PageVo (list,page.getTotal())); } private List<CommentVo> toCommentVoList (List<Comment> list) { List<CommentVo> commentVos = BeanCopyUtils.copyBeanList(list, CommentVo.class); for (CommentVo commentVo : commentVos){ String nickName = userService.getById(commentVo.getCreateBy()).getNickName(); commentVo.setUsername(nickName); if (commentVo.getToCommentId() != -1 ){ String toCommentName = userService.getById(commentVo.getToCommentId()).getNickName(); commentVo.setToCommentUserName(toCommentName); } } return commentVos; } }
查询根评论对应的子评论也就是多条评论
1 2 3 4 5 6 for (CommentVo commentVo : list){ List<CommentVo> children = getChildren(commentVo.getId()); commentVo.setChildren(children); }
service层
1 2 3 4 5 6 7 8 9 10 11 12 13 14 15 16 17 18 19 20 21 22 23 24 25 26 27 28 29 30 31 32 33 34 35 36 37 38 39 40 41 42 43 44 45 46 47 48 49 50 51 /todo 评论列表 @Override public ResponseResult commentList (Long articleId, Integer pageNum, Integer pageSize) { LambdaQueryWrapper<Comment> queryWrapper = new LambdaQueryWrapper <>(); queryWrapper.eq(Comment::getArticleId,articleId); queryWrapper.eq(Comment::getRootId, SystemConstants.ARTICLE_ROOT_COMMENT); Page<Comment> pageN = new Page <>(pageNum,pageSize); Page<Comment> page = page(pageN, queryWrapper); List<CommentVo> list = toCommentVoList(page.getRecords()); for (CommentVo commentVo : list){ List<CommentVo> children = getChildren(commentVo.getId()); commentVo.setChildren(children); } return ResponseResult.okResult(new PageVo (list,page.getTotal())); } private List<CommentVo> getChildren (Long commentId) { LambdaQueryWrapper<Comment> queryWrapper = new LambdaQueryWrapper <>(); queryWrapper.eq(Comment::getRootId,commentId); List<Comment> list = list(queryWrapper); return toCommentVoList(list); } private List<CommentVo> toCommentVoList (List<Comment> list) { List<CommentVo> commentVos = BeanCopyUtils.copyBeanList(list, CommentVo.class); for (CommentVo commentVo : commentVos){ String nickName = userService.getById(commentVo.getCreateBy()).getNickName(); commentVo.setUsername(nickName); if (commentVo.getToCommentId() != -1 ){ String toCommentName = userService.getById(commentVo.getToCommentId()).getNickName(); commentVo.setToCommentUserName(toCommentName); } } return commentVos; }
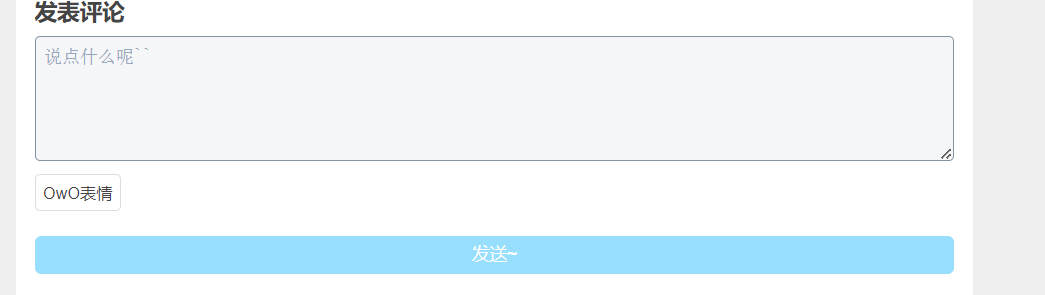
发表评论 请求
如果是友链 type为 1
还需要有请求体
实现 1 2 3 4 5 6 7 8 9 10 11 12 13 14 15 16 17 18 19 20 21 22 23 24 25 26 27 28 29 30 31 32 33 34 35 36 37 38 39 40 41 42 43 44 45 46 47 48 49 50 51 52 53 54 55 56 57 58 59 60 61 62 63 64 65 66 67 68 69 70 71 72 73 74 75 76 77 78 79 80 81 82 83 84 85 86 87 88 89 90 91 92 93 94 95 96 97 98 99 100 101 102 package com.blog.service.impl;import com.baomidou.mybatisplus.core.conditions.query.LambdaQueryWrapper;import com.baomidou.mybatisplus.core.mapper.BaseMapper;import com.baomidou.mybatisplus.extension.plugins.pagination.Page;import com.baomidou.mybatisplus.extension.service.impl.ServiceImpl;import com.blog.domain.ResponseResult;import com.blog.domain.entity.Comment;import com.blog.domain.entity.LoginUser;import com.blog.domain.entity.User;import com.blog.domain.vo.CommentVo;import com.blog.domain.vo.PageVo;import com.blog.enums.AppHttpCodeEnum;import com.blog.exception.SystemException;import com.blog.mapper.CommentMapper;import com.blog.service.CommentService;import com.blog.service.UserService;import com.blog.utils.BeanCopyUtils;import com.blog.utils.SecurityUtils;import com.blog.utils.SystemConstants;import org.springframework.security.core.Authentication;import org.springframework.security.core.context.SecurityContextHolder;import org.springframework.stereotype.Service;import org.springframework.util.StringUtils;import org.springframework.web.bind.annotation.RestController;import javax.annotation.Resource;import javax.sql.rowset.BaseRowSet;import java.util.List;import java.util.Objects;@Service public class CommentServiceImpl extends ServiceImpl <CommentMapper, Comment> implements CommentService { @Resource private UserService userService; @Override public ResponseResult commentList (Long articleId, Integer pageNum, Integer pageSize) { LambdaQueryWrapper<Comment> queryWrapper = new LambdaQueryWrapper <>(); queryWrapper.eq(Comment::getArticleId,articleId); queryWrapper.eq(Comment::getRootId, SystemConstants.ARTICLE_ROOT_COMMENT); Page<Comment> pageN = new Page <>(pageNum,pageSize); Page<Comment> page = page(pageN, queryWrapper); List<CommentVo> list = toCommentVoList(page.getRecords()); for (CommentVo commentVo : list){ List<CommentVo> children = getChildren(commentVo.getRootId()); commentVo.setChildren(children); } return ResponseResult.okResult(new PageVo (list,page.getTotal())); } @Override public ResponseResult addComment (Comment comment) { if (!StringUtils.hasText(comment.getContent())){ throw new SystemException (AppHttpCodeEnum.CONTENT_NOT_NULL); } save(comment); return ResponseResult.okResult(); } private List<CommentVo> getChildren (Long commentId) { LambdaQueryWrapper<Comment> queryWrapper = new LambdaQueryWrapper <>(); queryWrapper.eq(Comment::getRootId,commentId); queryWrapper.orderByAsc(Comment::getCreateTime); List<Comment> list = list(queryWrapper); return toCommentVoList(list); } private List<CommentVo> toCommentVoList (List<Comment> list) { List<CommentVo> commentVos = BeanCopyUtils.copyBeanList(list, CommentVo.class); for (CommentVo commentVo : commentVos){ String nickName = userService.getById(commentVo.getCreateBy()).getNickName(); commentVo.setUsername(nickName); if (commentVo.getToCommentUserId() != -1 ){ String toCommentUserName = userService.getById(commentVo.getToCommentUserId()).getNickName(); commentVo.setToCommentUserName(toCommentUserName); } } return commentVos; } }
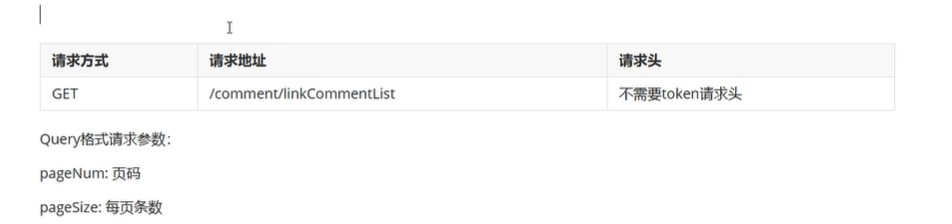
友链评论 接口
实现 1 2 3 4 @GetMapping("/linkCommentList") public ResponseResult listCommentList (Integer pageNum , Integer pageSize) { return commentService.commentList(SystemConstants.COMMENT_TYPE_FRIEND,null ,pageNum,pageSize); }
1 2 3 4 5 6 7 8 9 10 11 12 13 14 15 16 17 18 19 20 21 22 23 24 25 26 27 28 29 30 31 32 @Service public class CommentServiceImpl extends ServiceImpl <CommentMapper, Comment> implements CommentService { @Resource private UserService userService; @Override public ResponseResult commentList (String commentType, Long articleId, Integer pageNum, Integer pageSize) { LambdaQueryWrapper<Comment> queryWrapper = new LambdaQueryWrapper <>(); queryWrapper.eq(SystemConstants.COMMENT_TYPE_ARTICLE.equals(commentType),Comment::getArticleId,articleId); queryWrapper.eq(Comment::getRootId, SystemConstants.ARTICLE_ROOT_COMMENT); queryWrapper.eq(Comment::getType,commentType); Page<Comment> pageN = new Page <>(pageNum,pageSize); Page<Comment> page = page(pageN, queryWrapper); List<CommentVo> list = toCommentVoList(page.getRecords()); for (CommentVo commentVo : list){ List<CommentVo> children = getChildren(commentVo.getRootId()); commentVo.setChildren(children); } return ResponseResult.okResult(new PageVo (list,page.getTotal())); } }
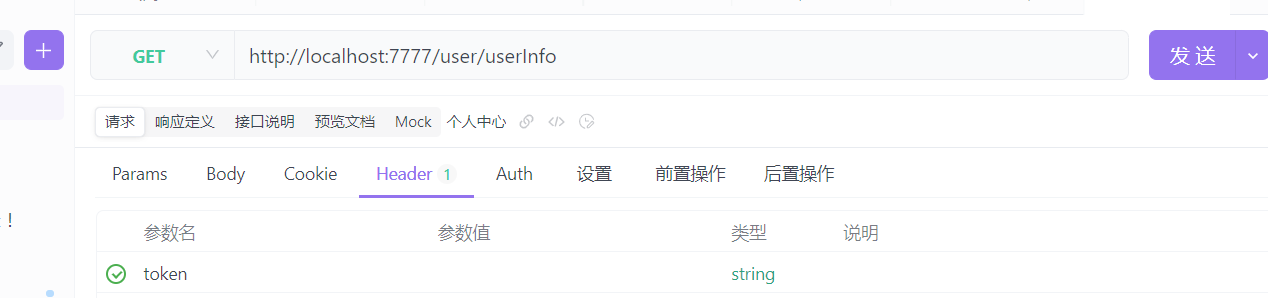
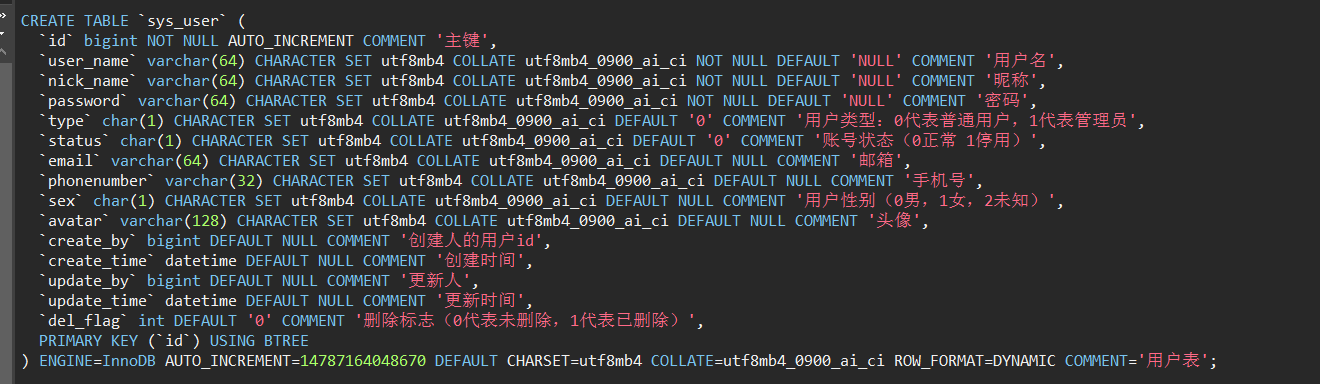
个人中心 接口
表分析
实现 1 2 3 4 5 6 7 8 9 10 11 @RestController @RequestMapping("/user") public class UserController { @Autowired private UserService userService; @GetMapping("/userInfo") public ResponseResult userInfo () { return userService.userInfo(); } }
1 2 3 4 5 6 7 8 9 10 11 12 13 14 15 @Service public class UserServiceImpl extends ServiceImpl <UserMapper, User> implements UserService { @Override public ResponseResult userInfo () { Long userId = SecurityUtils.getUserId(); User user = getById(userId); UserInfoVo userInfoVo = BeanCopyUtils.copyBean(user, UserInfoVo.class); return ResponseResult.okResult(userInfoVo); } }
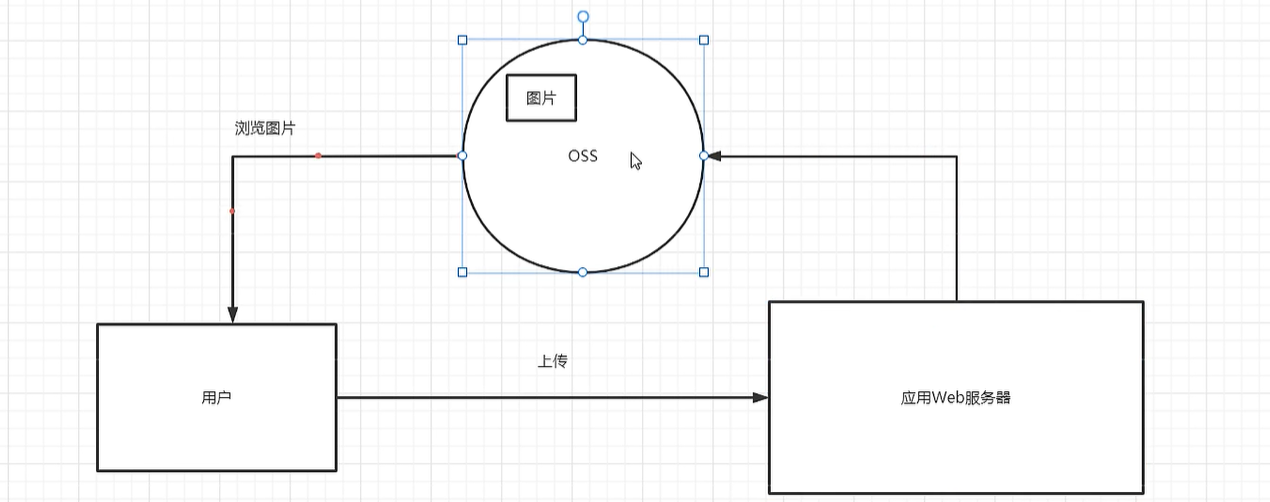
个人信息curd 头像上传—-使用七牛云
首先上传至web应用服务器 ,然后再从web服务器上传至 oss
接口 上传文件需求 :
更新个人信息需求 :
实现 上传文件
1 2 3 4 5 6 7 8 9 10 @RestController public class UploadController { @Autowired private UploadService uploadService; @PostMapping("/upload") public ResponseResult uploadImg (MultipartFile img) { return uploadService.uploadImg(img); } }
1 2 3 4 5 6 7 8 9 10 11 12 13 14 15 16 17 18 19 20 21 22 23 24 25 26 27 28 29 30 31 32 33 34 35 36 37 38 39 40 41 42 43 44 45 46 47 48 49 50 51 52 53 54 55 56 57 58 59 60 61 62 63 64 65 66 @ConfigurationProperties(prefix = "oss") @Service @Data public class UploadServiceImpl implements UploadService { @Override public ResponseResult uploadImg (MultipartFile img) { String originalFilename = img.getOriginalFilename(); if (!originalFilename.endsWith(".png" ) && !originalFilename.endsWith(".jpg" )){ return ResponseResult.errorResult(AppHttpCodeEnum.FILE_TYPE_ERROR); } String url = uploadOSS(img); return ResponseResult.okResult(url); } private String accessKey; private String secretKey; private String bucket; private String uploadOSS (MultipartFile imgFile) { Configuration cfg = new Configuration (Region.autoRegion()); UploadManager uploadManager = new UploadManager (cfg); String originalFilename = imgFile.getOriginalFilename(); String key = "images/" +originalFilename; try { InputStream inputStream = imgFile.getInputStream(); Auth auth = Auth.create(accessKey, secretKey); String upToken = auth.uploadToken(bucket); try { Response response = uploadManager.put(inputStream,key,upToken,null , null ); DefaultPutRet putRet = new Gson ().fromJson(response.bodyString(), DefaultPutRet.class); System.out.println(putRet.key); System.out.println(putRet.hash); } catch (QiniuException ex) { Response r = ex.response; System.err.println(r.toString()); try { System.err.println(r.bodyString()); } catch (QiniuException ex2) { } } } catch (Exception ex) { } return "http://rrpanx30j.hd-bkt.clouddn.com/images/" + originalFilename; } }
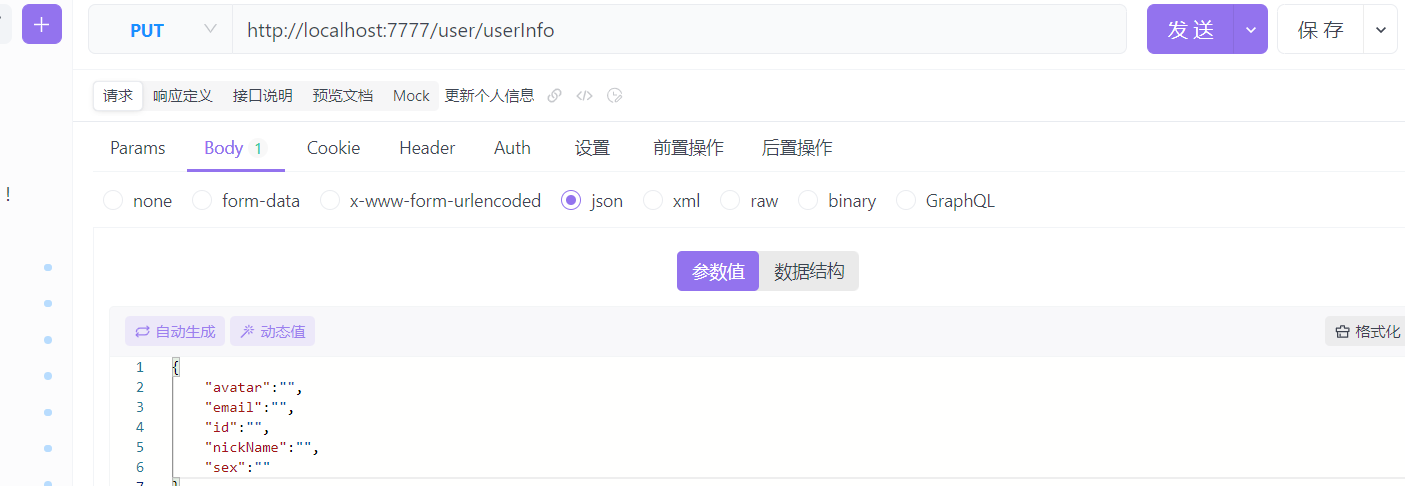
更新个人信息实现 :
1 2 3 4 5 6 7 8 9 10 11 12 13 14 15 16 @RestController @RequestMapping("/user") public class UserController { @Autowired private UserService userService; @GetMapping("/userInfo") public ResponseResult userInfo () { return userService.userInfo(); } @PutMapping("/userInfo") public ResponseResult updateUserInfo (@RequestBody User user) { return userService.updateUserInfo(user); } }
1 2 3 4 5 6 7 8 9 10 11 12 13 14 15 16 17 18 19 20 21 22 23 @Service public class UserServiceImpl extends ServiceImpl <UserMapper, User> implements UserService { @Override public ResponseResult userInfo () { Long userId = SecurityUtils.getUserId(); User user = getById(userId); UserInfoVo userInfoVo = BeanCopyUtils.copyBean(user, UserInfoVo.class); return ResponseResult.okResult(userInfoVo); } @Override public ResponseResult updateUserInfo (User user) { updateById(user); return ResponseResult.okResult(); } }
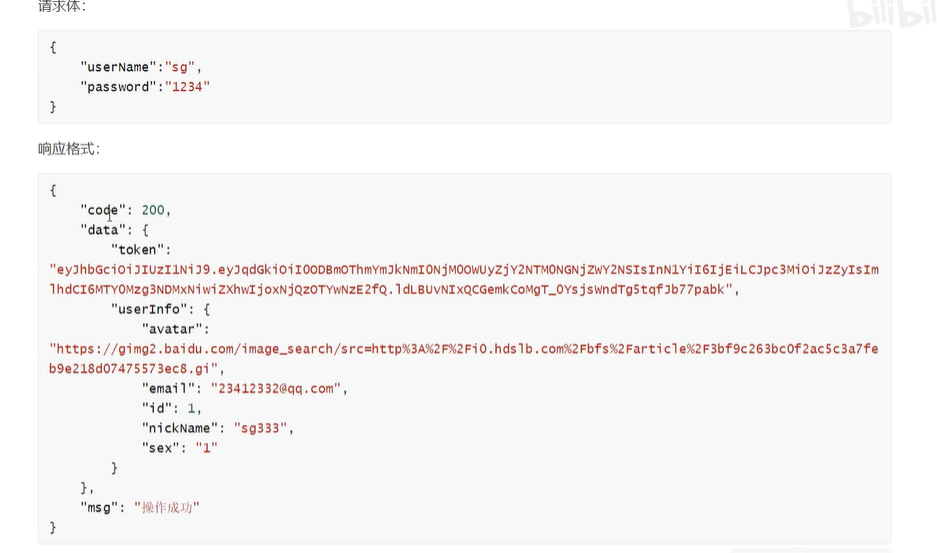
登录系统 接口
请求and响应信息
表分析
思路分析
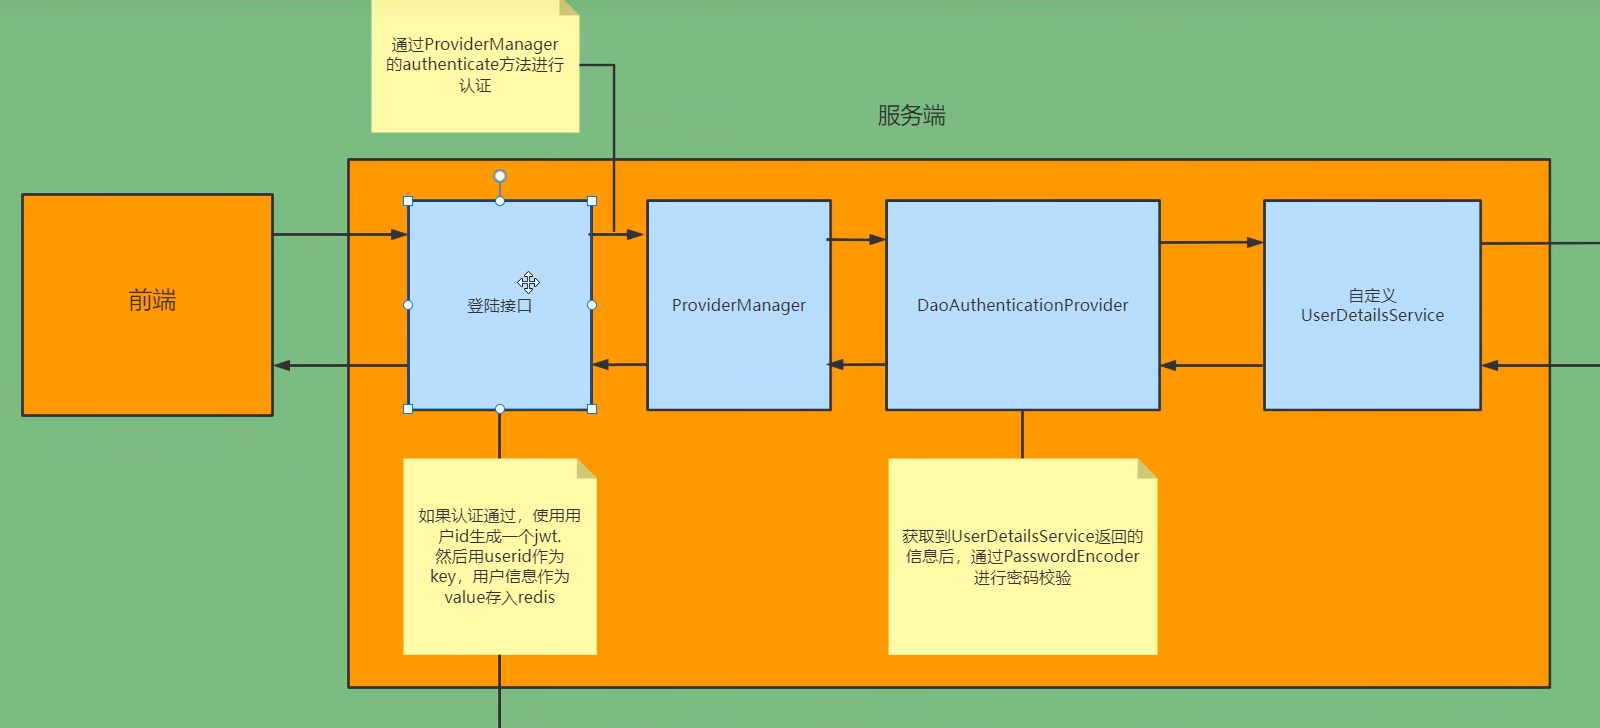
登录
①自定义登录接口
调用ProviderManager的方法进行认证 如果认证成功生成jwt
把信息存入redis中
②自定义UserDetailsServic e
在这个实现类中进行查询数据库操作
注意配置密码加密BCryptPasswordCoder
校验
①自定义jwt认证过滤器
获取token
解析token获取其中的userId
从redis中获取用户信息
存入securityContextHolder
配置信息 1 2 3 4 5 6 7 8 9 10 11 12 13 14 15 16 17 18 19 20 <dependency > <groupId > org.springframework.boot</groupId > <artifactId > spring-boot-starter-security</artifactId > </dependency > <dependency > <groupId > org.springframework.boot</groupId > <artifactId > spring-boot-starter-data-redis</artifactId > </dependency > <dependency > <groupId > com.alibaba</groupId > <artifactId > fastjson</artifactId > </dependency > <dependency > <groupId > io.jsonwebtoken</groupId > <artifactId > jjwt</artifactId > </dependency >
实现 登录校验过滤器代码实现 校验
①自定义jwt认证过滤器
获取token
解析token获取其中的userId
从redis中获取用户信息
存入securityContextHolder
JwtAuthenticationTokenFilter
实现
重新jwt过滤器
1 2 3 4 5 6 7 8 9 10 11 12 13 14 15 16 17 18 19 20 21 22 23 24 25 26 27 28 29 30 31 32 33 34 35 36 37 38 39 40 41 42 43 44 45 46 47 48 49 @Component public class JwtAuthenticationTokenFilter extends OncePerRequestFilter { @Autowired private RedisCache redisCache; @Override protected void doFilterInternal (HttpServletRequest httpServletRequest, HttpServletResponse httpServletResponse, FilterChain filterChain) throws ServletException, IOException { String token = httpServletRequest.getHeader("token" ); if (!StringUtils.hasText(token)){ filterChain.doFilter(httpServletRequest,httpServletResponse); return ; } Claims claims = null ; try { claims = JwtUtil.parseJWT(token); } catch (Exception e) { e.printStackTrace(); ResponseResult result = ResponseResult.errorResult(AppHttpCodeEnum.NEED_LOGIN); WebUtils.renderString(httpServletResponse, JSON.toJSONString(result)); return ; } String userId = claims.getSubject(); LoginUser loginUser = redisCache.getCacheObject(SystemConstants.LOGIN_KEY_PREFIX + userId); if (Objects.isNull(loginUser)){ ResponseResult result = ResponseResult.errorResult(AppHttpCodeEnum.NEED_LOGIN); WebUtils.renderString(httpServletResponse, JSON.toJSONString(result)); return ; } UsernamePasswordAuthenticationToken authenticationToken = new UsernamePasswordAuthenticationToken (loginUser,null ,null ); SecurityContextHolder.getContext().setAuthentication(authenticationToken); filterChain.doFilter(httpServletRequest,httpServletResponse); } }
将过滤器加入到SecurityConfig的配置文件中
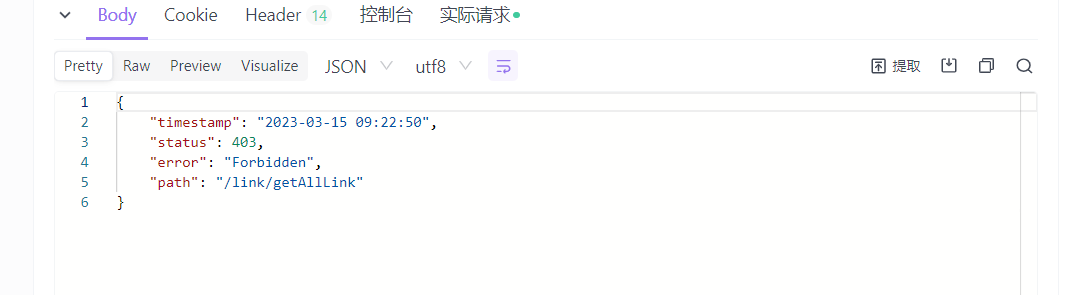
1 2 3 4 5 6 7 8 9 10 11 12 13 14 15 16 17 18 19 20 21 22 23 24 25 26 27 28 29 30 31 32 33 34 35 36 37 38 39 40 41 42 @Configuration public class SecurityConfig extends WebSecurityConfigurerAdapter { @Autowired private JwtAuthenticationTokenFilter jwtAuthenticationTokenFilter; @Bean public PasswordEncoder passwordEncoder () { return new BCryptPasswordEncoder (); } @Override protected void configure (HttpSecurity http) throws Exception { HttpSecurity disable = http.csrf().disable(); System.out.println("----" +disable.toString()); http .authorizeRequests() .mvcMatchers("/login" ).anonymous() .antMatchers("/link/getAllLink" ).authenticated() .anyRequest().permitAll() .and() .sessionManagement().sessionCreationPolicy(SessionCreationPolicy.STATELESS) ; http.logout().disable(); http.cors(); http.addFilterBefore(jwtAuthenticationTokenFilter, UsernamePasswordAuthenticationFilter.class); } }
认证授权异常处理 未处理的异常
上面这种异常处理的方式不符合项目接口的规范,所以我们需要自定义异常处理
实现的认证失败的接口处理
AuthenticationEntryPoint认证失败处理 1 2 3 4 5 6 7 8 9 10 11 12 13 14 15 16 17 18 19 20 21 22 23 24 25 @Component public class AuthenticationEntryPointImpl implements AuthenticationEntryPoint { @Override public void commence (HttpServletRequest httpServletRequest, HttpServletResponse httpServletResponse, AuthenticationException e) throws IOException, ServletException { e.printStackTrace(); ResponseResult result = null ; if (e instanceof BadCredentialsException){ result = ResponseResult.errorResult(AppHttpCodeEnum.LOGIN_ERROR.getCode(),e.getMessage()); }else if (e instanceof InsufficientAuthenticationException){ result = ResponseResult.errorResult(AppHttpCodeEnum.LOGIN_ERROR); } else { result = ResponseResult.errorResult(AppHttpCodeEnum.SYSTEM_ERROR.getCode(),"认证失败!!!" ); } WebUtils.renderString(httpServletResponse, JSON.toJSONString(result)); } }
AccessDeniedHandler授权失败处理 1 2 3 4 5 6 7 8 9 10 11 12 13 14 15 16 17 @Component public class AccessDeniedHandlerImpl implements AccessDeniedHandler { @Override public void handle (HttpServletRequest httpServletRequest, HttpServletResponse httpServletResponse, AccessDeniedException e) throws IOException, ServletException { e.printStackTrace(); ResponseResult result = ResponseResult.errorResult(AppHttpCodeEnum.NO_OPERATOR_AUTH); WebUtils.renderString(httpServletResponse, JSON.toJSONString(result)); } }
放入SecurityConfig中 1 2 3 4 5 6 7 8 9 @Override protected void configure (HttpSecurity http) throws Exception { http.exceptionHandling() .authenticationEntryPoint(authenticationEntryPoint) .accessDeniedHandler(accessDeniedHandler); }
对于controller层出现的异常 比如向如下的异常, 用户登录时没有输入用户名,那么如果我们不在controller层进行拦截 ,他就会进入service层
1 2 3 4 5 6 7 8 @PostMapping("/login") public ResponseResult login (@RequestBody User user) { if (!StringUtils.hasText(user.getUserName())){ throw new SystemException (AppHttpCodeEnum.REQUIRE_USERNAME); } return blogLoginService.login(user); }
所以我们直接在controller层进行拦截
操作
自定义异常类
1 2 3 4 5 6 7 8 9 10 11 12 13 14 15 16 17 18 19 20 21 public class SystemException extends RuntimeException { private int code; private String msg; public int getCode () { return code; } public String getMsg () { return msg; } public SystemException (AppHttpCodeEnum httpCodeEnum) { super (httpCodeEnum.getMsg()); this .code = httpCodeEnum.getCode(); this .msg = httpCodeEnum.getMsg(); } }
配置自定义异常拦截器
1 2 3 4 5 6 7 8 9 10 11 12 13 14 15 16 17 18 19 @RestControllerAdvice @Slf4j public class GlobalExceptionHandler { @ExceptionHandler(SystemException.class) public ResponseResult systemExceptionHandler (SystemException e) { log.error("出现了异常! {}" ,e); return ResponseResult.errorResult(e.getCode(),e.getMsg()); } }
退出登录 接口 需要token
登录时 ,我们将用户的相关信息存入到了redis中 ,同时也包括token
如果想要退出 ,我们只需要删除redis中的用户登录数据即可
实现 1 2 3 4 @PostMapping("/logout") public ResponseResult logout () { return blogLoginService.logout(); }
service
1 2 3 4 5 6 7 8 9 10 11 @Override public ResponseResult logout () { Authentication authentication = SecurityContextHolder.getContext().getAuthentication(); LoginUser loginUser = (LoginUser) authentication.getPrincipal(); Long userId = loginUser.getUser().getId(); redisCache.deleteObject(SystemConstants.LOGIN_KEY_PREFIX + userId); return ResponseResult.okResult(); }
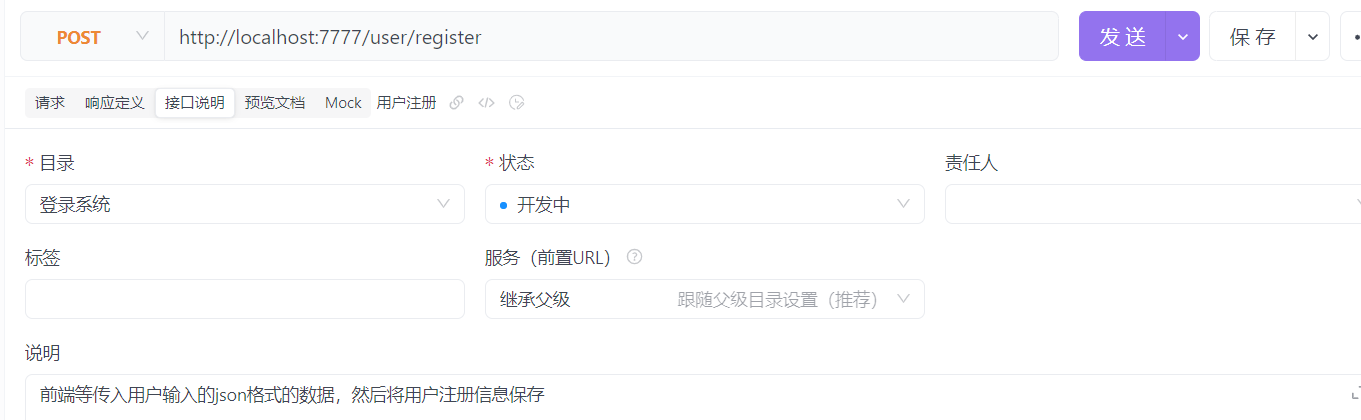
注册系统 接口
实现 1 2 3 4 @PostMapping("register") public ResponseResult register (@RequestBody User user) { return userService.register(user); }
业务层实现
1 2 3 4 5 6 7 8 9 10 11 12 13 14 15 16 17 18 19 20 21 22 23 24 25 26 27 28 29 30 31 32 33 34 35 36 37 38 39 40 41 42 43 44 45 46 47 48 49 50 51 52 53 54 55 56 57 58 59 60 @Service public class UserServiceImpl extends ServiceImpl <UserMapper, User> implements UserService { @Autowired private PasswordEncoder passwordEncoder; @Override public ResponseResult register (User user) { if (!StringUtils.hasText(user.getUserName())){ ResponseResult.errorResult(AppHttpCodeEnum.USERNAME_NOT_NULL); } if ( StringUtils.hasText(user.getPassword())){ ResponseResult.errorResult(AppHttpCodeEnum.PASSWORD_NOT_NULL); } if ( StringUtils.hasText(user.getEmail())){ ResponseResult.errorResult(AppHttpCodeEnum.EMAIL_NOT_NULL); } if ( StringUtils.hasText(user.getNickName())){ ResponseResult.errorResult(AppHttpCodeEnum.NICKNAME_EXIST); } if (usernameExist(user.getUserName())){ ResponseResult.errorResult(USERNAME_EXIST); } if (nickNameExist(user.getNickName())){ ResponseResult.errorResult(NICKNAME_EXIST); } String encodePass = passwordEncoder.encode(user.getPassword()); user.setPassword(encodePass); save(user); return ResponseResult.okResult(); } private boolean usernameExist (String username) { LambdaQueryWrapper<User> queryWrapper = new LambdaQueryWrapper <>(); queryWrapper.eq(User::getUserName,username); int count = count(queryWrapper); if (count >= 1 ){ return true ; } return false ; } private boolean nickNameExist (String nickName) { LambdaQueryWrapper<User> queryWrapper = new LambdaQueryWrapper <>(); queryWrapper.eq(User::getNickName,nickName); int count = count(queryWrapper); if (count >= 1 ){ return true ; } return false ; } }