SpringBoot项目复盘 项目起始
确定数据库中的表、主键、各个字段及其代表的含义;确立好表与表之间的关联关系; (规范好字段的命名规则)**按照数据库中表及其字段创建实体类及其属性;规范好命名规则
前端确定好页面长什么样,数据以什么格式交互
导入需要的各种依赖,以及做好自定义配置
准备好自己的后台模板,开始实现功能
实现各个功能 登录实现
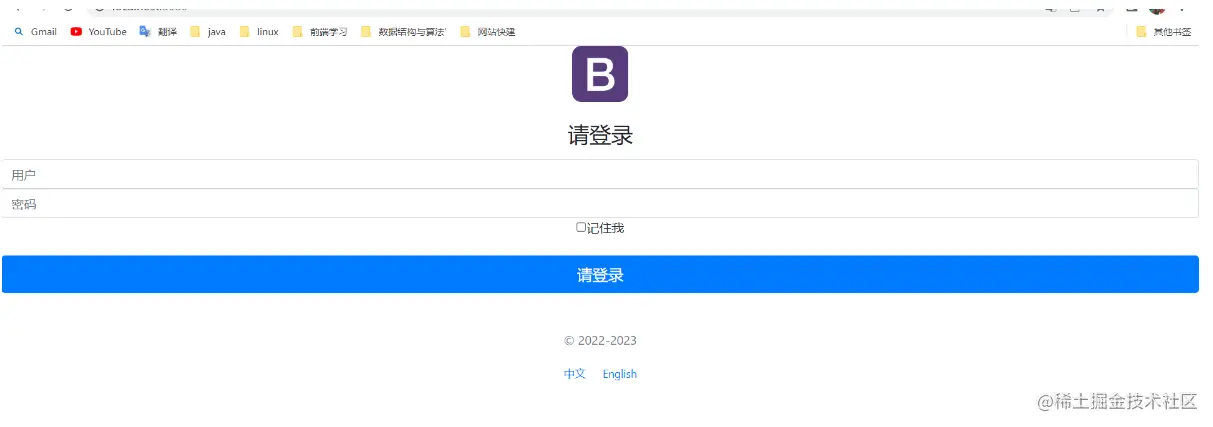
在form表单中实现对账号、密码的输入。通过th:action="@{/user/login}"将表单数据提交至controller层中
在controller层通过匹配方法上的请求映射为@RequestMapping("/user/login")的方法。
在该方法中实现好对password的判断、是否username为空、username输入有误如何提示、数据如何回显至index页面….
1
2
3
4
5
6
7
8
9
10
11
12
13
14
15
16
@RequestMapping ("/user/login" )public String login (Model model, HttpSession session, @RequestParam ("username" ) String username , @RequestParam ("password" ) String password){ if (username !=null && "123456" .equals (password)){ System .out .println ("username= " + username); System .out .println ("密码:" + password); session .setAttribute ("loginUser" , username); return "redirect :/main .html "; }else { model .addAttribute ("msg" ,"用户名或密码错误!" ); return "index "; } }
后台实现数据回显的操作 1 2 <p style="color: red" th:text="${msg} " th:if ="${not #strings.isEmpty(msg)} " ></p>
如果后端数据判断显示为null或者密码错误。通过上述的语法就可以实现将数据回显出来,而不是一开始就显示数据
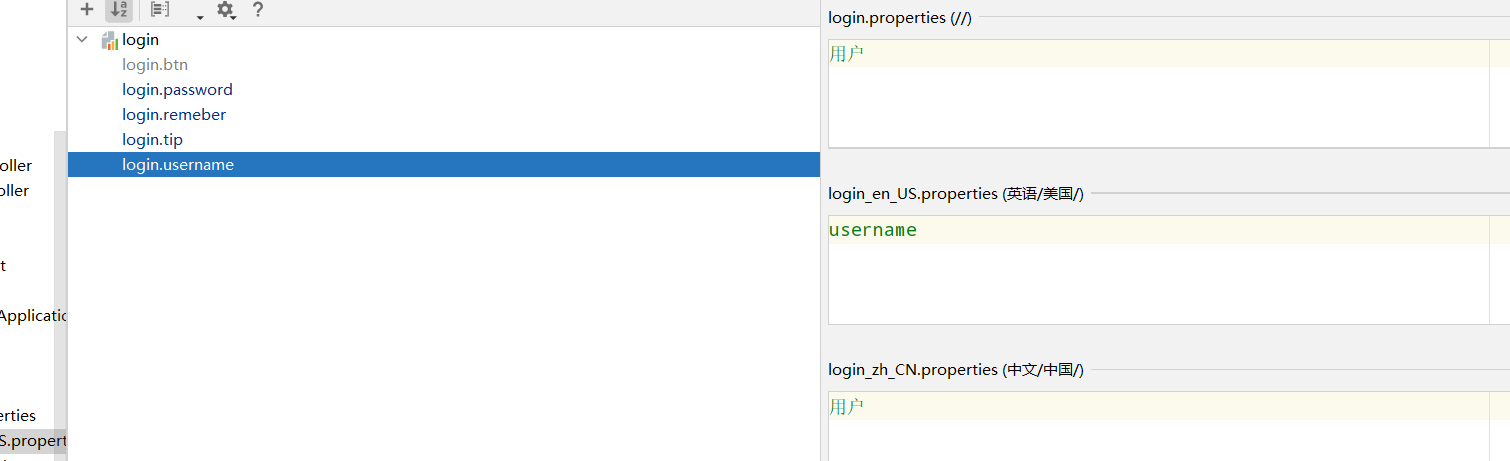
其中输入框提示的信息我们使用国际化的技术,能够实现页面的语言自由切换
1 2 3 4 5 6 7 8 9 10 11 12 13 14 15 16 17 18 19 20 21 22 <form class ="form-signin" th:action ="@{/user/login}" > <img class ="mb-4" src ="https://getbootstrap.com/docs/4.0/assets/brand/bootstrap-solid.svg" alt ="" width ="72" height ="72" > <h1 class ="h3 mb-3 font-weight-normal" th:text ="#{login.tip}" > Please sign in</h1 > <p style ="color: red" th:text ="${msg}" th:if ="${not #strings.isEmpty(msg)}" > </p > <label for ="inputEmail" class ="sr-only" > [#{login.username}]</label > <input type ="email" id ="inputEmail" class ="form-control" th:name ="username" th:placeholder ="#{login.username}" required autofocus > <label for ="inputPassword" class ="sr-only" > [#{login.password}]</label > <input type ="password" id ="inputPassword" th:name ="password" class ="form-control" th:placeholder ="#{login.password}" required > <div class ="checkbox mb-3" > <label > <input type ="checkbox" value ="remember-me" th:text ="#{login.remeber}" > </label > </div > <button class ="btn btn-lg btn-primary btn-block" type ="submit" th:text ="#{login.tip}" > </button > <p class ="mt-5 mb-3 text-muted" > © 2022-2023</p > <a class ="btn btn-sm" th:href ="@{/index.html(l='zh_CN')}" > 中文</a > <a class ="btn btn-sm" th:href ="@{/index.html(l='en_US')}" > English</a > </form >
通过<label for="inputEmail" class="sr-only">[#{login.username}]</label>显示提示语。
在配置中开启国际化
在application.properties配置文件中,通过spring.messages.basename=i18n.login开启我们配置的国际化配置
在自定义配置类中开启国际化方法
1 2 3 4 5 6 7 @Bean public LocaleResolver localeResolver ( return new MyLocaleResolver (); }
在config包下创建MyLocaleResolver类实现国际化的接口
1 2 3 4 5 6 7 8 9 10 11 12 13 14 15 16 17 18 19 20 21 22 public class MyLocaleResolver implements LocaleResolver { @Override public Locale resolveLocale (HttpServletRequest httpServletRequest ) { String language = httpServletRequest.getParameter ("l" ); Locale locale = Locale .getDefault (); if (!StringUtils .isEmpty (language)){ String [] split = language.split ("_" ); locale = new Locale (split[0 ], split[1 ]); } return locale; } @Override public void setLocale (HttpServletRequest httpServletRequest, HttpServletResponse httpServletResponse, Locale locale ) { } }
在resources文件夹下创建资源包login.properties、 login_en_US.properties 、 login_zh_CN.properties从而实现国际化的要求
登录开启拦截器 为了防止恶意的跳转,我们需要在用户未登录时自动拦截页面,使其跳转到登录页面,从而防止用户未登录就操作
首先在config包下的myConfig类中添加拦截器配置
1 2 3 4 5 6 7 8 9 10 @Override public void addInterceptors (InterceptorRegistry registry ) { registry.addInterceptor (new LoginHandlerInterceptor ()).addPathPatterns ("/**" ).excludePathPatterns ("/index.html" , "/user/login" ,"/" ,"/css/**" ,"/dist/**" ,"/docs.4.0/**" ,"/js/**" ,"/img/**" ,"/index.html(l='zh_CN')" ,"/index.html(l='en_US')" ,"/user/LogOut" ); }
在config包下同样创建LoginHandlerInterceptor类,使其实现拦截器接口。从而实现preHandle方法
1 2 3 4 5 6 7 8 9 10 11 12 13 14 15 public class LoginHandlerInterceptor implements HandlerInterceptor { @Override public boolean preHandle (HttpServletRequest request, HttpServletResponse response, Object handler) throws Exception { Object loginUser = request.getSession().getAttribute("loginUser" ); if (loginUser == null ) { request.setAttribute("msg" , "没有权限,请登录" ); request.getRequestDispatcher("/index.html" ).forward(request, response); return false ; } return true ; } }
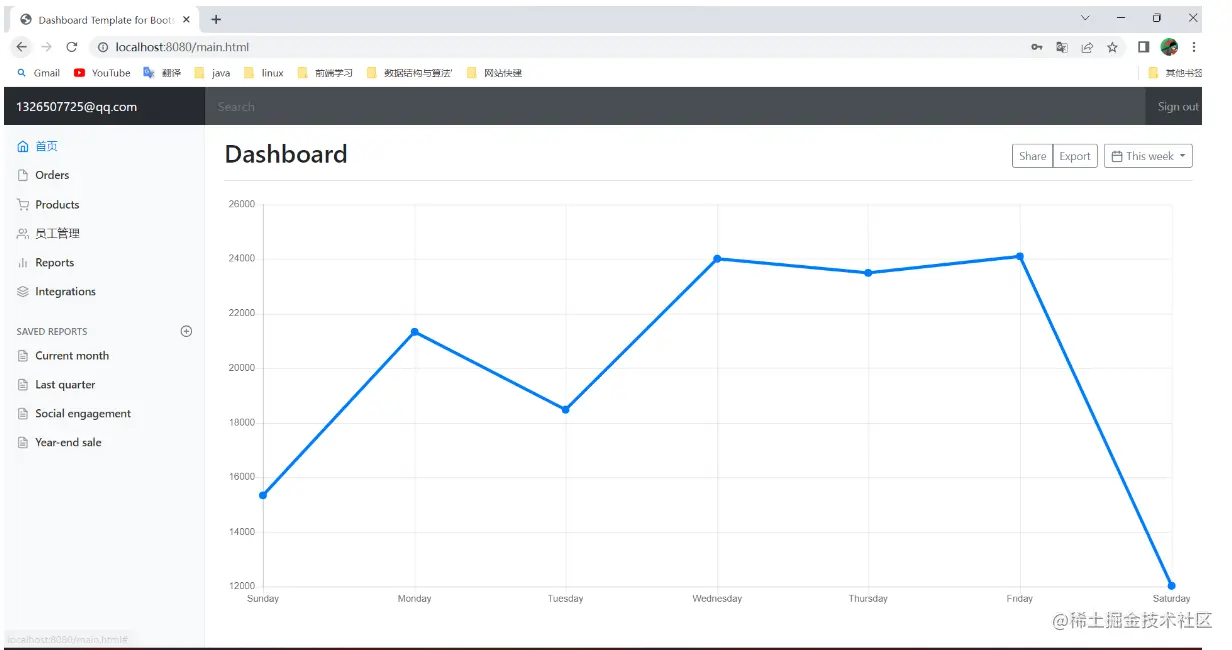
首页实现 1 2 3 4 5 6 7 8 9 10 11 12 13 14 15 16 17 18 19 20 21 22 23 24 25 26 27 28 29 30 31 32 33 34 35 36 37 38 39 40 41 42 43 44 45 46 47 48 49 50 51 52 53 54 55 56 57 58 59 60 61 62 63 64 65 66 67 68 69 70 71 72 73 74 75 76 77 78 79 80 81 82 83 84 85 86 87 88 89 90 91 92 93 94 95 96 97 98 <!doctype html > <html lang ="en" xmlns:th ="http://www.thymeleaf.org" > <head > <meta charset ="utf-8" > <meta name ="viewport" content ="width=device-width, initial-scale=1, shrink-to-fit=no" > <meta name ="description" content ="" > <meta name ="author" content ="" > <link rel ="icon" th:href ="@{/docs/4.0/assets/img/favicons/favicon.icof}" > <title > Dashboard Template for Bootstrap</title > <link rel ="canonical" href ="https://getbootstrap.com/docs/4.0/examples/dashboard/" > <link th:href ="@{/dist/css/bootstrap.min.css}" rel ="stylesheet" > <link th:href ="@{/docs/4.0/examples/dashboard/dashboard.css}" rel ="stylesheet" > </head > <body > <div th:insert ="~{common/common::topbar}" > </div > <div class ="container-fluid" > <div class ="row" > <div th:insert ="~{common/common::sidebar(active='main.html')}" > </div > <main role ="main" class ="col-md-9 ml-sm-auto col-lg-10 pt-3 px-4" > <div class ="d-flex justify-content-between flex-wrap flex-md-nowrap align-items-center pb-2 mb-3 border-bottom" > <h1 class ="h2" > Dashboard</h1 > <div class ="btn-toolbar mb-2 mb-md-0" > <div class ="btn-group mr-2" > <button class ="btn btn-sm btn-outline-secondary" > Share</button > <button class ="btn btn-sm btn-outline-secondary" > Export</button > </div > <button class ="btn btn-sm btn-outline-secondary dropdown-toggle" > <span data-feather ="calendar" > </span > This week </button > </div > </div > <canvas class ="my-4" id ="myChart" width ="900" height ="380" > </canvas > </main > </div > </div > <script src ="https://code.jquery.com/jquery-3.2.1.slim.min.js" integrity ="sha384-KJ3o2DKtIkvYIK3UENzmM7KCkRr/rE9/Qpg6aAZGJwFDMVNA/GpGFF93hXpG5KkN" crossorigin ="anonymous" > </script > <script > window.jQuery || document.write('<script src ="../static/js/vendor/jquery-slim.min.js" > </script > ')</script > <script src ="../static/js/vendor/popper.min.js" > </script > <script src ="../static/dist/js/bootstrap.min.js" > </script > <script src ="https://unpkg.com/feather-icons/dist/feather.min.js" > </script > <script > feather.replace() </script > <script src ="https://cdn.jsdelivr.net/npm/chart.js@2.7.1/dist/Chart.min.js" > </script > <script > var ctx = document .getElementById ("myChart" ); var myChart = new Chart (ctx, { type : 'line' , data : { labels : ["Sunday" , "Monday" , "Tuesday" , "Wednesday" , "Thursday" , "Friday" , "Saturday" ], datasets : [{ data : [15339 , 21345 , 18483 , 24003 , 23489 , 24092 , 12034 ], lineTension : 0 , backgroundColor : 'transparent' , borderColor : '#007bff' , borderWidth : 4 , pointBackgroundColor : '#007bff' }] }, options : { scales : { yAxes : [{ ticks : { beginAtZero : false } }] }, legend : { display : false , } } }); </script > </body > </html >
解释 通过后端登录成功将数据return "redirect:/main.html";重定向main.html,但是main.html这个地址是我们虚构的首页地址,以防止登录成功将用户信息传入导致用户信息泄露。
只需要在自定义配置中配置即可
1 2 3 4 5 6 7 8 9 10 11 12 13 14 @Configuration public class MyConfig implements WebMvcConfigurer { @Override public void addViewControllers (ViewControllerRegistry registry ) { registry.addViewController ("/" ).setViewName ("index" ); registry.addViewController ("/index.html" ).setViewName ("index" ); registry.addViewController ("/main.html" ).setViewName ("dashboard" ); } }
通过registry.addViewController("/main.html").setViewName("dashboard");调用main.html就可以跳转至dashboard首页
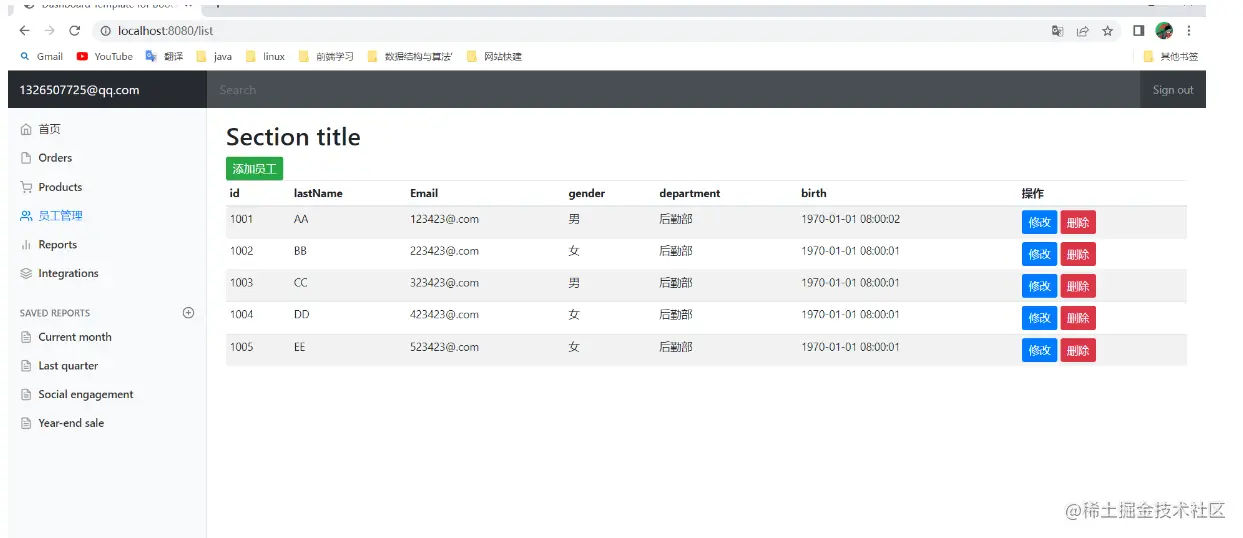
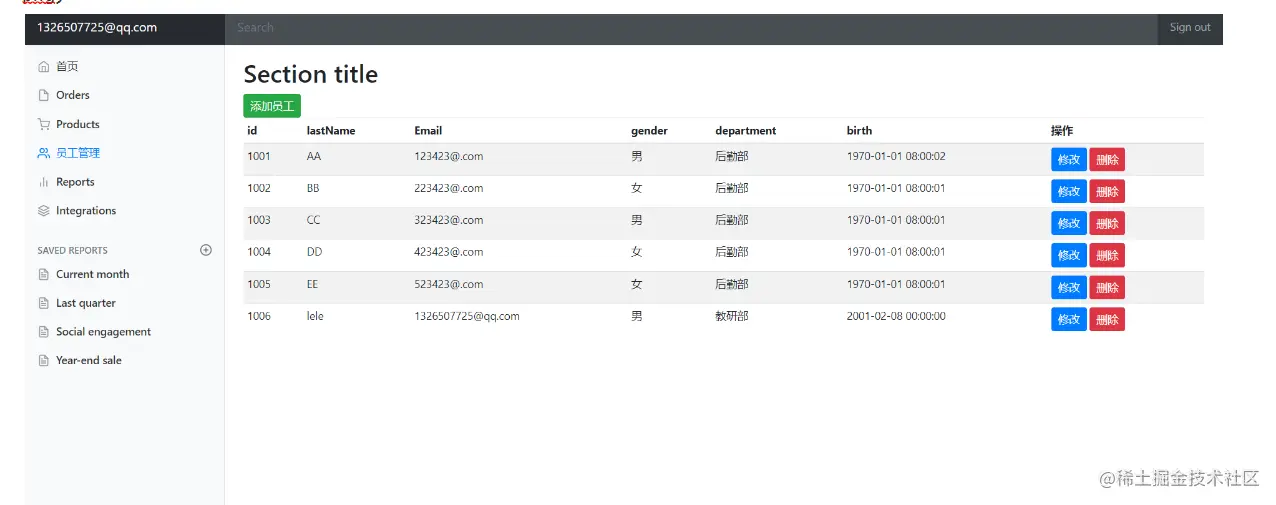
list页面实现 list页面作为数据显示的页面,它可以将我们后台传过来的数据通过Thymeleaf语法,将数据显示到后台
1 2 3 4 5 6 7 8 9 10 11 12 13 14 15 16 17 18 19 20 21 22 23 24 25 26 27 28 29 30 31 32 33 34 35 <main role ="main " class ="col-md-9 ml-sm-auto col-lg-10 pt-3 px-4 "> <h2 >Section title </h2 > <a class ="btn btn-sm btn-success " th :href ="@{/to /add }">添加员工</a > <div class ="table -responsive "> <table class ="table table -striped table -sm "> <thead > <tr > <th >id </th > <th >lastName </th > <th >Email </th > <th >gender </th > <th >department </th > <th >birth </th > <th >操作</th > </tr > </thead > <tbody > <tr th :each ="li : ${list }"> <td th :text ="${li .getId ()}"></td > <td th :text ="${li .getLastName ()}"></td > <td th :text ="${li .getEmail ()}"></td > <td th :text ="${li .getGender () == 0 ? '女' : '男'}" ></td > <td th :text ="${li .getDepartment ().getDepartmentName ()}"></td > <td th :text ="${#dates .format (li.getBirth (),'yyyy-MM-dd HH:mm:ss' )}"></td > <td > <a class ="btn btn-sm btn-primary " th :href ="@{'/updateEmp /'+${li .getId ()}}">修改</a > <a class ="btn btn-sm btn-danger " th :href ="@{'/deleteEmp /'+${li .getId ()}}">删除</a > </td > </tr > </tbody > </table > </div > </main >
后端通过用户点击员工管理
1 2 3 4 5 6 7 <li class ="nav -item "> <a th :class ="${active =='list .html ' ? 'nav -link active ' :'nav -link '}" th :href ="@{/list }"> <span data-feather ="users "></span > 员工管理 </a > </li >
,请求就会跳转至controller匹配相应的请求映射
1 2 3 4 5 6 7 8 9 10 11 @Autowired private EmployeeDao employeeDao;@Autowired private DepartmentDao departmentDao;@RequestMapping ("/list" )public String list (Model model ){ Collection <Employee > list = employeeDao.getAllEmployee (); model.addAttribute ("list" ,list); return "list" ; }
后端通过Model将数据回显给list页面
在list页面。通过Thymeleaf语法<tr th:each="li : ${list}">将数据显示出来
1 2 3 4 5 6 7 8 9 10 11 12 <td th :text ="${li .getId ()}"></td > <td th :text ="${li .getLastName ()}"></td > <td th :text ="${li .getEmail ()}"></td > <td th :text ="${li .getGender () == 0 ? '女' : '男'}" ></td > <td th :text ="${li .getDepartment ().getDepartmentName ()}"></td > <td th :text ="${#dates .format (li.getBirth (),'yyyy-MM-dd HH:mm:ss' )}"></td > <td > <a class ="btn btn-sm btn-primary " th :href ="@{'/updateEmp /'+${li .getId ()}}">修改</a > <a class ="btn btn-sm btn-danger " th :href ="@{'/deleteEmp /'+${li .getId ()}}">删除</a > </td > </tr >
这样,我们请求就能转发过来,用户就能看到数据
同时在list页面,我们也会有实现curd的跳转键
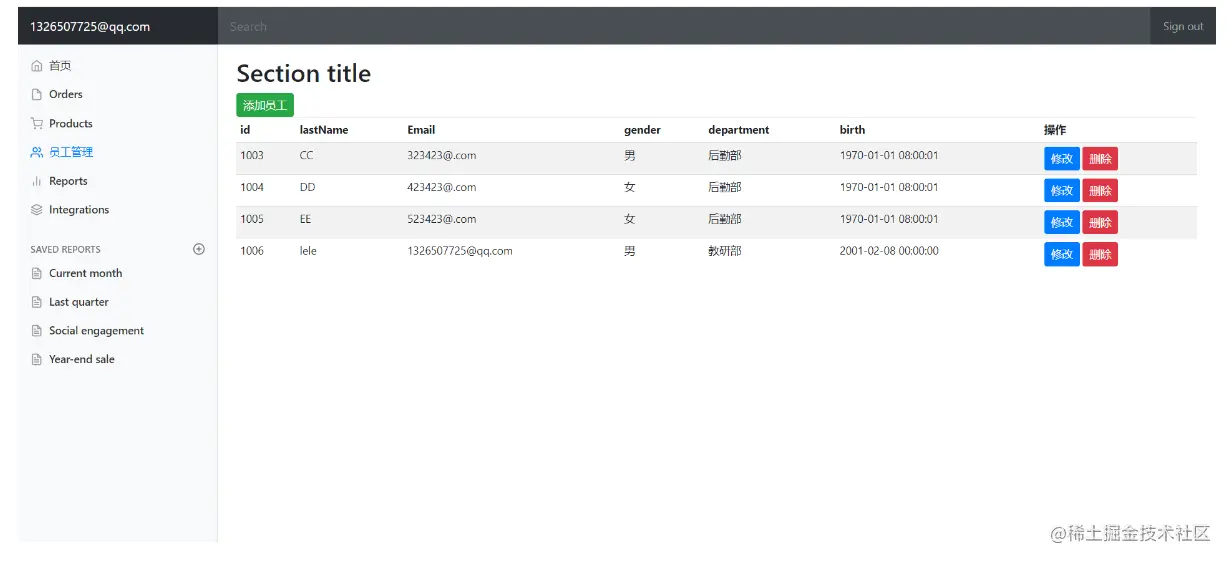
实现delete 和 update功能 对于delete功能,这里没什么好说的,仅仅通过点击用户后面对应的标签,将要删除的员工的id作为请求参数传到后端即可th:href="@{'/updateEmp/'+${li.getId()}}"后端通过匹配请求映射将功能实现
1 2 3 4 5 6 @RequestMapping ("/deleteEmp/{id}" )public String deleteEmp (@PathVariable ("id" )Integer id){ employeeDao .deleteEmp (id); return "redirect :/list "; }
实现update功能 相较于delete功能是比较麻烦的
同样需要将要修改的员工id作为请求参数传入后端th:href="@{'/updateEmp/'+${li.getId()}}",然后后端通过查询,获取该员工的所有信息,然后通过Model将数据共享至update页面
1 2 3 4 5 6 7 8 9 10 11 @RequestMapping ("/updateEmp/{id}" )public String update (Model model,@PathVariable ("id" ) Integer id){ System .out .println ("id==" + id); Employee employee = employeeDao .getEmployeeById (id); System .out .println ("emp == " + employee); model .addAttribute ("emp" ,employee); Collection <Department > departments = departmentDao .getDepartments (); model .addAttribute ("departments" ,departments); return "/updateEmp "; }
在updateEmp页面,需要将数据回显出来
1 2 3 4 5 6 7 8 9 10 11 12 13 14 15 16 17 18 19 20 21 22 23 24 25 26 27 28 29 30 31 32 33 34 35 36 37 38 39 40 41 42 43 44 45 46 47 48 49 50 51 52 53 54 55 56 57 58 59 60 <form class ="form-horizontal" role ="form" th:action ="@{/updateSucc}" method ="post" > <input type ="hidden" name ="id" th:value ="${emp.getId()}" > <div class ="form-group" > <label for ="lastName" class ="col-sm-2 control-label" > 名字</label > <div class ="col-sm-10" > <input th:value ="${emp.getLastName()}" type ="text" class ="form-control" id ="lastName" name ="lastName" placeholder ="请输入名字" > </div > </div > <div class ="form-group" > <label for ="lastname" class ="col-sm-2 control-label" > Email</label > <div class ="col-sm-10" > <input th:value ="${emp.getEmail()}" type ="text" class ="form-control" id ="Email" name ="Email" placeholder ="请输入邮箱" > </div > </div > <div class ="form-group" > <label for ="gender" > 性别</label > <div class ="form-check form-check-inline" > <input th:checked ="${emp.getGender()==1}" type ="radio" class ="form-check-input" name ="gender" value ="1" > <label class ="form-check-label" > 男</label > </div > <div class ="form-check form-check-inline" > <input th:checked ="${emp.getGender()==0}" type ="radio" class ="form-check-input" name ="gender" value ="0" > <label class ="form-check-label" > 女</label > </div > </div > <div class ="form-group" > <label > Department</label > <select class ="form-control" name ="department.id" > <option th:selected ="${dept.getId()==emp.getDepartment().getId()}" th:each ="dept:${departments}" th:text ="${dept.getDepartmentName()}" th:value ="${dept.getId()}" > </option > </select > </div > <div class ="form-group" > <label for ="birth" class ="col-sm-2 control-label" > birth</label > <div class ="col-sm-10" > <input th:value ="${#dates.format(emp.getBirth(),'yyyy-MM-dd HH:mm')}" type ="text" class ="form-control" id ="birth" name ="birth" placeholder ="请输入生日" > </div > </div > <div class ="form-group" > <div class ="col-sm-offset-2 col-sm-10" > <div class ="checkbox" > <label > <input type ="checkbox" > 请记住我 </label > </div > </div > </div > <div class ="form-group" > <div class ="col-sm-offset-2 col-sm-10" > <button type ="submit" class ="btn btn-default" > 登录</button > </div > </div > </form >
通过隐藏域<input type="hidden" name="id" th:value="${emp.getId()}">可以将后端传入的信息获取到
因为我们共享数据时是通过model.addAttribute("emp",employee);,所以在获取,然后在<input th:value="${emp.getLastName()}" type="text" class="form-control" id="lastName" name="lastName" placeholder="请输入名字">中通过th:value="${emp.getLastName()}"就可以将数据显示到页面
对于复杂的比如department
1 2 3 4 <select class="form-control" name="department.id" > <option th:selected="${dept.getId()==emp.getDepartment().getId()} " th:each ="dept:${departments} " th:text="${dept.getDepartmentName()} " th:value="${dept.getId()} " ></option> </s elect>
可以先通过deparment.id获取全部的信息,然后通过匹配emp.getDepartment().getId()获取将表单展示出来。通过th:value="${dept.getId()}"将我们需要的数据显示到页面
然后通过请求form表单的th:action="@{/updateSucc}"提交表单至后端.
后端通过请求映射匹配到相应的请求方法
1 2 3 4 5 6 @PostMapping ("/updateSucc" )public String updateSuccess (Employee employee ){ employeeDao.save (employee); return "redirect:/list" ; }
然后进行修改,最后通过重定向将请求跳转至原来的页面
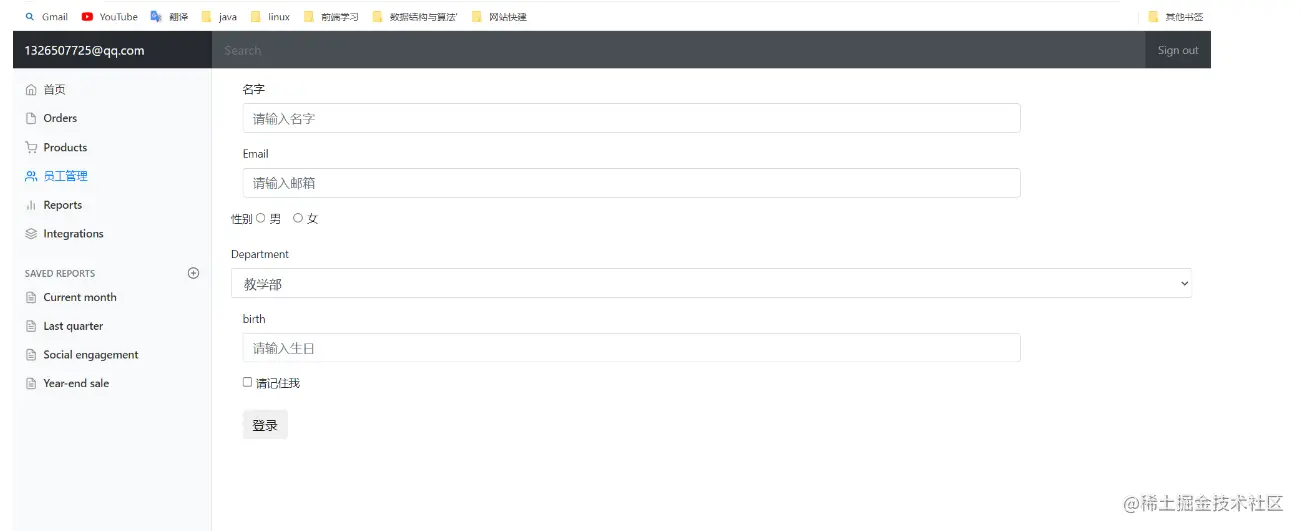
add功能实现 用户通过点击添加员工将请求发送到后端,后端通过请求映射匹配到相应的请求方法,实现添加功能
1 2 3 4 5 6 7 8 9 <a class ="btn btn-sm btn-success" th:href="@{/to/add}" >添加员工</a> @GetMapping("/to/add") public String addEmp(Model model){ Collection<Department> departments = departmentDao.getDepartments() model.addAttribute("departments",departments) return "addEmp" }
后台页面与update页面类似
添加功能
删除功能
修改功能
添加页面
国际化页面