需求描述
之前我们实现了ChatGPT项目的核心问答业务, 接着为了实现项目的商业化服务和引流, 对接微信公众号实现用户扫码关注、获取验证码登录等一系列的用户引入公众号进行登录。 这样的实现让我们的项目接入微信的广大用户群体,对于以后项目的商业化发展奠定了基调。
接着, 为了项目不让有心人恶意利用以及我们自己的apiKey的额度也是有限的, 所以进行了一系列的规则过滤操作。 这样的规则过滤让我们的项目向商业化的道路上又迈进了一步。
但是, 虽然我们做了用户限流限频的操作,但是还是相当于免费的产品 。这可不是一个商业化产品应该具有的操作。 如果用户后续还想使用我们的产品, 那当然免不了给钱咯。 所以, 本章节我们通过对于ChatGPT核心业务的扩展,实现了用户支付下单的操作。 并且, 基于DDD架构, 让我们的项目变得可拓展性非常好。
我们都知道ChatGPT的更新迭代是非常快的, 所以项目的可拓展性变得至关重要了。 所以使用DDD架构的优点就体现的一览无余。
项目支付领域逻辑
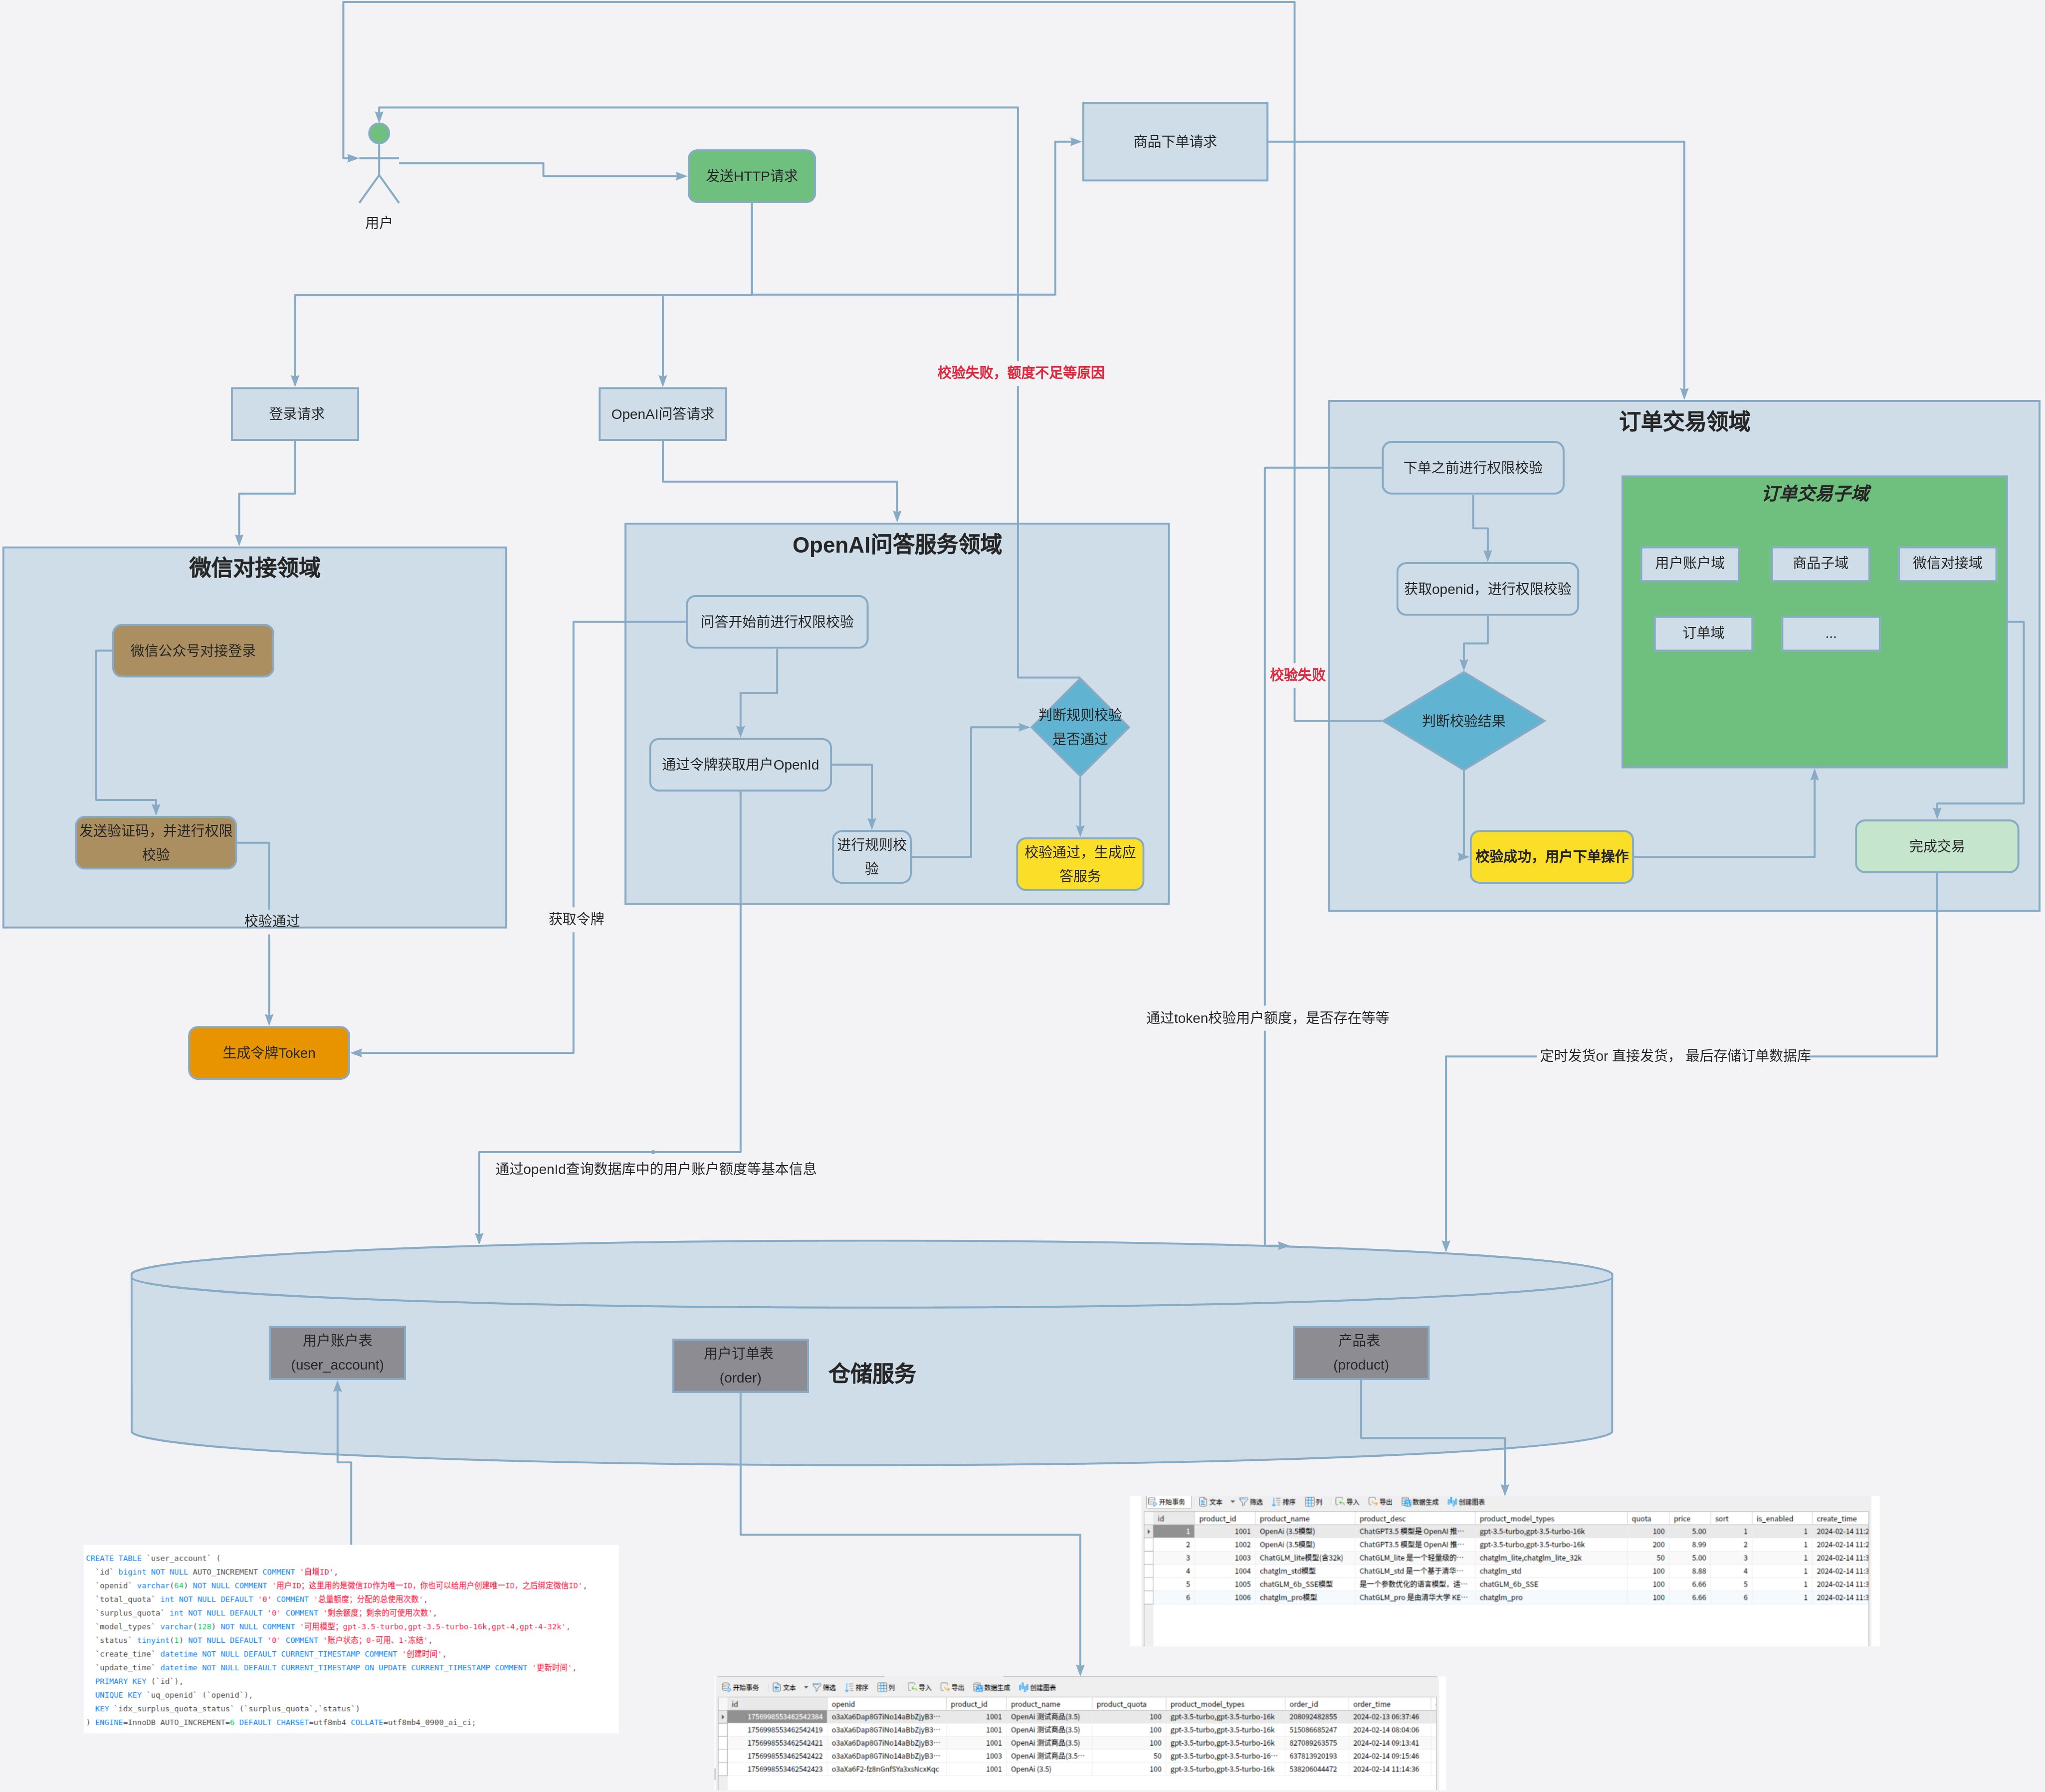
用户下单支付
用户选择商品下单,之后生成一个支付URL,用户扫码支付。再接收到支付成功回调后,把用户购买的订单发货【额度充值】。
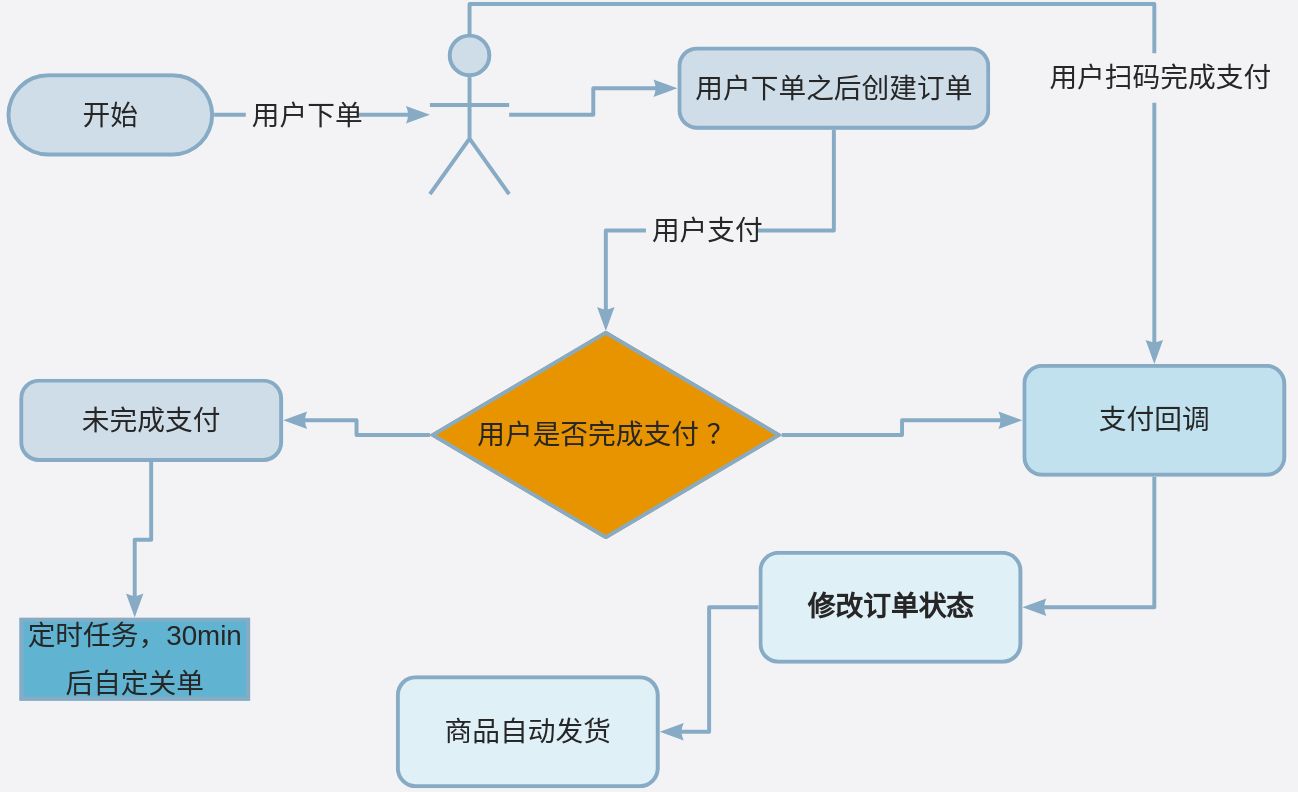
这是一个非常核心的任务流程。同时可能会出现的异常流程。如:
- 用户订单创建成功,但创建支付单 HTTP 超时失败。
- 支付回调时,系统宕机或者本身服务出问题。
- 支付成功后发送MQ消息,消息丢失,用户支付掉单。
- 长时间未支付,超时订单。
那么,这些就都是可能出现的异常流程。虽然概率很低,但随着使用规模的增加,很低概率的问题,也会产生较大规模的客诉问题。所以要针对这些流程做补偿处理。
所以,在用户点击商品进行下单之后, 我们需要立马创建对应的订单, 同样, 如果还有未支付的订单, 我们也会给出提示, 订单未支付。
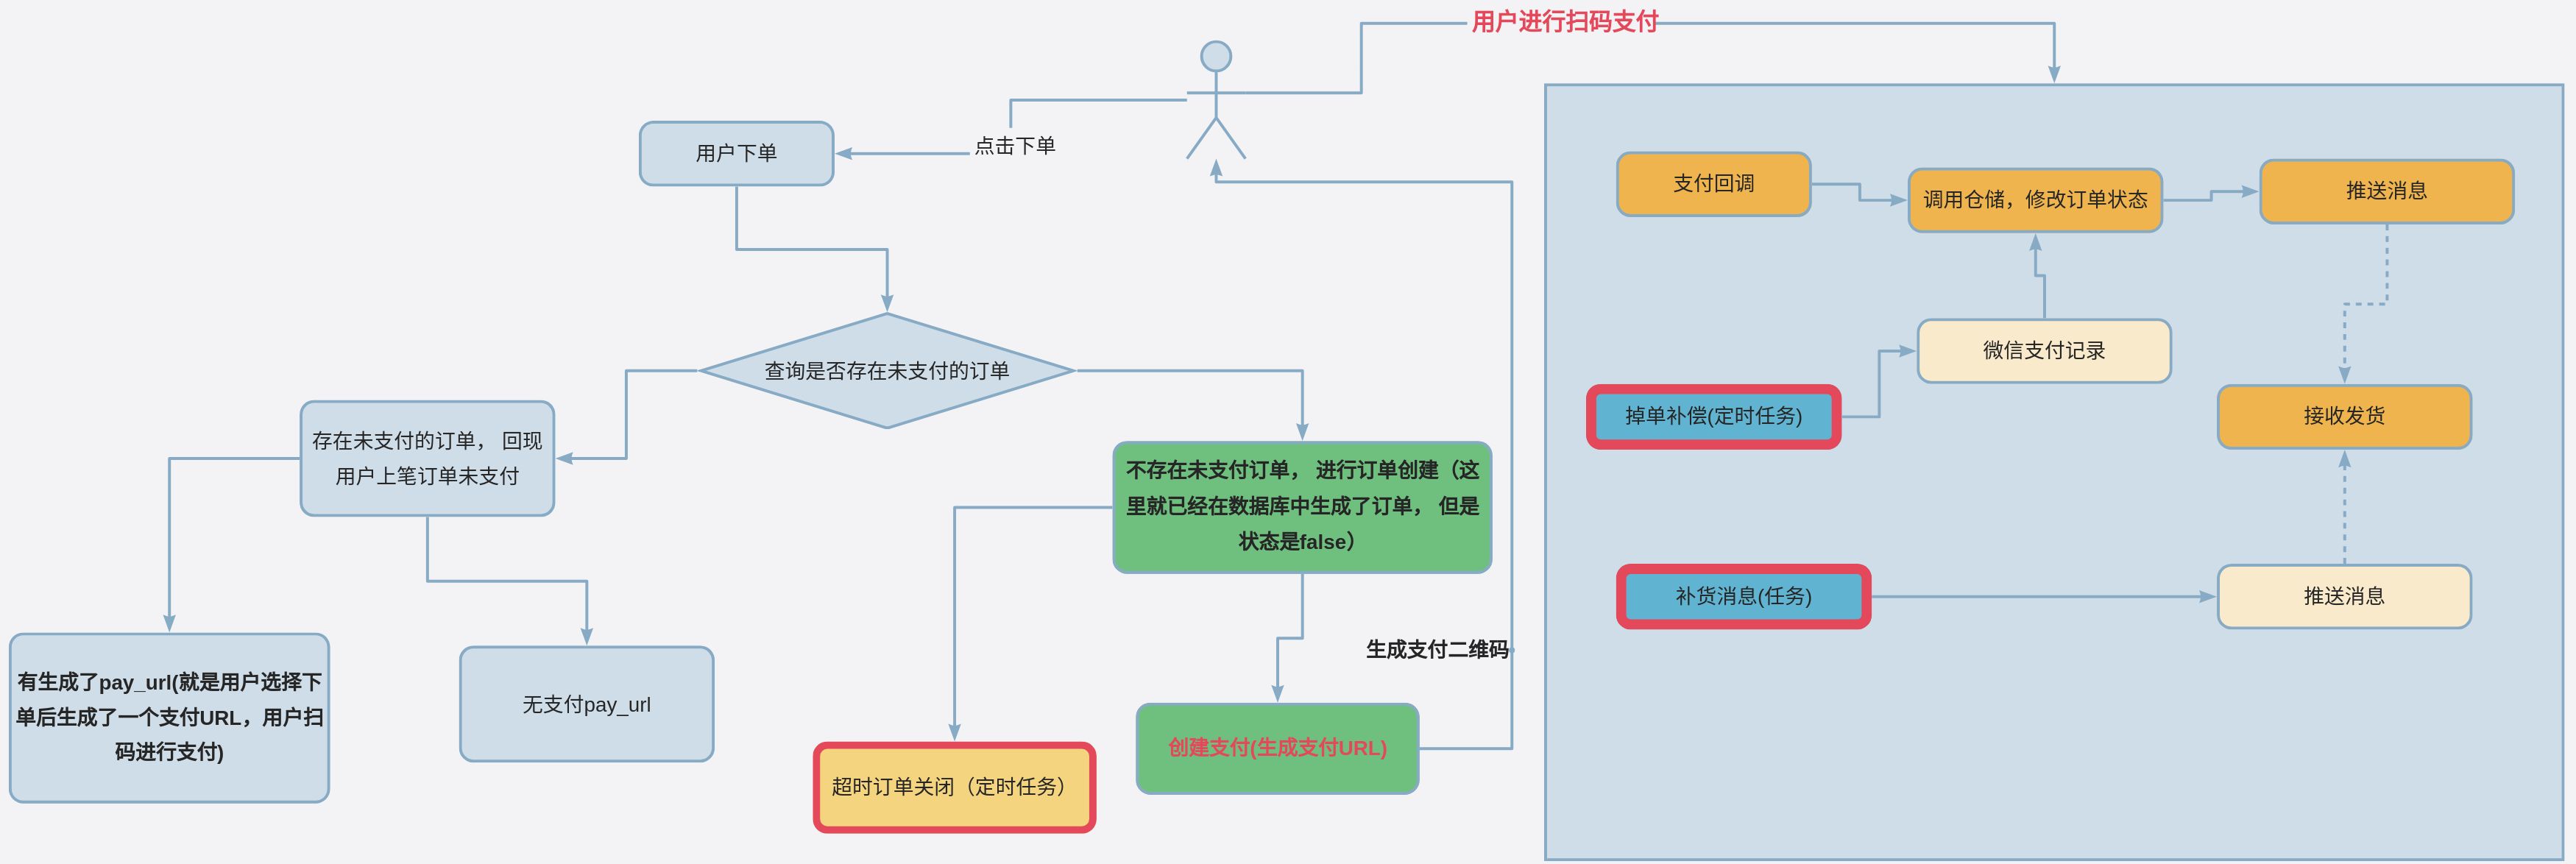
- 针对1~4提到异常流程,一条支付链路就会被扩展为现在的样子,在各个流程中需要穿插进入异常补偿流程。
- 用户下单,但可能存在之前下的残单,那么就要对应给予补充的流程后,再返回回去。
- 支付回调,仍然可能有异常。所以要有掉单补偿和发货补偿。两条任务处理。
领域实现
代码结构:
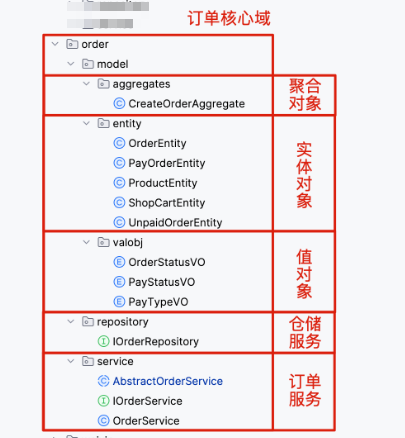
以创建订单服务为例
- 首先 ,在trigger层中进行商品下单
1
2
3
4
5
6
7
8
9
10
11
12
13
14
15
|
assert null != openid;
log.info("用户商品下单,根据商品ID创建支付单开始 openid:{} productId:{}", openid, productId);
ShopCartEntity shopCartEntity = ShopCartEntity.builder()
.productId(productId).openid(openid).build();
PayOrderEntity payOrder = orderService.createOrder(shopCartEntity);
log.info("用户商品下单,根据商品ID创建支付单完成 openid: {} productId: {} orderPay: {}, 支付url: {}", openid, productId, payOrder.toString(),payOrder.getPayUrl());
|
- 接着就进入领域层, 在领域层我们就可以实现下单的业务逻辑
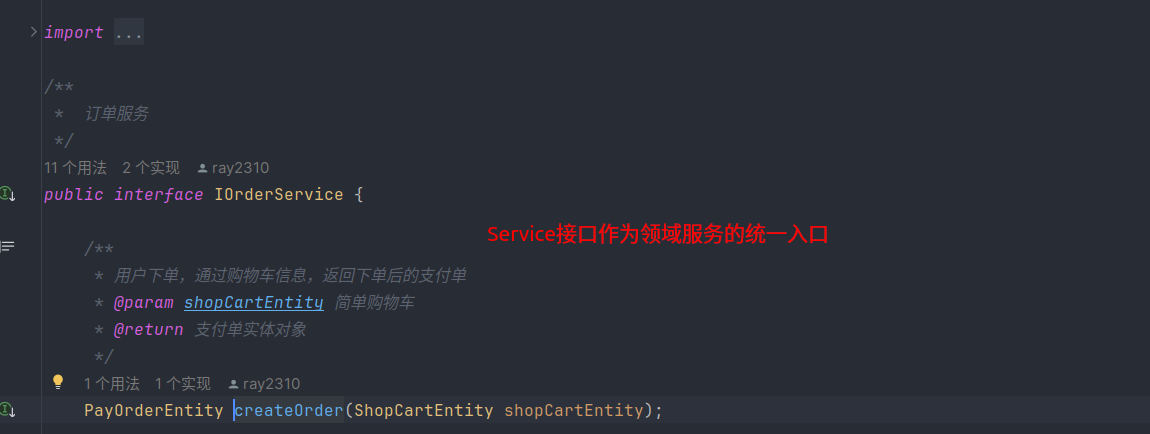
有了统一的入口, 我们就可以通过实现接口的方式来实现不同的服务, 对于可以抽象出来的服务, 我们可以使用抽象类来定义, 然后其他实现类来继承抽象类, 再实现接口
1
2
3
4
5
6
7
8
9
10
11
12
13
14
15
16
17
18
19
20
21
22
23
24
25
26
27
28
29
30
31
32
33
34
35
36
37
38
39
40
41
42
43
44
45
46
47
48
49
50
51
52
53
54
55
56
57
58
59
60
61
62
63
64
65
66
67
68
69
| @Slf4j
public abstract class AbstractOrderService implements IOrderService {
@Resource
protected IOrderRepository orderRepository;
@Override
public PayOrderEntity createOrder(ShopCartEntity shopCartEntity) {
try {
String openid = shopCartEntity.getOpenid();
Integer productId = shopCartEntity.getProductId();
UnpaidOrderEntity unpaidOrderEntity = orderRepository.queryUnpaidOrder(shopCartEntity);
if(null != unpaidOrderEntity
&& PayStatusVO.WAIT.equals(unpaidOrderEntity.getPayStatus())
&& null != unpaidOrderEntity.getPayUrl()){
log.info("创建订单-存在, 已生成微信支付, 返回 openid:{} OrderId:{} PayUrl:{}",openid, unpaidOrderEntity.getOrderId(), unpaidOrderEntity.getPayUrl());
return PayOrderEntity.builder()
.openid(openid)
.orderId(unpaidOrderEntity.getOrderId())
.payUrl(unpaidOrderEntity.getPayUrl())
.payStatus(unpaidOrderEntity.getPayStatus())
.build();
}
else if (null != unpaidOrderEntity
&& null != unpaidOrderEntity.getPayUrl()){
log.info("创建订单-存在,未生成微信支付。openid: {} orderId: {}", openid, unpaidOrderEntity.getOrderId());
PayOrderEntity payOrderEntity = this.doPrepayOrder(openid, unpaidOrderEntity.getOrderId(), unpaidOrderEntity.getProductName(), unpaidOrderEntity.getTotalAmount());
log.info("创建订单-完成,生成支付单。openid: {} orderId: {} payUrl: {}", openid, payOrderEntity.getOrderId(), payOrderEntity.getPayUrl());
return payOrderEntity;
}
ProductEntity productEntity = orderRepository.queryProduct(productId);
if(!productEntity.isAvailable()){
throw new ChatGPTException(Constants.ResponseCode.ORDER_PRODUCT_ERR.getCode(), Constants.ResponseCode.ORDER_PRODUCT_ERR.getInfo());
}
OrderEntity orderEntity = this.doSaveOrder(openid, productEntity);
PayOrderEntity payOrderEntity = this.doPrepayOrder(openid, orderEntity.getOrderId(), productEntity.getProductName(), orderEntity.getTotalAmount());
log.info("创建订单-完成,生成支付单。openid: {} orderId: {} payUrl: {}", openid, orderEntity.getOrderId(), payOrderEntity.getPayUrl());
return payOrderEntity;
}
}
protected abstract OrderEntity doSaveOrder(String openid, ProductEntity productEntity);
protected abstract PayOrderEntity doPrepayOrder(String openid, String orderId, String productName, BigDecimal amountTotal) throws AlipayApiException;
}
|
在这个AbstractOrderService抽象类中, 我们定义创建订单的逻辑。 同时, 后续如果有未支付的订单, 我们也在这里实现逻辑的判断。而后 ,再进行保存订单和创建支付单。
- 在订单实现类中, 通过继承抽象类并且实现接口, 我们就可以完善其逻辑。
在保存订单doSaveOrder中 ,通过依赖倒置的方式实现无循环依赖调用仓储层(infrastructure层), 然后就可以实现订单任务的保存订单服务。
1
2
3
4
5
6
7
8
9
10
11
12
13
14
15
16
17
18
19
20
21
| @Override
protected OrderEntity doSaveOrder(String openid, ProductEntity productEntity) {
OrderEntity orderEntity = new OrderEntity();
orderEntity.setOrderId(RandomStringUtils.randomNumeric(12));
orderEntity.setOrderTime(new Date());
orderEntity.setOrderStatus(OrderStatusVO.CREATE);
orderEntity.setTotalAmount(productEntity.getPrice());
orderEntity.setPayTypeVO(PayTypeVO.WEIXIN_NATIVE);
CreateOrderAggregate aggregate = CreateOrderAggregate.builder()
.openid(openid)
.product(productEntity)
.order(orderEntity)
.build();
orderRepository.saveOrder(aggregate);
return orderEntity;
}
|
在保存完订单之后,接下来就是预付款阶段, 也就是系统生成支付码, 然后用户支付订单时。 此时我们就需要生成支付单。这是支付单领域实体
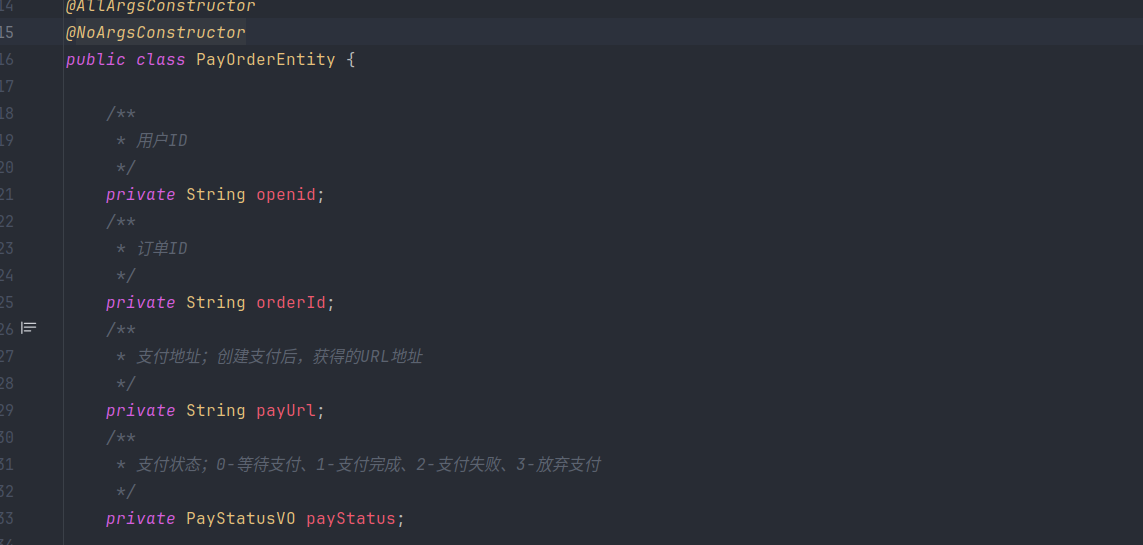
在用户完成支付的时候,我们通过完成支付单的创建。 然后对接支付宝or微信来让用户完成支付。接着将支付单的字段通过依赖倒置的方式让我们的仓储服务来保存。
1
2
3
4
5
6
7
8
9
10
11
12
13
14
15
16
17
18
19
20
21
22
23
24
25
26
27
28
29
30
31
| @Override
protected PayOrderEntity doPrepayOrder(String openid, String orderId, String productName, BigDecimal amountTotal) throws AlipayApiException {
AlipayTradePagePayRequest payService = new AlipayTradePagePayRequest();
payService.setNotifyUrl(notifyUrl);
payService.setReturnUrl(returnUrl);
JSONObject bizContent = new JSONObject();
bizContent.put("out_trade_no", orderId);
bizContent.put("total_amount", amountTotal.toString());
bizContent.put("subject", productName);
bizContent.put("product_code", "FAST_INSTANT_TRADE_PAY");
payService.setBizContent(bizContent.toString());
String form = alipayClient.pageExecute(payService).getBody();
PayOrderEntity payOrderEntity = PayOrderEntity.builder()
.openid(openid)
.orderId(orderId)
.payUrl(form)
.payStatus(PayStatusVO.WAIT)
.build();
System.out.println();
orderRepository.updateOrderPayInfo(payOrderEntity);
return payOrderEntity;
}
|
- 支付回调之后,更新订单
用户支付完成, 后台需要立即完成发货, 这样用户的体验感才不会太差。
所以再完成支付后,在支付回调逻辑中, 我们需要做的不仅仅是获取请求参数并进行支付宝or微信验签。 还需要做的是完成发货。

通过对支付宝和微信支付接口的解读, 然后判断是否支付成功, 并且通过支付宝和微信的支付回调中所携带的信息解读。 这里面最重要的就是支付宝or微信提供的支付单号。我们需要将支付单号和支付成功的时间进行update到数据库中的订单表中。
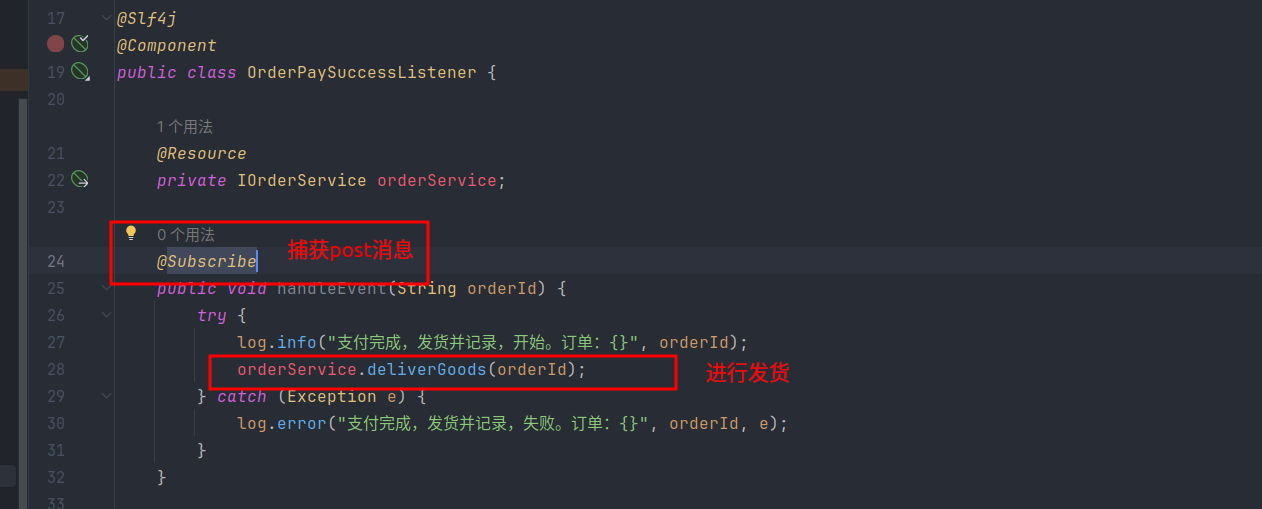
更新成功后发布消息

通过消息队列来进行发货
订单业务的注意点:
- 这里大家可能会疑惑, 一会支付单、一会订单、支付成功又要修改订单。 这三者有什么区别 ?
我们的项目是基于DDD架构的, 每个领域都有对应的领域实体, 而仓储中的数据库表对应的实体类和我们领域实体是不大相同的 ,同时为了实现防腐和隔离。 我们也不应该直接操作数据库实体。所以领域实体和数据库实体的对应关系就至关重要了。
以订单业务为例
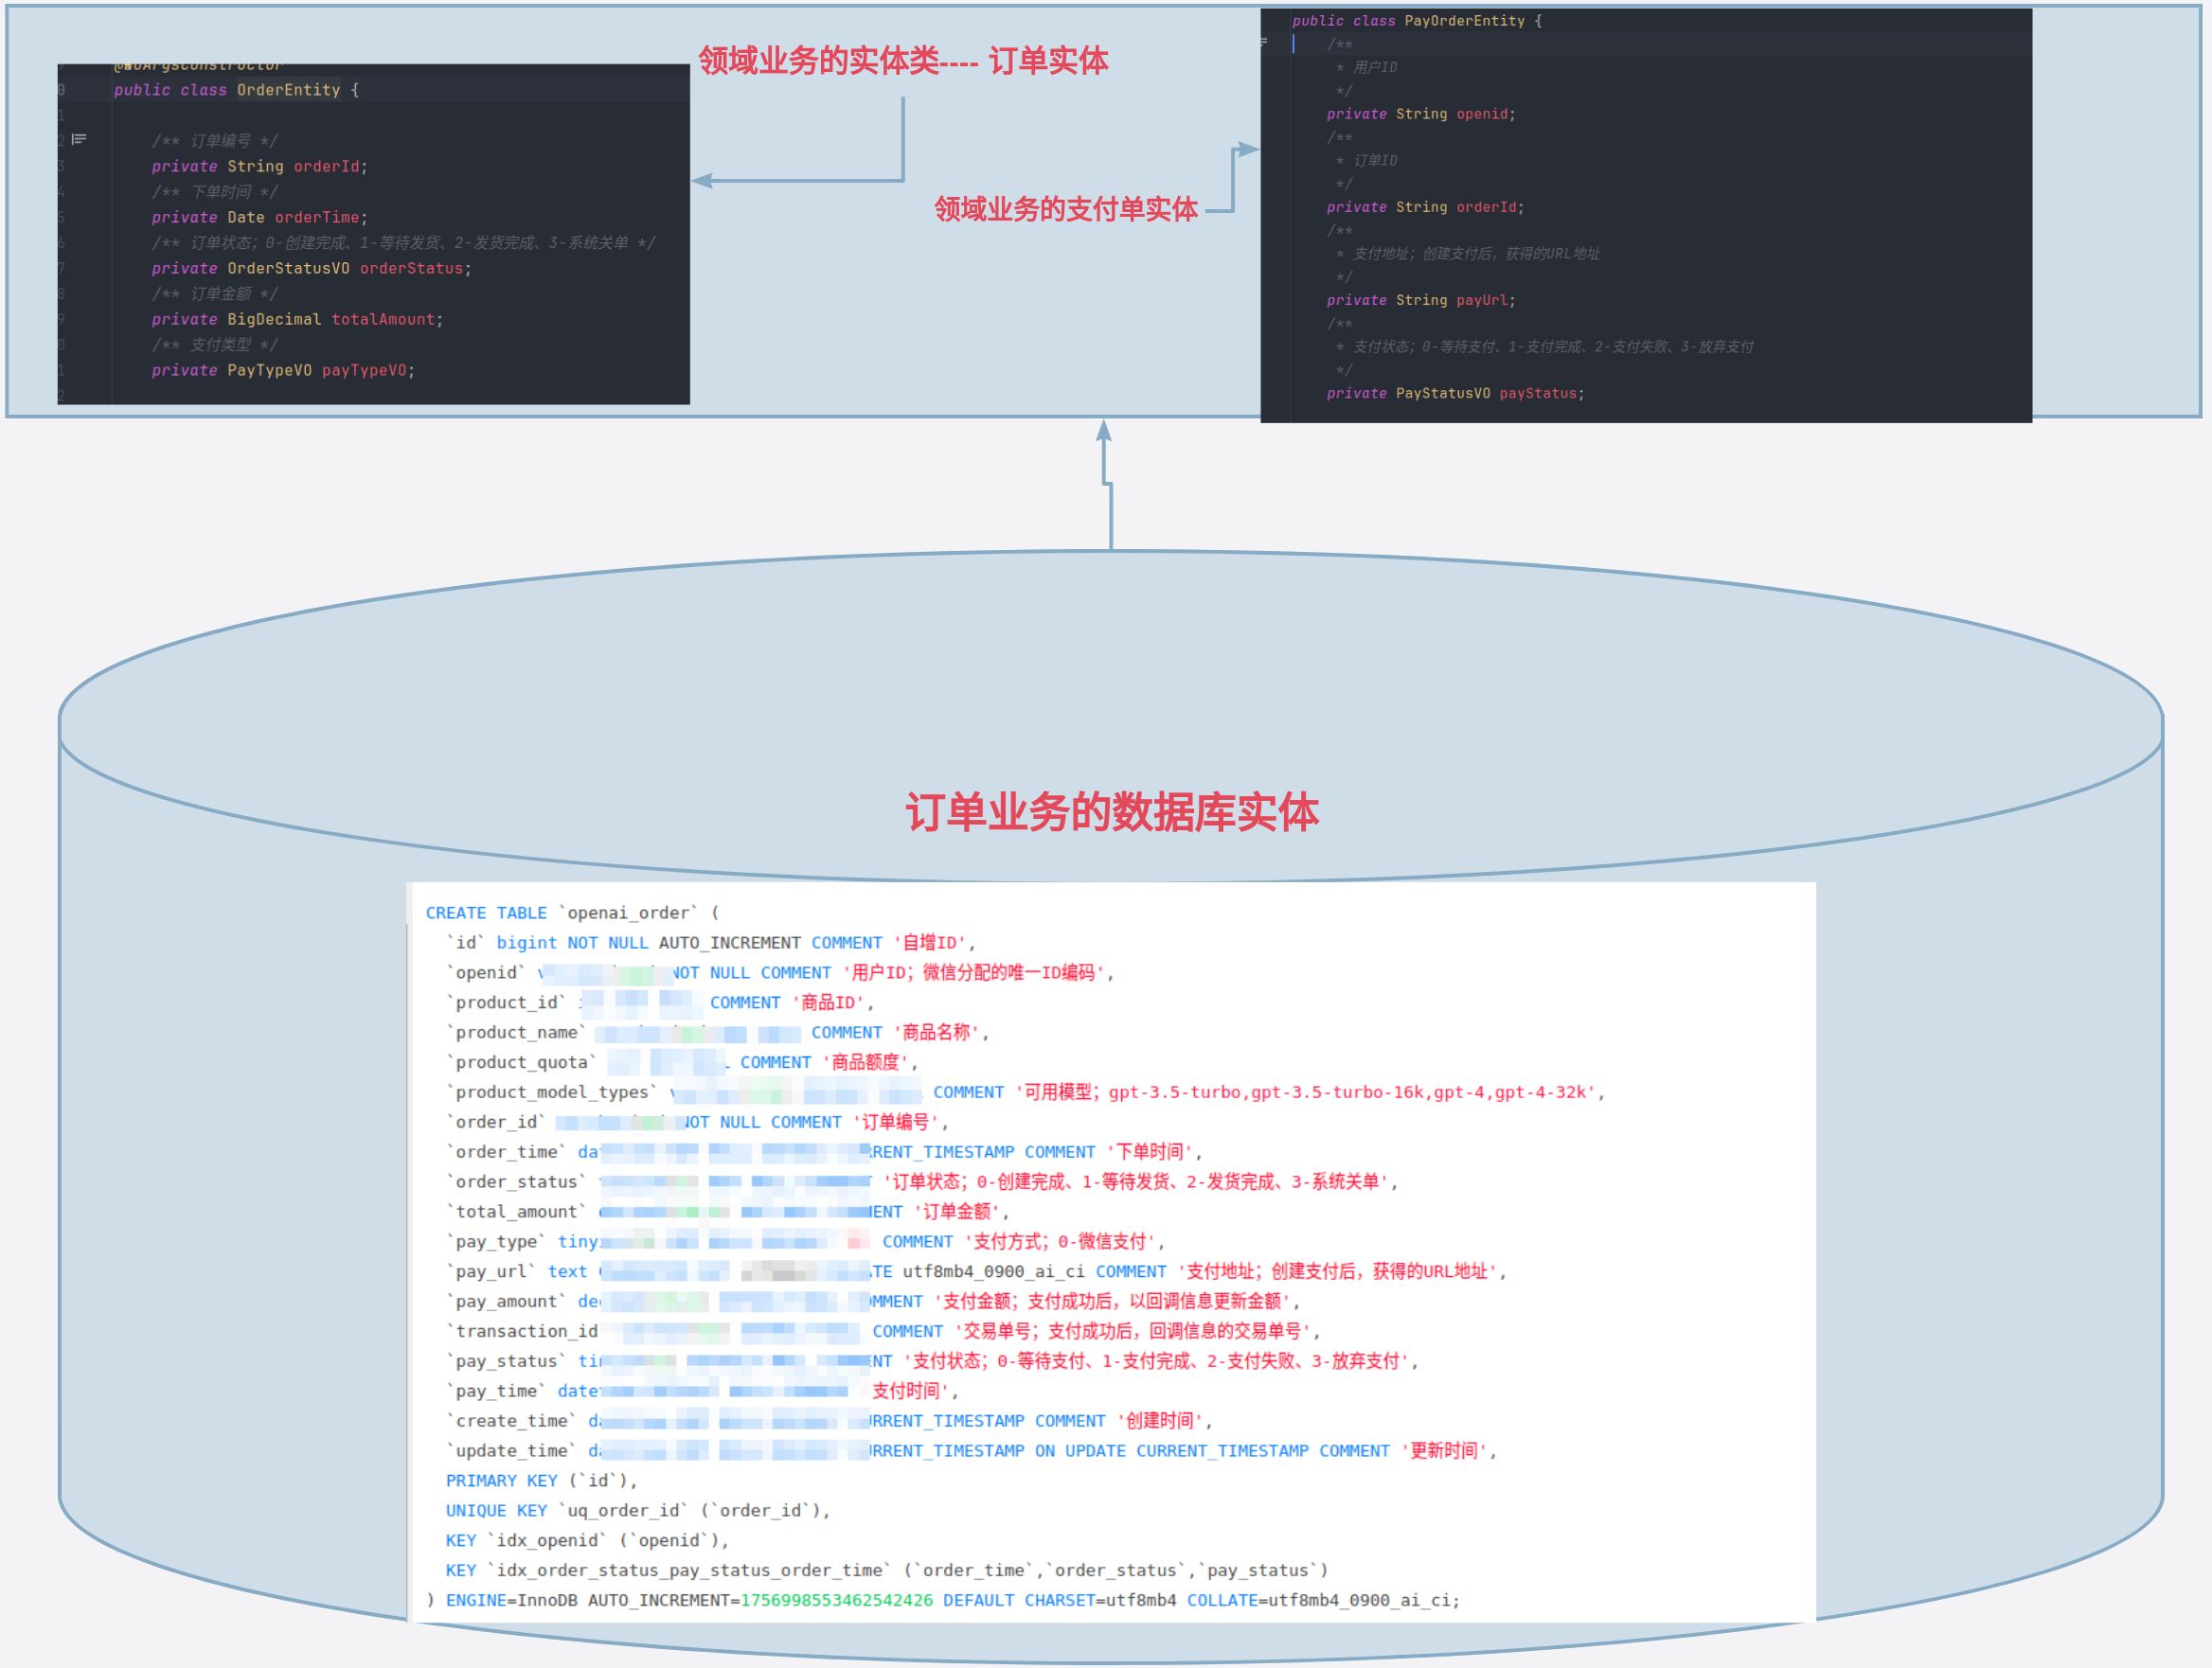
数据库实体和领域业务的两个实体是二对一的关系。 所以我们在领域中通过两次操作才能够完成数据库实体的完整创建, 最后update时,也同样需要更新数据库实体。但是这里我们并没有封装, 所以就相当于数据库实体和领域业务的两个实体是二对一的关系。但是实际上来说应该是三对一的关系。
- 为什么保存订单的逻辑要和更新订单的逻辑分开来完成, 然后在发货的时候通过事务来保证数据的一致性 ?
首先,我们这里的用户支付是通过支付宝或者微信完成的, 使用的是HTTP请求, 而不是简单的使用逻辑上的支付成功。由于支付过程涉及到网络请求,网络延迟或请求失败是常见的问题。所以,如果在涉及到网络请求的同时使用事务。这不管从设计的角度,还是从资源消耗的角度。 都是行不通的。
网络出现延迟, 那么数据库的事务就需要保持, 事务锁就无法释放。 数据库的资源消耗就非常高。其他依赖数据库的请求就无法执行。
同时,在事务中包含网络请求,错误处理和回滚机制会变得更加复杂。例如,如果网络请求成功了,但是后续的数据库操作失败导致事务回滚,那么你可能需要在第三方服务上执行某种形式的补偿逻辑,比如取消已经执行的操作。
系统的健壮性考虑。
基于以上的种种情况考虑,同时也遵循我们的DDD架构的设计理念(领域实体和数据库实体互不干涉, 实现防腐和隔离), 我们在用户点击下单的时候就保存订单(将基本的字段进行保存 ,比如订单号、价格、商品类型….)。
接着, 如果用户支付成功并且回调校验完成之后。在回调逻辑中, 将支付单的内容保存到订单表中。
最后, 在更新支付单到订单表之后, 如果更新成功, 那么就通过消息队列的方式 发货。
支付对接
在创建支付单完成之后, 我们需要生成支付码。 这样用户才能完成支付 ,才能通过支付回调通知系统完成了支付。给用户发货。
这一系列的流程,对于商业化产品来说, 最重要的当然是商家能安全的收到钱。 我们即想要用户能够能够方便的支付(不能为了支付下载一个莫名其妙的应用吧,一般非必要没有用户会这样干), 又想要商家能够安全的收到钱。 目前最主流的是市场就是微信、支付宝、银行。 这三大家基本上是目前最具有保障的了。这其中虽然银行最安全, 但是不太方便, 所以就考虑到微信和支付宝了。
下面,我们就基于我们的OpenAI商品下单来学习一下支付对接的流程。
支付宝沙箱对接
对于新手来说, 最好的实验对接的平台就是支付宝的沙箱支付。 它主要用于开发环境和测试环境中的支付场景调用。 不涉及用户的真实资金流动, 他是基于支付宝提供的账户实现的内部模拟金额的流动。
同时,在大多数情况下,沙箱环境和实际支付环境使用的API接口和参数是相同的。所以我们完全可以通过支付宝沙箱支付对接完成之后再进行真实场景的用户现金支付。
综上, 支付宝的沙箱对接支付是我们现阶段使用的最好选择
对接地址:
https://open.alipay.com/develop/sandbox/app
对接流程
- 进入支付宝开放平台
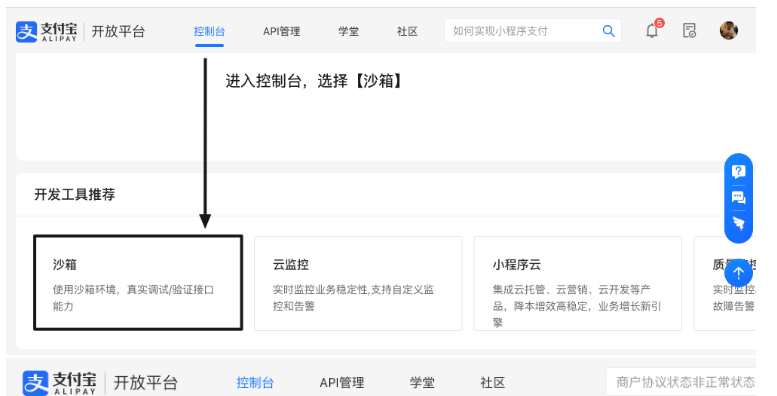
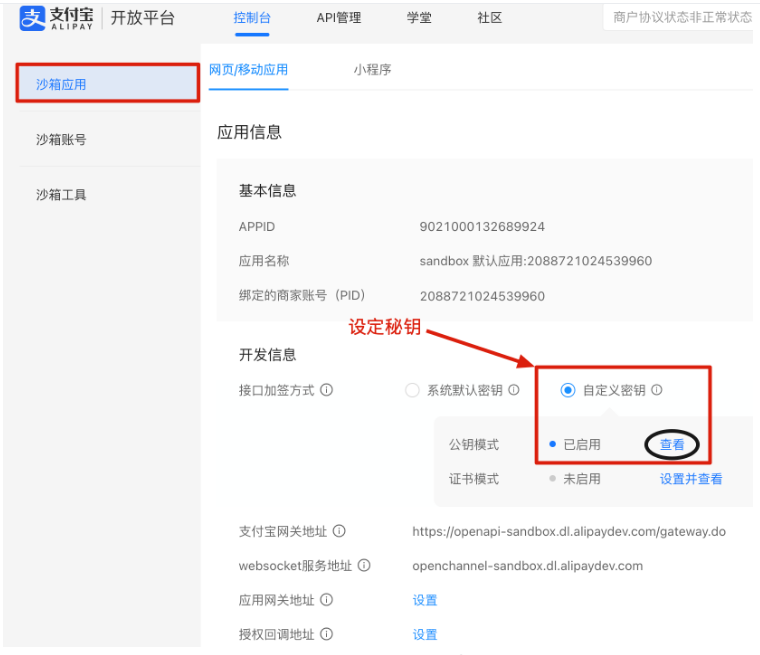
- 点击沙箱, 然后设置密钥。 这里支付宝提供了两种设置密钥的方式
- 地址:https://opendocs.alipay.com/common/02kipk(opens new window)- 下载支付宝开放平台秘钥工具 在文档的介绍中,也有很详细的说明。
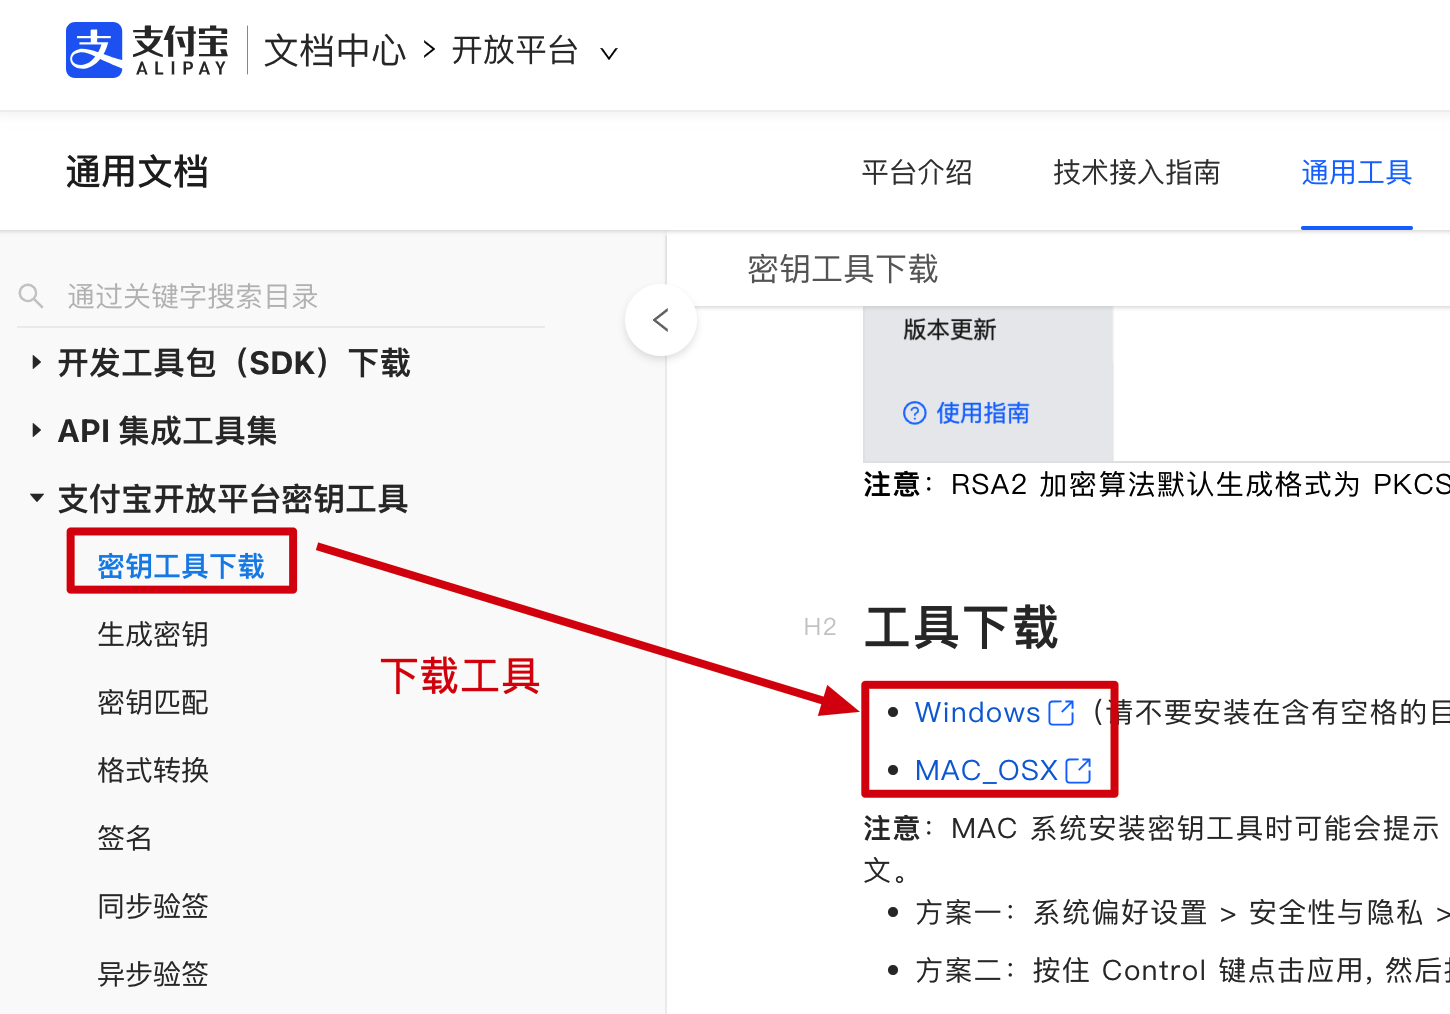
- 选择我们自己对应的系统, 然后下载工具, 在工具中生成你的密钥和公钥
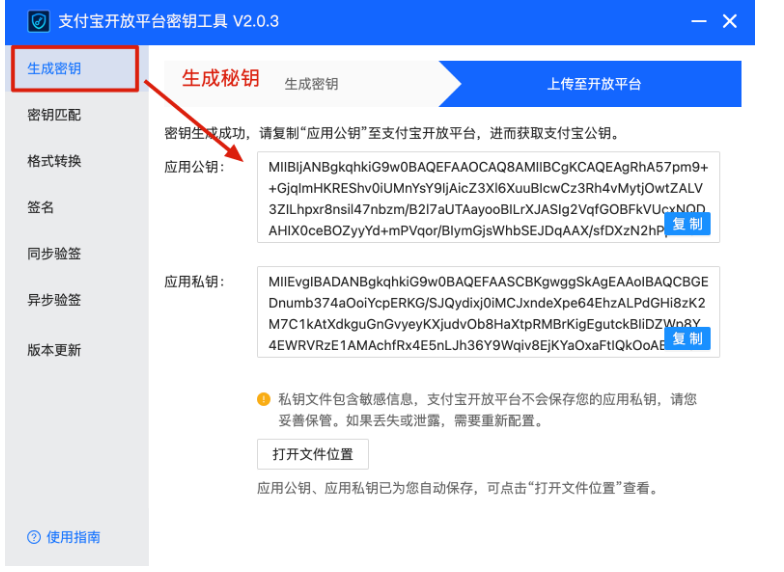
- 将得到的应用公钥复制, 然后复制到加签内容配置中
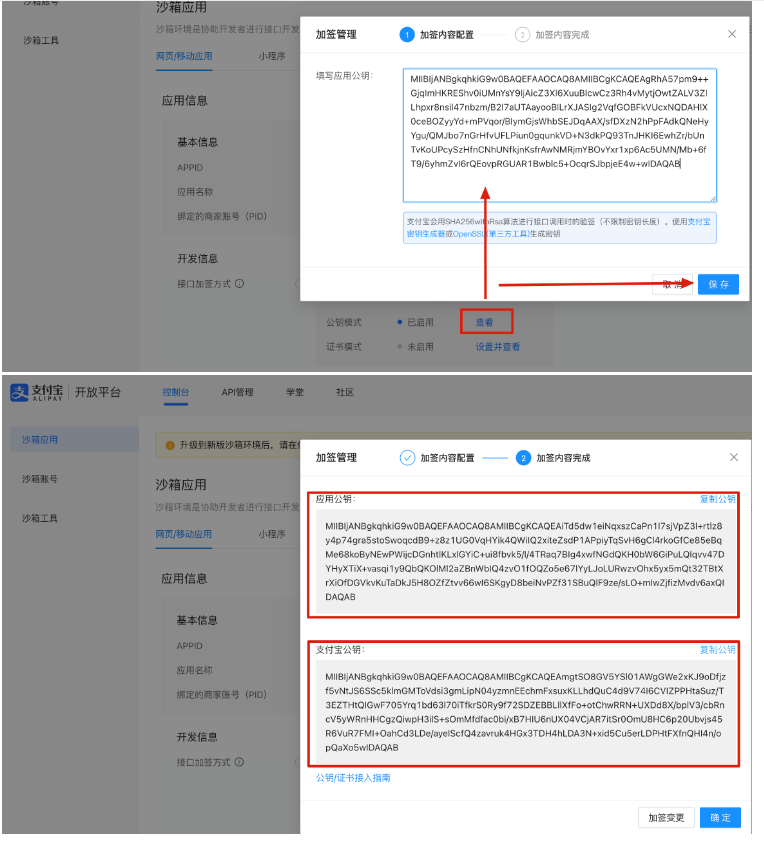
就会得到支付宝的公钥,这个公钥非常重要, 我们后续需要使用
项目中的使用说明
添加配置文件和依赖
1
2
3
4
5
6
|
<dependency>
<groupId>com.alipay.sdk</groupId>
<artifactId>alipay-sdk-java</artifactId>
<version>4.38.157.ALL</version>
</dependency>
|
在项目的配置文件中, 配置我们的支付宝配置内容

上述的这些内容填写自己的即可。
同时, 在config文件夹中添加这两个
AliPayConfig 和 AliPayConfigProperties, 这是为了后续我们在项目中使用起来方便
1
2
3
4
5
6
7
8
9
10
11
12
13
14
15
16
17
18
19
20
21
22
23
24
25
26
27
| package cn.rayce.config;
import com.alipay.api.AlipayClient;
import com.alipay.api.DefaultAlipayClient;
import org.springframework.boot.autoconfigure.condition.ConditionalOnProperty;
import org.springframework.boot.context.properties.EnableConfigurationProperties;
import org.springframework.context.annotation.Bean;
import org.springframework.context.annotation.Configuration;
@Configuration
@EnableConfigurationProperties(AliPayConfigProperties.class)
public class AliPayConfig {
@Bean(name = "alipayClient")
@ConditionalOnProperty(value = "alipay.enabled", havingValue = "true", matchIfMissing = false)
public AlipayClient alipayClient(AliPayConfigProperties properties){
return new DefaultAlipayClient(properties.getGatewayUrl(),
properties.getApp_id(),
properties.getMerchant_private_key(),
properties.getFormat(),
properties.getCharset(),
properties.getAlipay_public_key(),
properties.getSign_type());
}
}
|
1
2
3
4
5
6
7
8
9
10
11
12
13
14
15
16
17
18
19
20
21
22
23
24
25
26
27
28
29
30
| package cn.rayce.config;
import lombok.Data;
import org.springframework.boot.context.properties.ConfigurationProperties;
@Data
@ConfigurationProperties(prefix = "alipay", ignoreInvalidFields = true)
public class AliPayConfigProperties {
private String app_id;
private String merchant_private_key;
private String alipay_public_key;
private String notify_url;
private String return_url;
private String gatewayUrl;
private String sign_type = "RSA2";
private String charset = "utf-8";
private String format = "json";
}
|
使用支付宝提供的SDK对接
在我们订单服务中, 用户点击商品支付, 我们就需要提供支付的方式来让用户完成支付, 不管是微信支付也好还是支付宝支付也罢, 都是可以实现通过url跳转到支付页面的。
所以, 我们在使用支付宝实现支付的时候, 可以将支付包提供的支付跳转页面返回,然后让前端来进行解析展示。
1
2
3
4
5
6
7
8
9
10
11
12
13
14
15
16
17
18
19
20
21
22
23
24
25
26
27
28
29
30
31
32
33
34
35
36
37
|
@Override
protected PayOrderEntity doPrepayOrder(String openid, String orderId, String productName, BigDecimal amountTotal) throws AlipayApiException {
AlipayTradePagePayRequest payService = new AlipayTradePagePayRequest();
payService.setNotifyUrl(notifyUrl);
payService.setReturnUrl(returnUrl);
JSONObject bizContent = new JSONObject();
bizContent.put("out_trade_no", orderId);
bizContent.put("total_amount", amountTotal.toString());
bizContent.put("subject", productName);
bizContent.put("product_code", "FAST_INSTANT_TRADE_PAY");
payService.setBizContent(bizContent.toString());
String form = alipayClient.pageExecute(payService).getBody();
PayOrderEntity payOrderEntity = PayOrderEntity.builder()
.openid(openid)
.orderId(orderId)
.payUrl(form)
.payStatus(PayStatusVO.WAIT)
.build();
System.out.println();
orderRepository.updateOrderPayInfo(payOrderEntity);
return payOrderEntity;
}
|
在这里我们就可以使用支付宝提供得SDK来实现支付所需要的回调地址, 通知地址以及我们提供给支付宝展示给用户的用户所购商品的大致信息。 这样,支付宝的SDK就会通过调用支付宝的pageExecute方法, 来执行创建支付订单, 展示给用户的这个操作。
这里需要注意的是, 支付宝提供给我们的内容不是一个url ,然后一个页面。 类似于这样的一个支付页面
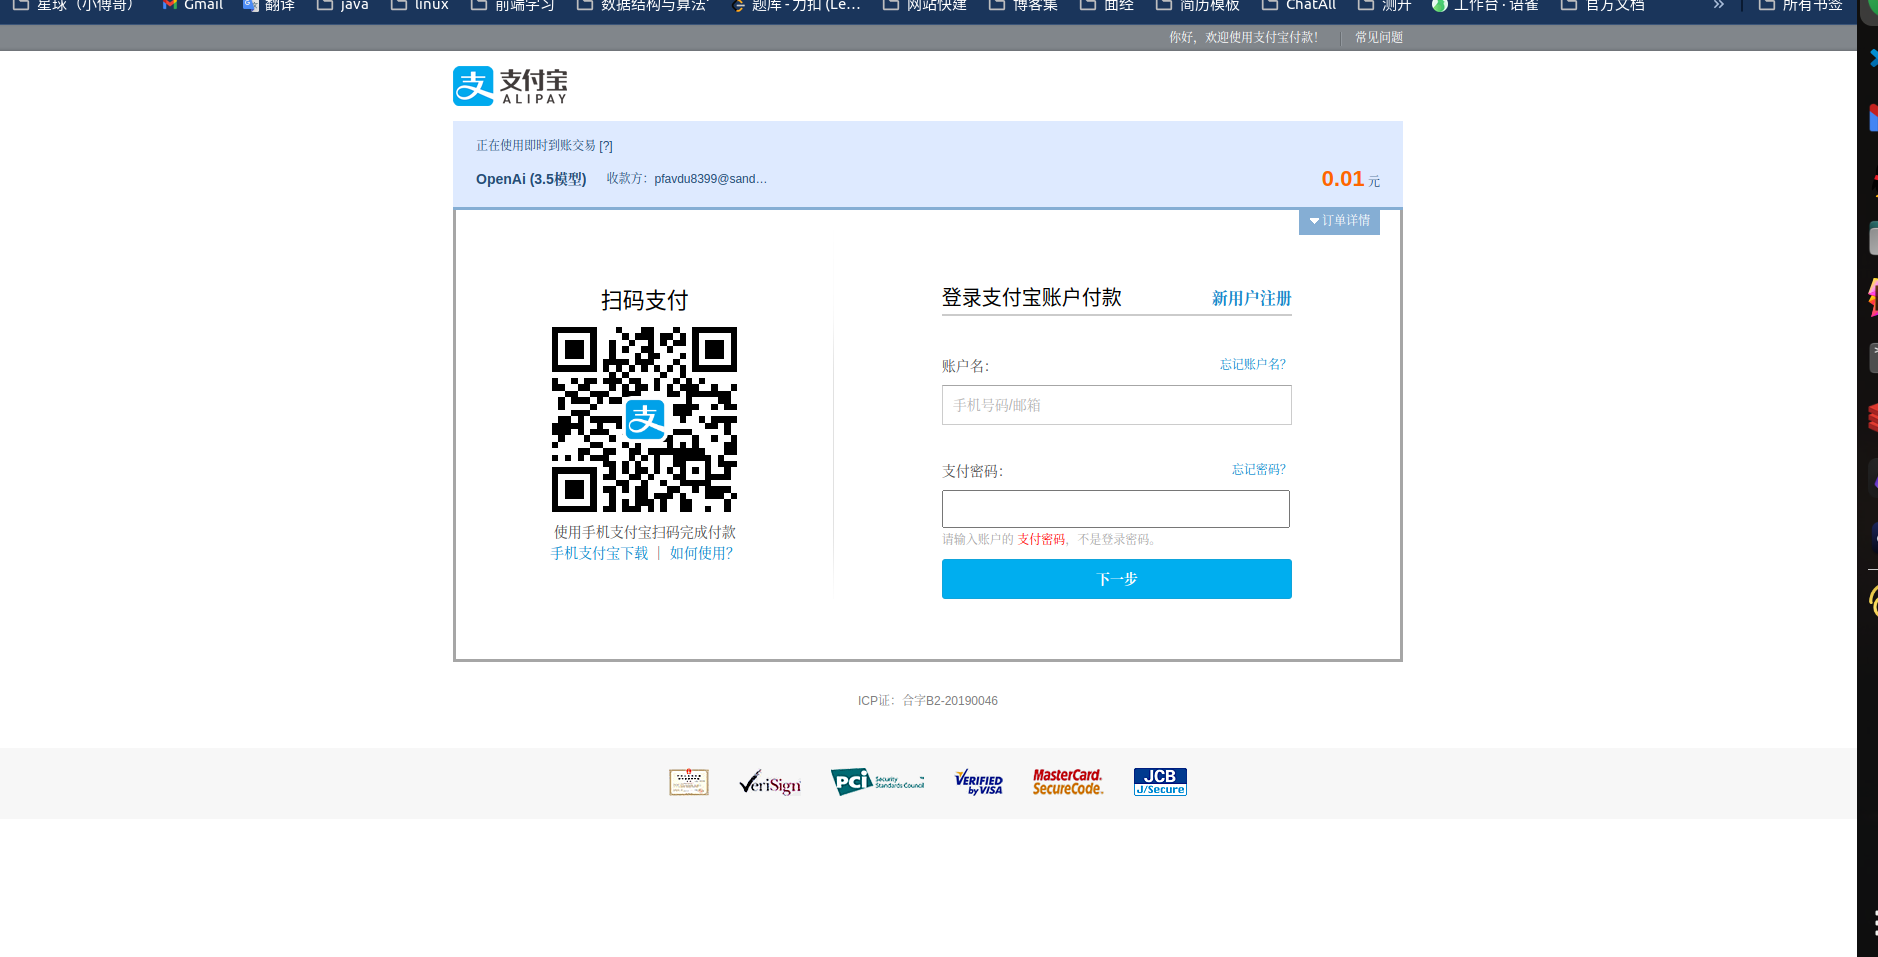
代码由支付宝的SDK提供,所以我们可以直接通过String接收这个代码。 然后将其作为支付的url返回给前端。
1
2
3
4
5
| <form name="punchout_form" method="post" action="https://openapi-sandbox.dl.alipaydev.com/gateway.do?charset=utf-8&method=alipay.trade.page.pay&sign=mFJx1bNgcRB63rZgl5H9oWNt0cEhaFdVy9sKEM9CNPue8HcEM04YtPrsNyk0%2BbqRppqLoSBo4u3rG1dB9AKsCEHCLVvm%2F4NqIWDHYMIn193rVXJfjdkObjxqIw2W8uXsbxi07nvkgsAIAKI%2BSNeY4bFyEseylRAVLN8iykkhqC3X%2FP82I4vOGTyaECL6kRwCJfSHDOIbE%2F2i9jR4LCDYVoan%2Bzkob4Dkuf9xX83lRibmzId2%2FkVie22XWtGD0ZZxrbgFrlbQK5ZStE1dISQRjXkdhueiwczE20%2Fi%2FqjEa%2B88j965N%2F2%2FwMNaYQPfGK0xaSNFEe69iieC9z%2BNuG0tyQ%3D%3D¬ify_url=http%3A%2F%2Ftkfpnv.natappfree.cc%2Fapi%2Fv1%2Fsale%2Fpay_notify&version=1.0&app_id=9021000134659768&sign_type=RSA2×tamp=2024-02-23+15%3A50%3A36&alipay_sdk=alipay-sdk-java-4.38.157.ALL&format=json">
<input type="hidden" name="biz_content" value="{"out_trade_no":"722655203408","total_amount":"0.01","subject":"OpenAi (3.5模型)","product_code":"FAST_INSTANT_TRADE_PAY"}">
<input type="submit" value="立即支付" style="display:none" >
</form>
<script>document.forms[0].submit();</script>
|
前端接收到这个支付的页面之后,通过createElement来进行解析
1
2
3
4
5
6
7
8
9
10
11
12
13
14
15
16
17
18
19
20
| const payOrder =async (productId: number) => {
const res = await createPayOrder(productId);
const {data, code} = await res.json();
const openId: string = data.openid;
const orderId: string = data.orderId;
const url: string = data.payUrl;
if (code === SaleProductEnum.SUCCESS) {
const formHtml: string = url;
const formElement = document.createElement('div');
formElement.innerHTML = formHtml;
document.body.appendChild(formElement);
document.forms[0].submit();
} else {
console.error('Error:');
}
}
|
通过这样,前端的支付请求触发后, 如果后端传过来的状态响应码是success的 ,那么就通过上述的解析代码来实现页面的跳转
最后页面就会跳转到支付宝提供的跳转界面。
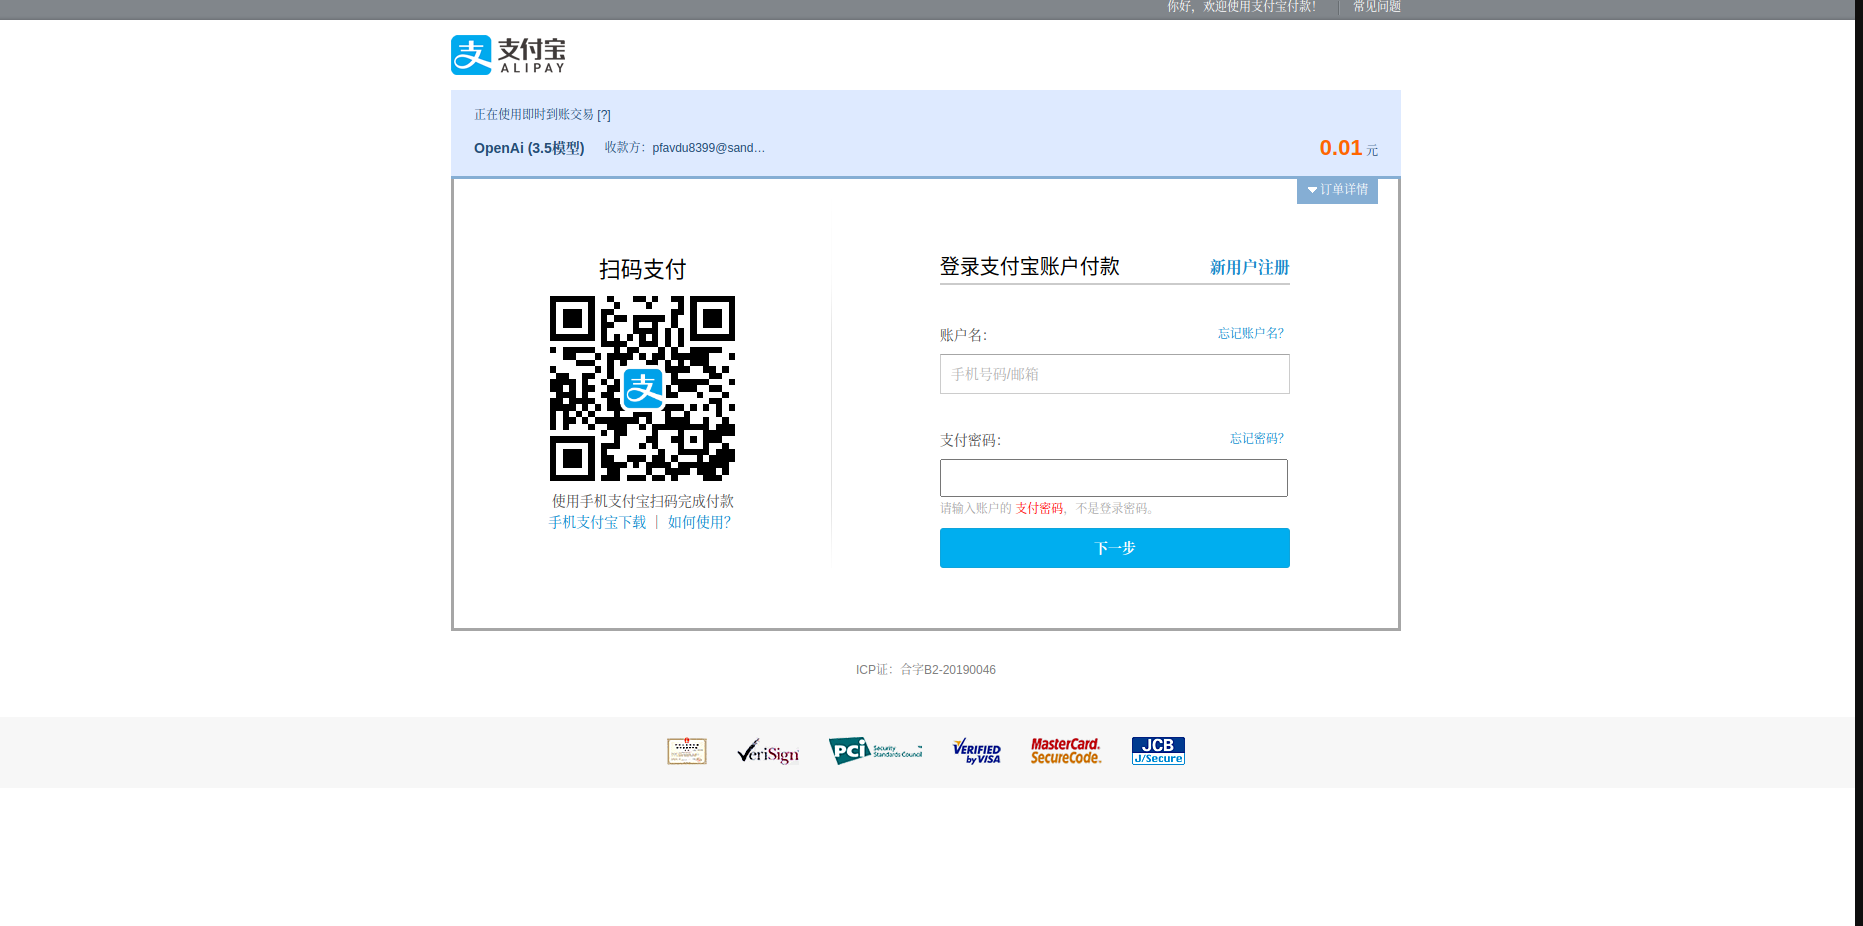
如果是真实场景, 那么就是用户扫码或者是输入账户密码来支付。
如果是测试场景, 那么就可以通过使用支付宝沙箱提供的测试账户来进行测试
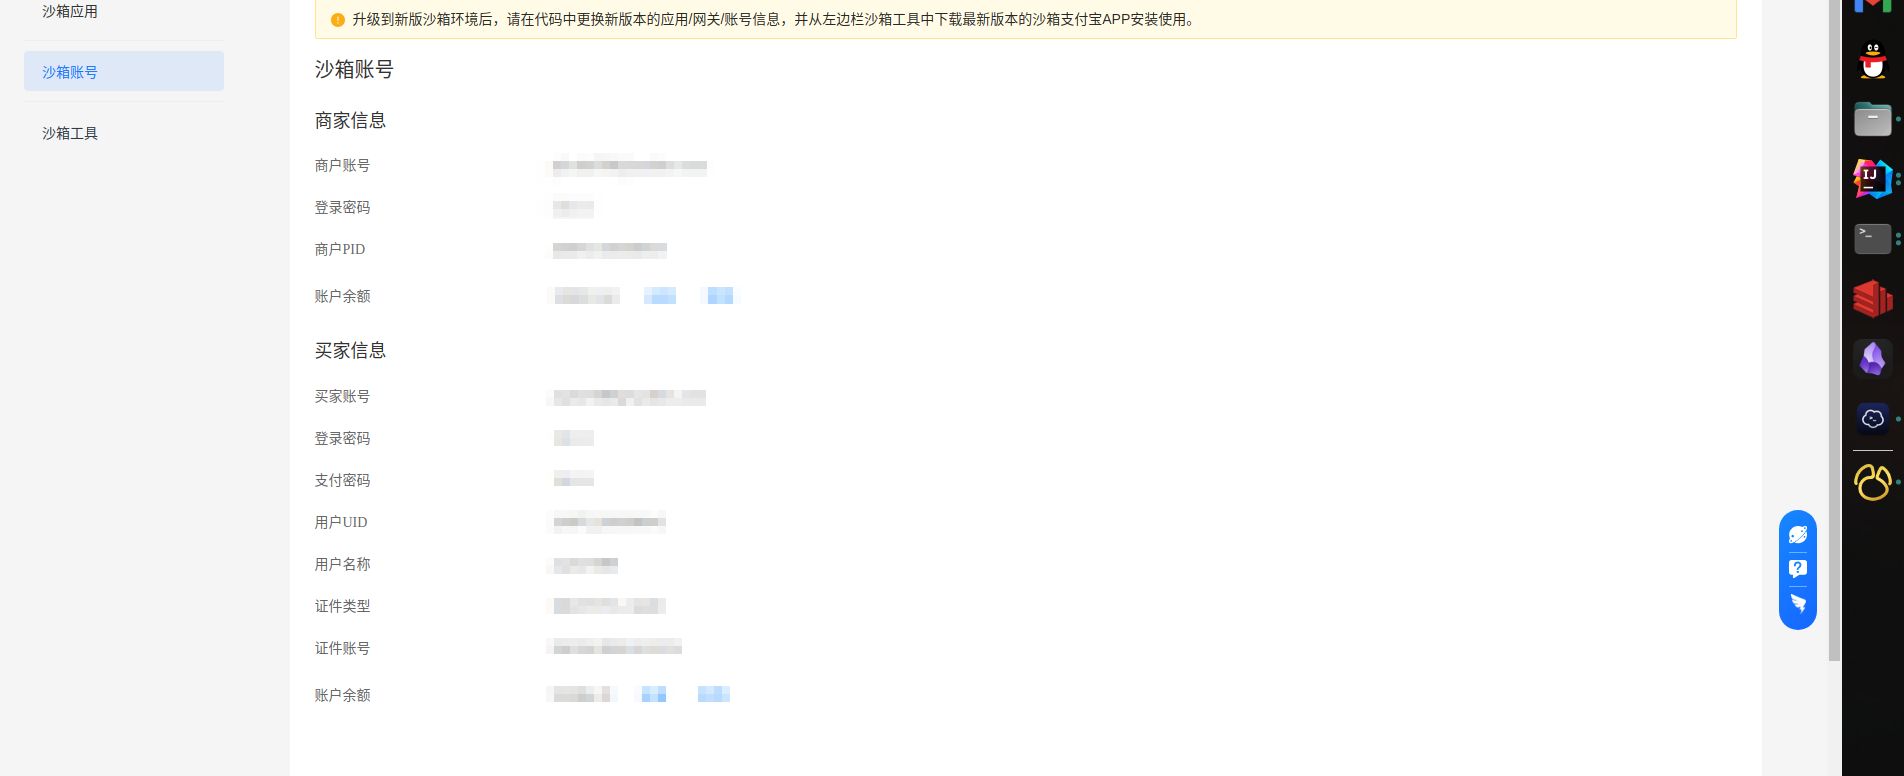
最后 ,当用户支付完成之后。就会触发支付回调pay_notify
在支付回调中, 我们需要对用户支付的内容以及对支付宝公钥的验签。完成验签之后就可以将得到的交易号等信息存入数据库, 并更新数据库的状态。 最后通过消息队列的形式完成发货
1
2
3
4
5
6
7
8
9
10
11
12
13
14
15
16
17
18
19
20
21
22
23
24
25
26
27
28
29
30
31
32
33
34
35
36
37
38
39
40
41
42
43
44
45
46
47
48
49
50
51
52
53
54
55
56
57
58
59
60
61
62
63
64
65
66
67
68
69
70
71
72
73
|
@RequestMapping("pay_notify")
public void payNotify( HttpServletRequest request, HttpServletResponse response) throws IOException {
try{
Map<String,String> params = new HashMap<String,String>();
Map<String,String[]> requestParams = request.getParameterMap();
for (Iterator<String> iter = requestParams.keySet().iterator(); iter.hasNext();) {
String name = iter.next();
String[] values = requestParams.get(name);
String valueStr = "";
for (int i = 0; i < values.length; i++) {
valueStr = (i == values.length - 1) ? valueStr + values[i] : valueStr + values[i] + ",";
}
params.put(name, valueStr);
}
String sign = params.get("sign");
String content = AlipaySignature.getSignCheckContentV1(params);
boolean checkSignature = AlipaySignature.rsa256CheckContent(content, sign, alipayPublicKey, "UTF-8");
if (checkSignature) {
log.info("支付回调,交易名称: {}", params.get("subject"));
log.info("支付回调,交易状态: {}", params.get("trade_status"));
log.info("支付回调,支付宝交易凭证号: {}", params.get("trade_no"));
log.info("支付回调,商户订单号: {}", params.get("out_trade_no"));
log.info("支付回调,交易金额: {}", params.get("total_amount"));
log.info("支付回调,买家在支付宝唯一id: {}", params.get("buyer_id"));
log.info("支付回调,买家付款时间: {}", params.get("gmt_payment"));
log.info("支付回调,买家付款金额: {}", params.get("buyer_pay_amount"));
String orderId = params.get("out_trade_no");
String transaction_id = params.get("trade_no");
String trade_status = params.get("trade_status");
String total = params.get("total_amount");
String successTime = params.get("gmt_payment");
if(trade_status.equals("TRADE_FINISHED") || trade_status.equals("TRADE_SUCCESS")){
log.info("支付成功 out_trade_no:{} trade_no:{}", orderId, transaction_id);
boolean isSuccess = orderService.changeOrderPaySuccess(orderId, transaction_id, new BigDecimal(total).divide(new BigDecimal(100), 2, RoundingMode.HALF_UP), dateFormat.parse(successTime));
if (isSuccess) {
eventBus.post(orderId);
}
response.getWriter().write("success");
}else if(trade_status.equals("TRADE_CLOSED")){
log.info( "交易关闭");
} else {
log.error("验签失败");
response.getWriter().write("fail");
}
}
} catch (Exception e) {
log.error("支付失败", e);
response.getWriter().write("fail");
}
}
|
蓝兔微信对接
蓝兔支付是专业服务于个人、个体户、企业的正规、安全、稳定、可靠的官方支付接口,方便个人创业者通过API进行收款。
为什么使用蓝兔支付?
因为如果想要使用微信支付或者真正的支付宝支付, 是需要营业执照的。 我们做的个体项目并没有营业执照, 所以就必须通过其他的第三方平台,而蓝兔支付则是一个非常不错的选择。虽然开户费就需要50元, 但是奈何我们没有营业执照呀, 所以这50是必须花的咯。
对接地址:
https://www.ltzf.cn/
对接流程:
完成对接及其响应的配置文件
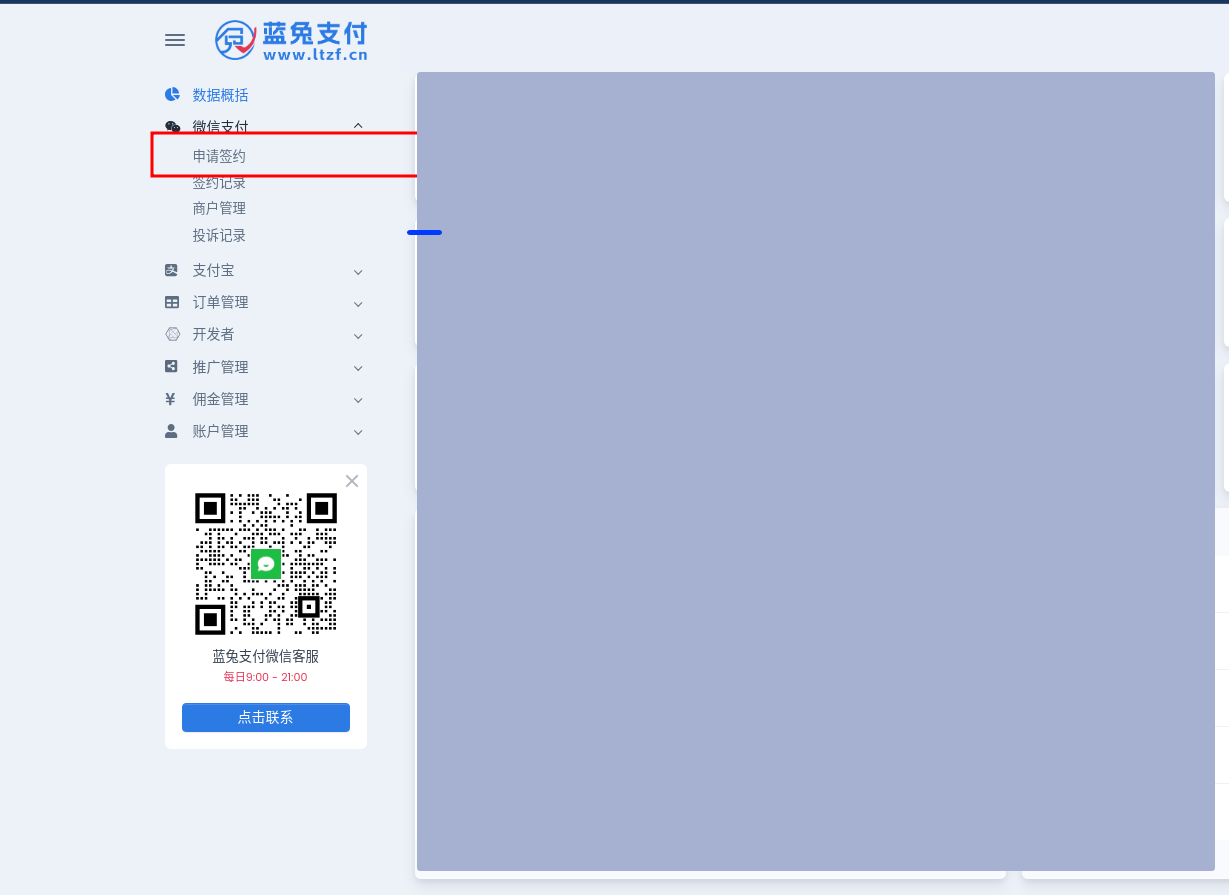
- 按照对接地址注册认证之后 , 点击申请签约。然后按照流程进行签约即可。
- 完成签约之后 ,在商户管理中, 就可以得到自己的商户号和商户密钥。 这两个是我们需要的

- 在项目的配置文件中配置这三个属性。

同时,我们还需要引入第三的蓝兔对接SDK
1
2
3
4
5
| <dependency>
<groupId>cn.ltzf</groupId>
<artifactId>lantu-sdk-spring-boot-starter</artifactId>
<version>1.0-SNAPSHOT</version>
</dependency>
|
在引入对应的两个config文件
蓝兔微信支付自动装配类 和 蓝兔支付自动装配类
1
2
3
4
5
6
7
8
9
10
11
12
13
14
15
16
17
18
19
20
21
22
23
24
25
26
27
28
29
30
31
32
33
34
35
36
37
38
39
40
41
42
43
44
45
46
47
48
49
50
51
52
53
54
55
56
57
58
59
60
61
62
63
64
65
66
67
68
69
70
71
72
73
74
75
76
77
78
| package cn.rayce.config;
import cn.ltzf.sdkjava.api.LantuWxPayService;
import cn.ltzf.sdkjava.api.impl.LantuWxPayServiceOkHttpImpl;
import cn.ltzf.sdkjava.config.LantuWxConfigStorage;
import cn.ltzf.sdkjava.config.impl.LantuWxDefaultConfigImpl;
import cn.ltzf.spring.starter.enums.HttpClientType;
import cn.ltzf.spring.starter.enums.StorageType;
import cn.ltzf.spring.starter.properties.LantuWxPayProperties;
import lombok.AllArgsConstructor;
import org.slf4j.Logger;
import org.slf4j.LoggerFactory;
import org.springframework.boot.autoconfigure.condition.ConditionalOnMissingBean;
import org.springframework.context.annotation.Bean;
import org.springframework.context.annotation.Configuration;
@Configuration
@AllArgsConstructor
public class LantuWxServiceAutoConfiguration {
private static final Logger LOGGER = LoggerFactory.getLogger(LantuWxServiceAutoConfiguration.class);
private final LantuWxPayProperties lantuWxPayProperties;
@Bean
@ConditionalOnMissingBean(LantuWxConfigStorage.class)
public LantuWxConfigStorage lantuWxConfigStorage() {
StorageType type = lantuWxPayProperties.getConfigStorage().getType();
LantuWxConfigStorage config = defaultConfigStorage();
return config;
}
private LantuWxConfigStorage defaultConfigStorage() {
LantuWxDefaultConfigImpl config = new LantuWxDefaultConfigImpl();
initConfig(config);
return config;
}
private void initConfig(LantuWxDefaultConfigImpl config) {
LantuWxPayProperties properties = lantuWxPayProperties;
LantuWxPayProperties.ConfigStorage configStorageProperties = properties.getConfigStorage();
config.setMchId(properties.getMchId());
config.setSecretKey(properties.getSecretKey());
config.setNotifyUrl(properties.getNotifyUrl());
config.setHttpProxyHost(configStorageProperties.getHttpProxyHost());
config.setHttpProxyUsername(configStorageProperties.getHttpProxyUsername());
config.setHttpProxyPassword(configStorageProperties.getHttpProxyPassword());
if (configStorageProperties.getHttpProxyPort() != null) {
config.setHttpProxyPort(configStorageProperties.getHttpProxyPort());
}
config.setMaxRetryTimes(configStorageProperties.getMaxRetryTimes());
config.setRetrySleepMillis(configStorageProperties.getRetrySleepMillis());
}
@Bean
@ConditionalOnMissingBean(LantuWxPayService.class)
public LantuWxPayService lantuWxPayService(LantuWxConfigStorage lantuWxConfigStorage) {
HttpClientType httpClientType = lantuWxPayProperties.getConfigStorage().getHttpClientType();
LantuWxPayService lantuWxPayService;
switch (httpClientType) {
case OkHttp:
lantuWxPayService = new LantuWxPayServiceOkHttpImpl();
break;
default:
lantuWxPayService = new LantuWxPayServiceOkHttpImpl();
break;
}
lantuWxPayService.setLantuWxConfig(lantuWxConfigStorage);
LOGGER.info("success load init Lantu SDK Spring Boot Starter......");
return lantuWxPayService;
}
}
|
1
2
3
4
5
6
7
8
9
10
11
12
13
14
15
16
17
18
19
| package cn.rayce.config;
import cn.ltzf.spring.starter.config.LantuWxServiceAutoConfiguration;
import cn.ltzf.spring.starter.properties.LantuWxPayProperties;
import org.springframework.boot.context.properties.EnableConfigurationProperties;
import org.springframework.context.annotation.Configuration;
import org.springframework.context.annotation.Import;
@Configuration
@EnableConfigurationProperties(LantuWxPayProperties.class)
@Import({
LantuWxServiceAutoConfiguration.class
})
public class LantuWxAutoConfiguration {
}
|
使用SDK
这里和前面的支付宝沙箱对接的流程是一样的, 只是使用的SDK不同,所以有些方法不一样
1
2
3
4
5
6
7
8
9
10
11
12
13
14
15
16
17
18
19
20
21
22
23
24
25
26
27
28
|
@Override
protected PayOrderEntity doPrepayOrder(String openid, String orderId, String productName, BigDecimal amountTotal) throws AlipayApiException {
LantuWxPayNativeOrderRequest request = new LantuWxPayNativeOrderRequest();
request.setOutTradeNo(orderId);
request.setTotalFee(amountTotal.toString());
request.setBody(productName);
LantuWxPayNativeOrderResult result = lantuWxPayService.createNativeOrder(request);
PayOrderEntity payOrderEntity = PayOrderEntity.builder()
.openid(openid)
.orderId(orderId)
.payUrl(result.getQrCodeUrl())
.payStatus(PayStatusVO.WAIT)
.build();
System.out.println();
orderRepository.updateOrderPayInfo(payOrderEntity);
return payOrderEntity;
}
|
蓝兔对接微信支付得到的支付地址是一张由蓝兔生成的支付二维码图片, 我们需要做的就是将这张二维码图片展示出来。 (和微信支付有些不同)
同时蓝兔这里也提供了微信的支付url, 但是貌似有问题….
最后就是支付回调了, 这里需要注意的是, 蓝兔支付需要我们将支付回调的ip或者是域名填入蓝兔支付客户端中, 也就是这里
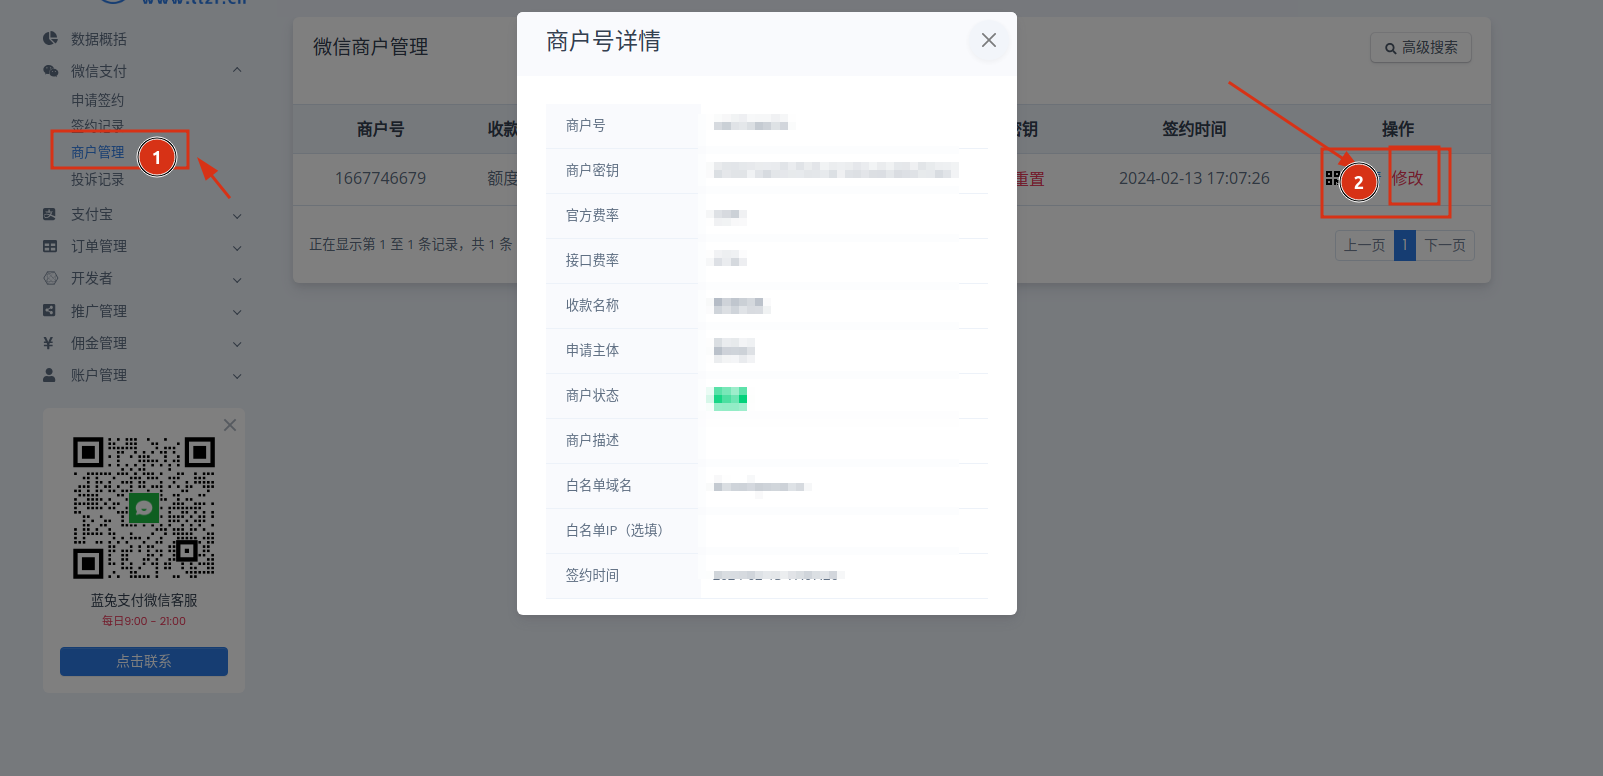
查看和修改, 将我们的支付回调地址的ip/域名 传进入即可。
蓝兔实现的支付回调
这里的支付回调中, 使用的第三方的SDK中有bug, 这里我自己通过阅读官网的文档实现了验签
1
2
3
4
5
6
7
8
9
10
11
12
13
14
15
16
17
18
19
20
21
22
23
24
25
26
27
28
29
30
31
32
33
34
35
36
37
|
@PostMapping("pay_notify")
public String payNotify(@RequestBody String requestBody,HttpServletRequest request, HttpServletResponse response) throws ParseException {
log.info("requestBody: {}", requestBody);
Map<String,String> params = new HashMap<String,String>();
params = parseQueryString(requestBody);
log.info("获取请求体成功? : {}",!params.isEmpty() );
if (params == null || params.isEmpty()) {
return "fail";
}
String json = JSON.toJSONString(params);
log.info("支付回调接口接收到参数进行验签 :{} ", json);
boolean checkSign = LantuWxPaySignUtil.checkSign(params, ltSecretKey);
if(checkSign){
log.error("校验失败" );
}
log.info("校验成功, 处理订单。");
String orderId = params.get("out_trade_no");
String transaction_id = params.get("order_no");
String successTime = params.get("success_time");
String total = params.get("total_fee");
log.info("支付成功 out_trade_no:{} trade_no:{}", orderId, transaction_id);
boolean isSuccess = orderService.changeOrderPaySuccess(orderId, transaction_id, new BigDecimal(total).divide(new BigDecimal(100), 2, RoundingMode.HALF_UP), dateFormat.parse(successTime));
if (isSuccess) {
eventBus.post(orderId);
System.out.println("发布成功");
}
return "success";
}
|
这是我实现的支付验签的工具类
1
2
3
4
5
6
7
8
9
10
11
12
13
14
15
16
17
18
19
20
21
22
23
24
25
26
27
28
29
30
31
32
33
34
35
36
37
38
39
40
41
42
43
44
45
46
47
48
49
50
51
52
53
54
55
56
57
58
| package cn.rayce.trigger.lantuUtils;
import org.apache.commons.codec.Charsets;
import org.apache.commons.lang3.StringUtils;
import org.springframework.context.annotation.Bean;
import java.io.UnsupportedEncodingException;
import java.net.URLEncoder;
import java.util.*;
import static cn.hutool.crypto.SecureUtil.md5;
public class LantuWxPaySignUtil {
public static String packageSign(Map < String, String > params, boolean urlEncoder) {
TreeMap < String, String > sortedParams = new TreeMap < String, String > (params);
StringBuilder sb = new StringBuilder();
boolean first = true;
for (Map.Entry< String, String > param: sortedParams.entrySet()) {
String value = param.getValue();
if (StringUtils.isBlank(value)) {
continue;
}
if (first) {
first = false;
} else {
sb.append("&");
}
sb.append(param.getKey()).append("=");
if (urlEncoder) {
try {
value = urlEncode(value);
} catch (UnsupportedEncodingException e) {}
}
sb.append(value);
}
return sb.toString();
}
public static String urlEncode(String src) throws UnsupportedEncodingException, UnsupportedEncodingException {
return URLEncoder.encode(src, Charsets.UTF_8.name()).replace("+", "%20");
}
public static String createSign(Map < String, String > params, String partnerKey) {
params.remove("sign");
String stringA = packageSign(params, false);
String stringSignTemp = stringA + "&key=" + partnerKey;
return md5(stringSignTemp).toUpperCase();
}
public static boolean checkSign(Map < String, String > params, String partnerKey){
String sign = createSign(params, partnerKey);
return sign.equals(params.get("sign"));
}
}
|
学习参考地址:
小傅哥
AliPay 商品下单支付场景


