VueCli 自定义创建项目
1.安装脚手架 (已安装)
2.创建项目
1
| vue create hm-exp-mobile
|
1
2
3
4
5
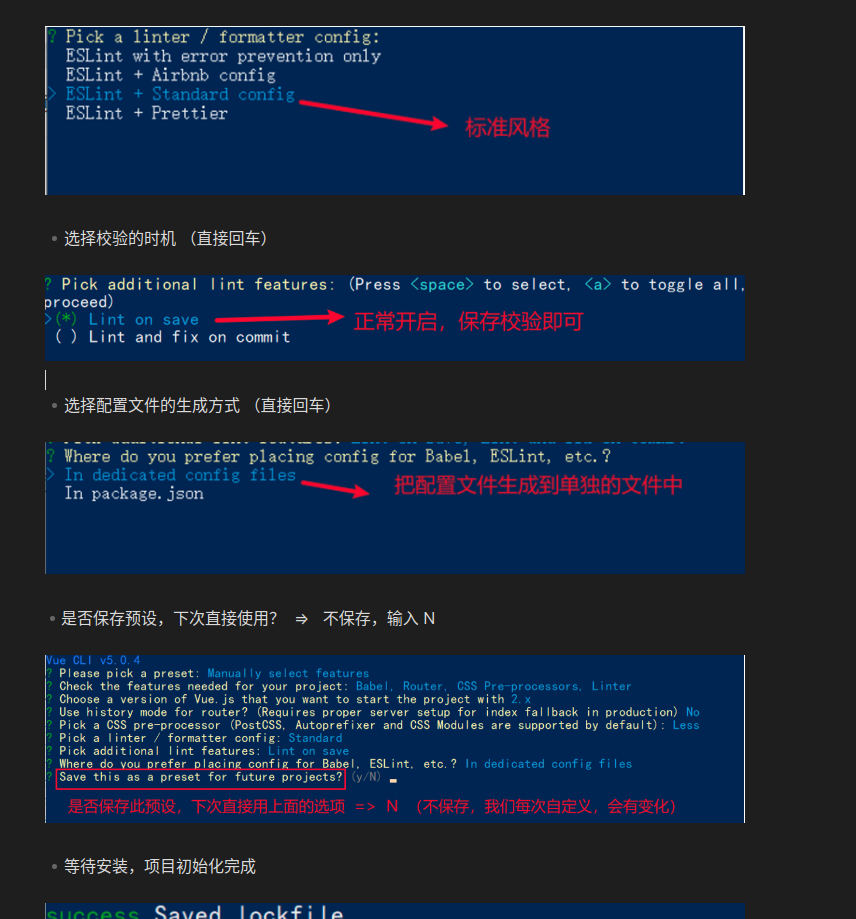
| Vue CLI v5.0.8
? Please pick a preset:
Default ([Vue 3] babel, eslint)
Default ([Vue 2] babel, eslint)
> Manually select features 选自定义
|
Vuex
Vuex 是一个 Vue 的 状态管理工具,状态就是数据。
大白话:Vuex 是一个插件,可以帮我们管理 Vue 通用的数据 (多组件共享的数据)。例如:购物车数据 个人信息数
基本使用

1.安装 vuex
安装vuex与vue-router类似,vuex是一个独立存在的插件,如果脚手架初始化没有选 vuex,就需要额外安装。
1
| yarn add vuex@3 或者 npm i vuex@3
|
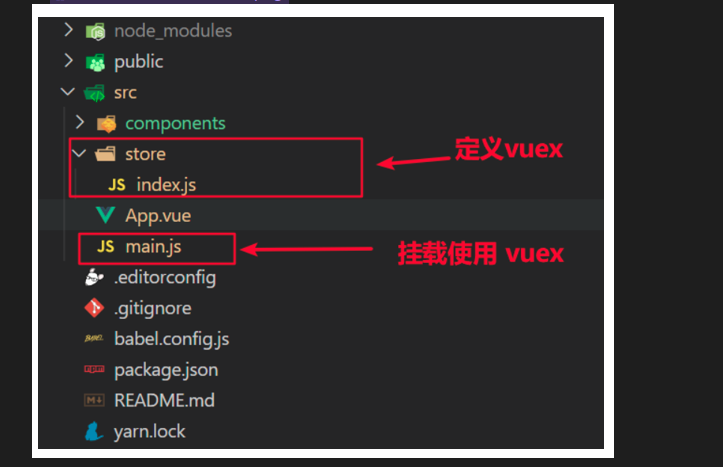
2.新建 store/index.js 专门存放 vuex
为了维护项目目录的整洁,在src目录下新建一个store目录其下放置一个index.js文件。 (和 `router/index.js` 类似)
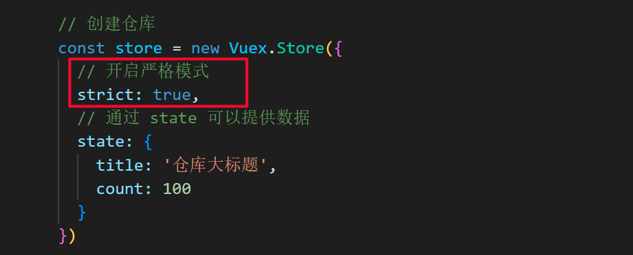
.创建仓库 store/index.js
1
2
3
4
5
6
7
8
9
10
11
12
|
import Vue from 'vue'
import Vuex from 'vuex'
Vue.use(Vuex)
const store = new Vuex.Store()
export default store
|
4 在 main.js 中导入挂载到 Vue 实例上
1
2
3
4
5
6
7
8
9
10
| import Vue from 'vue'
import App from './App.vue'
import store from './store'
Vue.config.productionTip = false
new Vue({
render: h => h(App),
store
}).$mount('#app')
|
此刻起, 就成功创建了一个 空仓库!!
5.测试打印Vuex
App.vue
1
2
3
| created(){
console.log(this.$store)
}
|
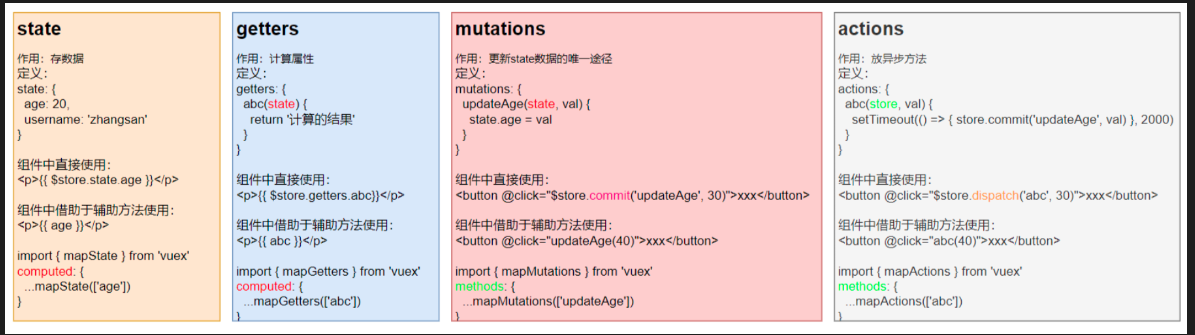
state 状态
如何给仓库存储数据, 如果取出使用仓库的数据
提供数据(存入数据)
State提供唯一的公共数据源,所有共享的数据都要统一放到Store中的State中存储。
打开项目中的store.js文件,在state对象中可以添加我们要共享的数据。
1
2
3
4
5
6
7
8
9
10
|
const store = new Vuex.Store({
state: {
count: 101
}
})
|
访问数据
1
2
3
4
5
6
7
8
| 获取 store:
1.Vue模板中获取 this.$store
2.js文件中获取 import 导入 store
模板中: {{ $store.state.xxx }}
组件逻辑中: this.$store.state.xxx
JS模块中: store.state.xxx
|
如果数据量变大, 那么使用这种方法明显就比较累坠了。所以我们可以通过使用辅助函数来帮助我们把store中的数据映射到 组件的计算属性中, 它属于一种方便的用法

通过数组的方式得到对象
第一步:导入mapState (mapState是vuex中的一个函数)
1
| import { mapState } from 'vuex'
|
第二步:采用数组形式引入state属性
上面代码的最终得到的是 类似于
1
2
3
| count () {
return this.$store.state.count
}
|
第三步:利用展开运算符将导出的状态映射给计算属性
1
2
3
| computed: {
...mapState(['count'])
}
|
1
| <div> state的数据:{{ count }}</div>
|
注意:
通过这样方式如果修改属性会报错, 因为vuex默认开启了严选模式
也就是说通过**vuex** 得到的数据是单项流模式, 组件是不能直接修改仓库中的数据。
state数据的修改只能通过mutations,并且mutations必须是同步的
核心概念mutations
定义mutations
1
2
3
4
5
6
7
8
9
| const store = new Vuex.Store({
state: {
count: 0
},
// 定义mutations
mutations: {
}
})
|
mutations是一个对象, 对象中存放的是修改state的方法
1
2
3
4
5
6
7
| mutations: {
// 方法里参数 第一个参数是当前store的state属性
// payload 载荷 运输参数 调用mutaiions的时候 可以传递参数 传递载荷
addCount (state) {
state.count += 1
}
},
|
组件中提交mutations
通过点击事件实现修改方法的触发, 然后在通过下面语句实现调用mustations中的addCount方法
1
| <button @click="add()">值 + 5</button>
|
1
2
3
4
5
| methods: {
add(){
this.$store.commit('addCount')
}
}
|
带参数的mutations函数
**提交 mutation 是可以传递参数的 **this.$store.commit('xxx', 参数)
在定义mutations中的方法的时候可以直接通过下面的类似语句进行修改。
1
2
3
4
5
6
| mutations: {
addCount (state, count) {
state.count = count
}
},
|
注意: 提交的参数只能是一个, 如果有多个参数要传, 可以传递一个对象

1
2
3
4
5
6
7
8
9
10
11
12
| <input :value="count" @input="handleInput" type="text">
export default {
methods: {
handleInput (e) {
// 1. 实时获取输入框的值
const num = +e.target.value
// 2. 提交mutation,调用mutation函数
this.$store.commit('changeCount', num)
}
}
}
|
然后在store/index.js文件中
1
2
3
4
5
| mutations: {
changeCount (state, newCount) {
state.count = newCount
}
},
|
辅助函数 - mapMutations
mapMutations和mapState很像,它把位于mutations中的方法提取了出来,我们可以将它导入
在所要使用的组件中
1
2
3
4
| import { mapMutations } from 'vuex'
methods: {
...mapMutations(['addCount'])
}
|
上面代码的含义是将mutations的方法导入了methods中,等价于
1
2
3
4
5
6
| methods: {
addCount () {
this.$store.commit('addCount')
}
}
|
此时,就可以直接通过this.addCount调用了
1
| <button @click="addCount">值+1</button>
|
注意: Vuex中mutations中要求不能写异步代码,如果有异步的ajax请求,应该放置在actions中
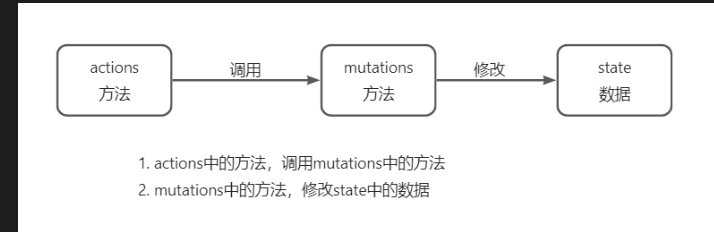
核心概念 - actions
state是存放数据的,mutations是同步更新数据 (便于监测数据的变化, 更新视图等, 方便于调试工具查看变化),actions则负责进行异步操作
说明:mutations必须是同步的
需求: 一秒钟之后, 要给一个数 去修改state
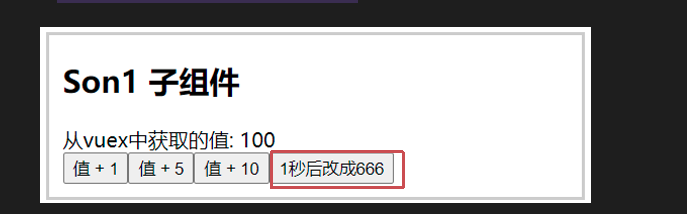
- 在组件中通过点击事件修改
1
2
3
4
5
6
7
8
9
10
11
| <button @click="setAfter()" >1s 后修改为 666</button>
// script格式中
methods: {
setAfter(){
const val = 666
this.$store.dispatch('change', val)
}
}
|
- 通过
this.$store.dispatch('方法名', 参数)调用store/index.js中的方法
1
2
3
4
5
6
7
8
9
10
11
12
13
14
15
16
17
18
19
20
| // 创建仓库 store
const store = new Vuex.Store({
state: {
ount: 100
},
mutations: {
changeCount(state, count){
state.ount = count
}
},
actions: {
// 不能在actions中直接修改, 需要调用mutations中的方法
change(context, count) {
setTimeout(() => {
//调用mutations 的changeCount, 从而修改
context.commit('changeCount', count)
},2000)
}
}
})
|
辅助函数 - mapActions
mapActions 是把位于 actions中的方法提取了出来,映射到组件methods中, 不需要在写方法来调用了
1
2
3
4
5
6
7
8
9
10
11
12
| import { mapActions } from 'vuex'
methods: {
...mapActions(['changeCountAction'])
}
|
1
2
| <!-- 参数可以直接进行传递, 不需要考虑methods中, 但是还是最多只能传一个, 多了就封装成为对象, 然后通过对象的形式传过去. -->
<button @click="changeCountAction(200)">+异步</button>
|
然后在store/index.js中进行修改
1
2
3
4
5
6
7
8
9
10
11
12
13
14
15
16
17
18
19
20
21
22
23
24
25
26
27
28
29
30
31
|
const store = new Vuex.Store({
state: {
ount: 100
},
mutations: {
addCount(state, count) {
state.ount += count
},
changeCount(state, count){
state.ount = count
}
},
actions: {
change(context, count) {
setTimeout(() => {
context.commit('changeCount', count)
},2000)
},
addFive(context, count) {
setTimeout(() => {
context.commit('addCount', count)
},2000)
}
}
})
|
核心概念 - getters
除了state之外,有时我们还需要从state中筛选出符合条件的一些数据,这些数据是依赖state的,此时会用到getters
例如, 组件中定义了list数组, 我们需要筛选出list中 大于 X的数据. 就可以通过getters实现
1
2
3
4
5
6
7
8
9
| state: {
list: [1, 2, 3, 4, 5, 6, 7, 8, 9, 10]
},
getters: {
// getters函数的第一个参数是 state
// 必须要有返回值
filterList: state => state.list.filter(item => item > 5)
}
|
使用getters
2.1原始方式-$store
在组件中, 通过$store对象来获取他的getters属性, 然后再获取其中的方法
1
| <div>{{ $store.getters.filterList }}</div>
|
2.2辅助函数 - mapGetters
1
2
3
| computed: {
...mapGetters(['filterList'])
}
|
1
| <div>{{ filterList }}</div>
|
四种核心方法使用总结
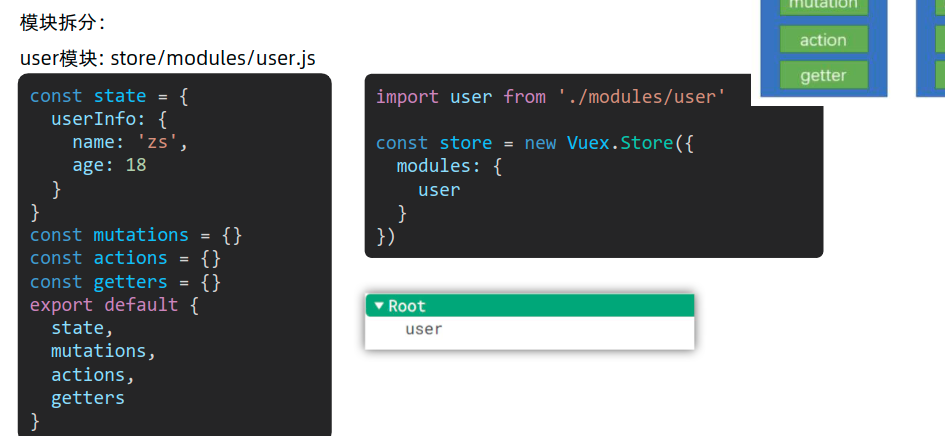
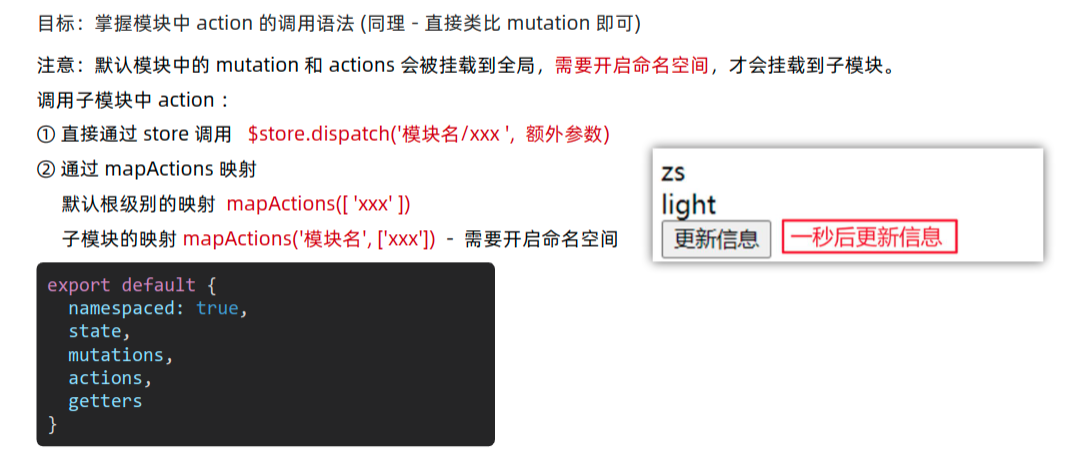
模块module
拆封模块的原因:
由于使用单一状态树,应用的所有状态会集中到一个比较大的对象。当应用变得非常复杂时,store 对象就有可能变得相当臃肿。
这句话的意思是,如果把所有的状态都放在state中,当项目变得越来越大的时候,Vuex会变得越来越难以维护
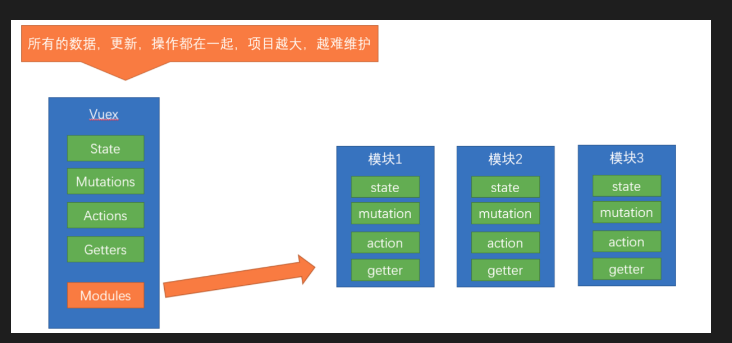
在store中配置module模块。 然后在每个模块中设置state、mutations、actions、getters
挂载模块
- 在
model/模块名.js定义模块的内容, 设置4个属性, 然后导出
1
2
3
4
5
6
7
8
9
10
11
12
13
14
15
16
|
const state= {
theme: 'light' ,
desc: '测试demo'
}
const mutations = { }
const actions = { }
const getters = { }
export default {
state,
mutations,
actions,
getters
}
|
- 在
index.js中进行导入模块和 注册这两个模块
1
2
3
4
5
6
7
8
9
10
11
12
|
import user from './modules/user'
import settings from './modules/settings'
const store = new Vuex.Store({
modules: {
user,
settings
},
})
|
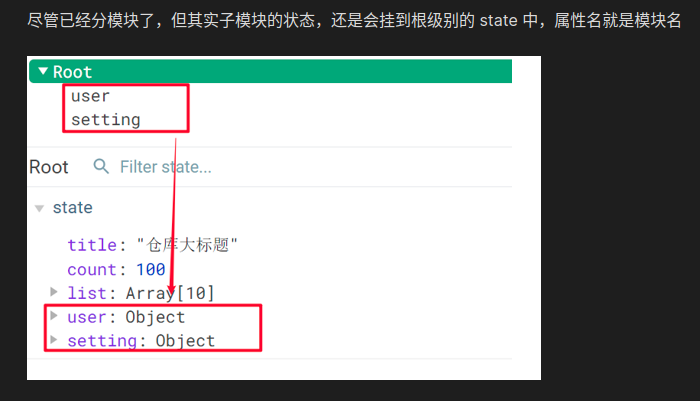
访问模块中的数据
具体细节可以参考之前的核心概念的使用方法
xxx 表示我们需要得到的属性
获取state内容
- 直接通过模块名访问
$store.state.模块名.xxx
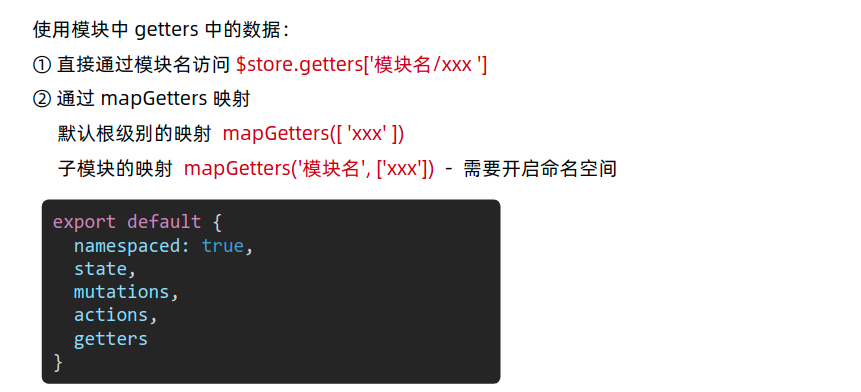
- 通过 mapState 映射:
- 默认根级别的映射
mapState([ 'xxx' ])
- 子模块的映射 :
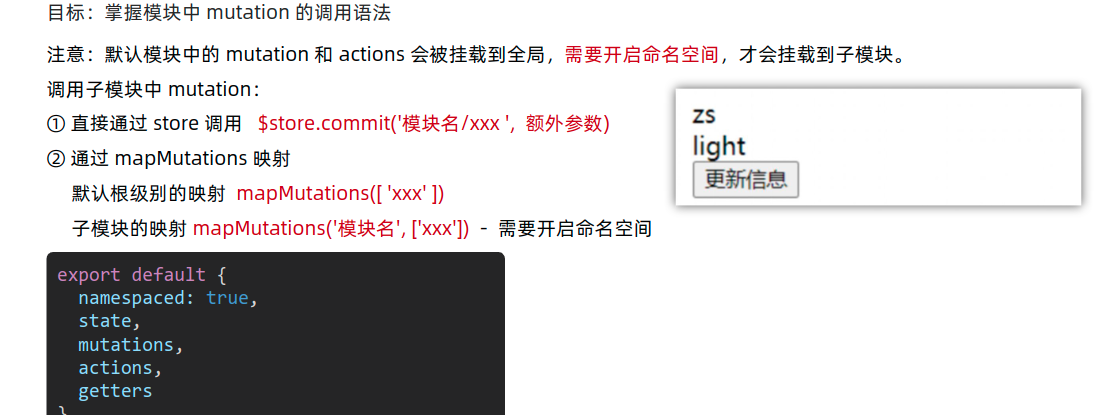
mapState('模块名', ['xxx']) - 需要开启命名空间 namespaced:true

获取getters中的内容
获取mutations中的内容
获取actions中的内容
实现案例
获取请求, 然后存入vuex ,最后渲染

- 首先创建模块
modules/cart.js, 然后构建框架
1
2
3
4
5
6
7
8
9
10
11
12
13
14
15
16
17
18
| import { mapActions ,mapGetters, mapState, mapMutations } from "vuex"
export default {
namespaced: true,
state() {
return {
list: []
}
},
mutations: {
},
actions: {
},
getters: {
}
}
|
通常都是通过一个对象的形式来进行构建数据的
- 注册模块到
index.js
1
2
3
4
5
6
7
8
9
10
11
12
13
14
| import Vue from 'vue
import Vuex from 'vuex'
//1. 导入模块
import cart from './modules/cart'
Vue.use(Vuex)
export default new Vuex.Store({
modules: {
cart
}
})
|
- 准备需要的
actions 和 mutations 代码( 因为我们获取数据是通过异步的方式, 所以在actions里 )
1
2
3
4
5
6
7
8
9
10
11
12
13
14
15
16
17
18
19
20
21
22
23
24
| export default {
namespaced: true,
state() {
return {
//关于购物车的一个数据[{ } ,{ }]
list: []
}
},
mutations: {
//更新List中的数据
updateList(state, newList){
state.list = newList
}
},
actions: {
// 异步更新数据
async getList(context){
const res = await axios.get('http://localhost:3000/cart')
// 调用updateList 存入数据
context.commit('updateList', res.data)
}
},
getters: {}
}
|
仅仅这样在模块中写还无法将数据加载到组件中, 需要在App.vue 组件中调用才行
1
2
3
4
5
6
7
8
9
10
11
12
13
14
15
16
17
18
19
20
21
22
23
24
25
26
27
28
| <script>
//1. 导入组件和模块
import { mapActions , mapGetters, mapState, mapMutations} from 'vuex'
import cart from './store/modules/cart'
export default {
name: 'App',
components: {
//组件注册
CartHeader,
CartFooter,
CartItem
},
//得到使用vuex中存入的数据
computed: {
...mapState('cart', ['list'])
},
// 通过使用created将数据加载进去
created() {
// this.$store.dispatch('cart/getList')
//通过this调用
this.getList()
},
methods: {
...mapActions('cart',['getList'])
}
}
</script>
|
- 动态渲染
1
2
3
4
5
6
7
8
9
10
11
12
13
14
15
| <template>
<div class="app-container">
<cart-header></cart-header>
<cart-item v-for="(item, index) in list" :key="item.id" :item="item"></cart-item>
<cart-footer></cart-footer>
</div>
</template>
|
子组件通过props数据, 然后进行渲染即可
数据更新
- 基于state 来使用getters从而实现 数据的更新
1
2
3
4
5
6
7
8
9
10
11
12
13
14
15
16
17
18
19
20
21
22
23
24
25
26
27
28
29
30
31
32
33
34
35
36
37
38
39
40
41
42
43
44
45
46
47
48
49
50
51
52
53
54
55
56
57
58
59
60
61
62
63
64
65
| import axios from "axios"
import { mapActions ,mapGetters, mapState, mapMutations } from "vuex"
export default {
namespaced: true,
state() {
return {
list: []
}
},
mutations: {
updateList(state, newList){
state.list = newList
},
add(state, id) {
const goods = state.list.find((item) => item.id == id)
goods.count += 1
},
del(state, id) {
const goods = state.list.find((item) => item.id == id)
goods.count -= 1
}
},
actions: {
async getList(context){
const res = await axios.get('http://localhost:3000/cart')
context.commit('updateList', res.data)
},
async addItem(context, item) {
const newCount = item.count + 1
const res = await axios.patch(`http://localhost:3000/cart/${item.id}`, {
count: newCount
})
console.log(res.data)
context.commit('add', item.id)
},
async delItem(context, item) {
const newCount = item.count - 1
if(newCount < 1) return
const res = await axios.patch(`http://localhost:3000/cart/${item.id}`, {
count: newCount
})
context.commit('del', item.id)
}
},
getters: {
totalCount(state) {
return state.list.reduce((sum,item ) => sum + item.count, 0);
},
totalMoney(state) {
return state.list.reduce((sum,item ) => sum += item.price*item.count, 0);
}
}
}
|
- 然后通过使用
getter实现总数的计算
1
2
3
4
5
6
7
8
9
10
11
12
13
14
15
16
17
18
19
20
21
22
23
24
25
26
27
28
29
30
31
32
33
34
35
36
| <template>
<!-- item页面的update数据 -->
<button class="btn btn-light" @click="delItem(item)">-</button>
<span class="count">{{ item.count }}</span>
<button class="btn btn-light" @click="addItem(item)">+</button>
<!-- 下面是footer页面的和上面不同 -->
<div class="footer-container">
<!-- 中间的合计 -->
<div>
<span>共 {{totalCount}} 件商品,合计:</span>
<span class="price">¥{{ totalMoney }}</span>
</div>
<!-- 右侧结算按钮 -->
<button class="btn btn-success btn-settle">结算</button>
</div>
</template>
<script>
import { mapActions , mapGetters, mapState, mapMutations} from 'vuex';
import cart from '../store/modules/cart'
export default {
name: 'CartFooter',
props: {
list: {
type: Array,
required: true //必须传
}
},
computed: {
...mapGetters('cart', ['totalCount','totalMoney'])
}
}
</script>
|