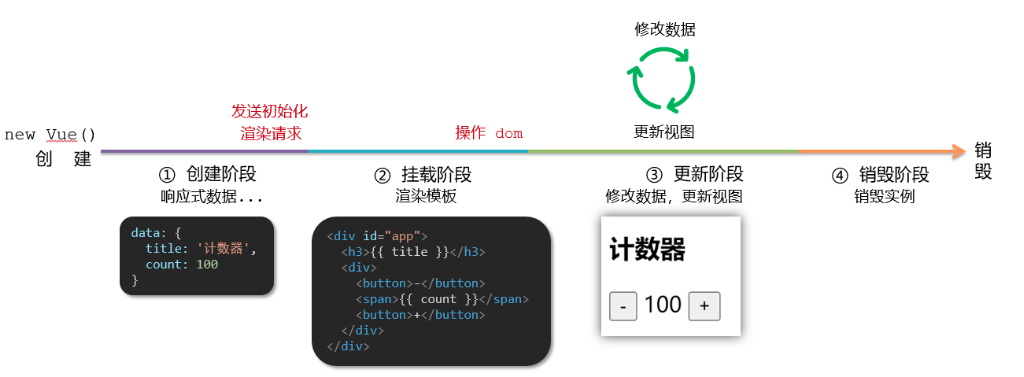
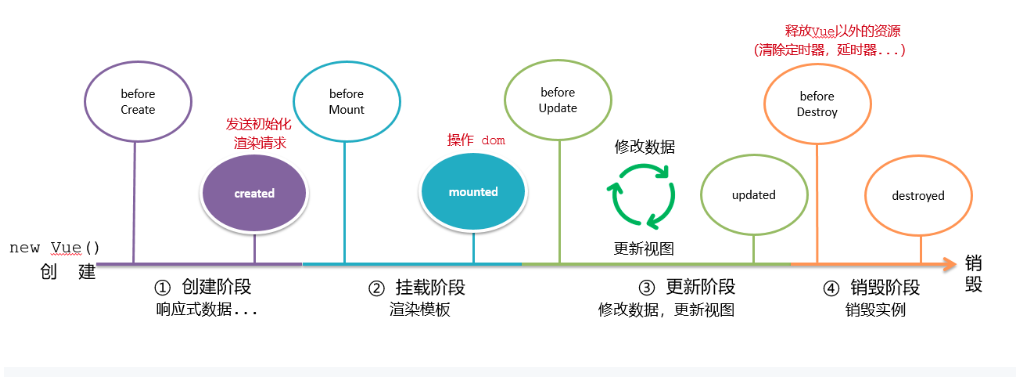
生命周期
Vue生命周期:就是一个Vue实例从创建 到 销毁 的整个过程。
生命周期四个阶段:① 创建 ② 挂载 ③ 更新 ④ 销毁
- 创建阶段:创建响应式数据
- 挂载阶段:渲染模板
- 更新阶段:修改数据,更新视图
- 销毁阶段:销毁Vue实例
1
2
3
4
5
6
7
8
9
10
11
12
13
14
15
16
17
18
19
20
21
22
23
24
25
26
27
28
29
30
31
| <div id="app">
<h3>{{ title }}</h3>
<div>
<button @click="count--">-</button>
<span>{{ count }}</span>
<button @click="count++">+</button>
</div>
</div>
<script src="https://cdn.jsdelivr.net/npm/vue@2/dist/vue.js"></script>
<script>
const app = new Vue({
el: '#app',
data: {
count: 100,
title: '计数器'
},
beforeCreate(){ }
beforeMount( ){ }
beforeUpdate(){ }
beforeDestroy(){ }
})
</script>
|
Vue生命周期过程中,会自动运行一些函数,被称为【生命周期钩子】→ 让开发者可以在【特定阶段】运行自己的代码
1
2
3
4
5
6
7
8
9
10
11
12
13
14
15
16
17
18
19
20
21
22
23
24
25
26
27
28
29
30
31
32
33
34
35
36
37
38
39
40
41
42
43
44
45
46
47
48
49
50
51
52
53
54
55
56
57
58
59
60
61
62
63
64
65
66
| <!DOCTYPE html>
<html lang="en">
<head>
<meta charset="UTF-8">
<meta name="viewport" content="width=device-width, initial-scale=1.0">
<title>Document</title>
</head>
<body>
<div id="app">
<h3>{{ title }}</h3>
<div>
<button @click="count--">-</button>
<span>{{ count }}</span>
<button @click="count++">+</button>
</div>
</div>
<script src="https://cdn.jsdelivr.net/npm/vue@2/dist/vue.js"></script>
<script>
const app = new Vue({
el: '#app',
data: {
count: 100,
title: '计数器'
},
beforeCreate () {
console.log('beforeCreate 响应式数据准备好之前', this.count)
},
created () {
console.log('created 响应式数据准备好之后', this.count)
},
beforeMount () {
console.log('beforeMount 模板渲染之前', document.querySelector('h3').innerHTML)
},
mounted () {
console.log('mounted 模板渲染之后', document.querySelector('h3').innerHTML)
},
beforeUpdate () {
console.log('beforeUpdate 数据修改了,视图还没更新', document.querySelector('span').innerHTML)
},
updated () {
console.log('updated 数据修改了,视图已经更新', document.querySelector('span').innerHTML)
},
beforeDestroy () {
console.log('beforeDestroy, 卸载前')
console.log('清除掉一些Vue以外的资源占用,定时器,延时器...')
},
destroyed () {
console.log('destroyed,卸载后')
}
})
</script>
</body>
</html>
|
案例
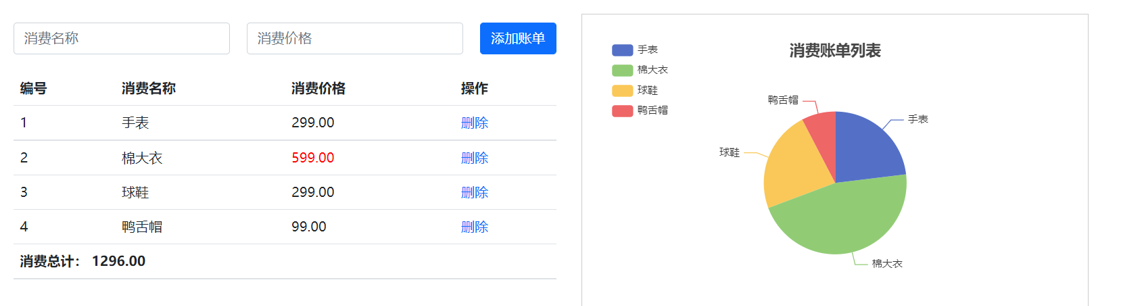
需求:
1.基本渲染
2.添加功能
3.删除功能
4.饼图渲染
相关代码实现
js
1
2
3
4
5
6
7
8
9
10
11
12
13
14
15
16
17
18
19
20
21
22
23
24
25
26
27
28
29
30
31
32
33
34
35
36
37
38
39
40
41
42
43
44
45
46
47
48
49
50
51
52
53
54
55
56
57
58
59
60
61
62
63
64
65
66
67
68
69
70
71
72
73
74
75
76
77
78
79
80
81
82
83
84
85
86
87
88
89
90
91
92
93
94
95
96
97
98
99
100
101
102
103
104
105
106
107
108
109
110
111
112
113
114
115
116
117
118
119
120
121
122
123
124
125
126
127
128
129
130
131
132
133
134
135
136
137
138
139
140
141
142
143
144
145
146
147
148
149
150
151
152
153
154
155
156
157
158
|
const app = new Vue({
el: '#app',
data: {
list: [
{
id: 0,
name: '',
price: 0,
creator: ''
}
],
itemName: '',
itemPrice: ''
},
computed: {
totalCount (){
return this.list.reduce((sum, item)=>sum += item.price,0)
}
},
methods: {
del(id) {
this.list = this.list.filter(item => item.id !== id)
},
add(){
console.log("商品名称:"+ this.itemName)
this.list.unshift({
id: +new Date(),
name: this.itemName,
price: this.itemPrice,
creator: 'rayce'
})
this.updateView()
this.itemName= ''
this.itemPrice=''
},
updateView(){
this.myCharts.setOption({
series: [
{
data: this.list.map(item => ({ value: item.price, name: item.name}))
}
]
})
}
},
async created(){
console.log("生命周期的准备响应式数据阶段")
const res = await axios({
url: 'https://applet-base-api-t.itheima.net/bill',
params: {
creator: 'rayce'
}
})
this.list = res.data.data
this.updateView()
},
beforeCreated(){
console.log("生命周期的创建数据阶段。 发送初始化渲染请求")
},
mounted(){
console.log("生命周期的挂载数据阶段(操作dom阶段)")
this.myCharts = echarts.init(document.querySelector('#main'))
this.myCharts.setOption({
title: {
text: '消费账单列表',
left: 'center'
},
tooltip: {
trigger: 'item'
},
legend: {
orient: 'vertical',
left: 'left'
},
series: [
{
name: '消费账单',
type: 'pie',
radius: '50%',
data: [
],
emphasis: {
itemStyle: {
shadowBlur: 10,
shadowOffsetX: 0,
shadowColor: 'rgba(0, 0, 0, 0.5)'
}
}
}
]
})
}
})
|
html
1
2
3
4
5
6
7
8
9
10
11
12
13
14
15
16
17
18
19
20
21
22
23
24
25
26
27
28
29
30
31
32
33
34
35
36
37
38
39
40
41
42
43
44
45
46
47
48
49
50
51
52
53
54
55
56
57
58
59
60
61
62
63
64
65
66
67
68
69
70
71
72
73
74
75
76
77
78
79
80
81
82
83
84
85
86
87
88
89
90
91
92
93
94
95
96
97
98
99
100
101
102
103
104
105
106
107
108
109
110
111
112
113
114
115
116
117
118
119
120
| <!DOCTYPE html>
<html lang="en">
<head>
<meta charset="UTF-8">
<meta name="viewport" content="width=device-width, initial-scale=1.0">
<title>Document</title>
</head>
<body>
<link
rel="stylesheet"
href="https://cdn.jsdelivr.net/npm/bootstrap@5.1.3/dist/css/bootstrap.min.css"
/>
<style>
.red {
color: red!important;
}
.search {
width: 300px;
margin: 20px 0;
}
.my-form {
display: flex;
margin: 20px 0;
}
.my-form input {
flex: 1;
margin-right: 20px;
}
.table > :not(:first-child) {
border-top: none;
}
.contain {
display: flex;
padding: 10px;
}
.list-box {
flex: 1;
padding: 0 30px;
}
.list-box a {
text-decoration: none;
}
.echarts-box {
width: 600px;
height: 400px;
padding: 30px;
margin: 0 auto;
border: 1px solid #ccc;
}
tfoot {
font-weight: bold;
}
@media screen and (max-width: 1000px) {
.contain {
flex-wrap: wrap;
}
.list-box {
width: 100%;
}
.echarts-box {
margin-top: 30px;
}
}
</style>
<div id="app">
<div class="contain">
<div class="list-box">
<form class="my-form">
<input v-model="itemName" type="text" class="form-control" placeholder="消费名称" />
<input v-model="itemPrice" type="text" class="form-control" placeholder="消费价格" />
<button @click="add()" type="button" class="btn btn-primary">添加账单</button>
</form>
<table class="table table-hover">
<thead>
<tr>
<th>编号</th>
<th>消费名称</th>
<th>消费价格</th>
<th>操作</th>
</tr>
</thead>
<tbody v-if="list.length > 0">
<tr v-for="(item, index) in list">
<td>{{item.id}}</td>
<td>{{ item.name }}</td>
<td>{{ item.price }}</td>
<td @click="del(item.id)"><a>删除</a></td>
</tr>
</tbody>
<tfoot>
<tr>
<td colspan="4">消费总计: {{ totalCount }}</td>
</tr>
</tfoot>
</table>
</div>
<div class="echarts-box" id="main"></div>
</div>
</div>
<script src="https://cdn.jsdelivr.net/npm/echarts@5.4.0/dist/echarts.min.js"></script>
<script src="https://cdn.jsdelivr.net/npm/vue@2/dist/vue.js"></script>
<script src="https://cdn.jsdelivr.net/npm/axios/dist/axios.min.js"></script>
<script src="./zhangdan.js"></script>
</body>
</html>
|
重点关注图表内容的实现
通过这个案例最好学会echarts的使用。
工程化开发入门
工程化开发模式:基于构建工具(例如:webpack)的环境中开发Vue。
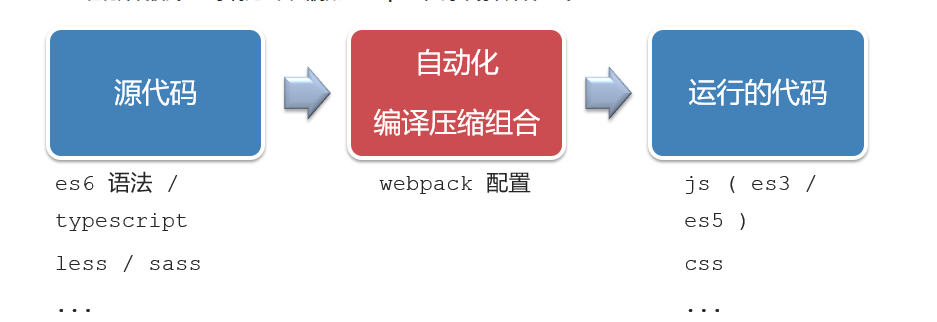
工程化开发模式优点:
提高编码效率,比如使用JS新语法、Less/Sass、Typescript等通过webpack都可以编译成浏览器识别的ES3/ES5/CSS等
工程化开发模式问题:
- webpack配置不简单
- 雷同的基础配置
- 缺乏统一的标准
为了解决以上问题,所以我们需要一个工具,生成标准化的配置
脚手架Vue CLI
基本介绍:
Vue CLI 是Vue官方提供的一个全局命令工具
可以帮助我们快速创建一个开发Vue项目的标准化基础架子。【集成了webpack配置】
好处:
- 开箱即用,零配置
- 内置babel等工具
- 标准化的webpack配置
使用步骤:
- 全局安装(只需安装一次即可) yarn global add @vue/cli 或者 npm i @vue/cli -g
- 查看vue/cli版本: vue –version
- 创建项目架子:vue create project-name(项目名不能使用中文)
- 启动项目:yarn serve 或者 npm run serve(命令不固定,找package.json)
项目目录及其运行流程
项目目录: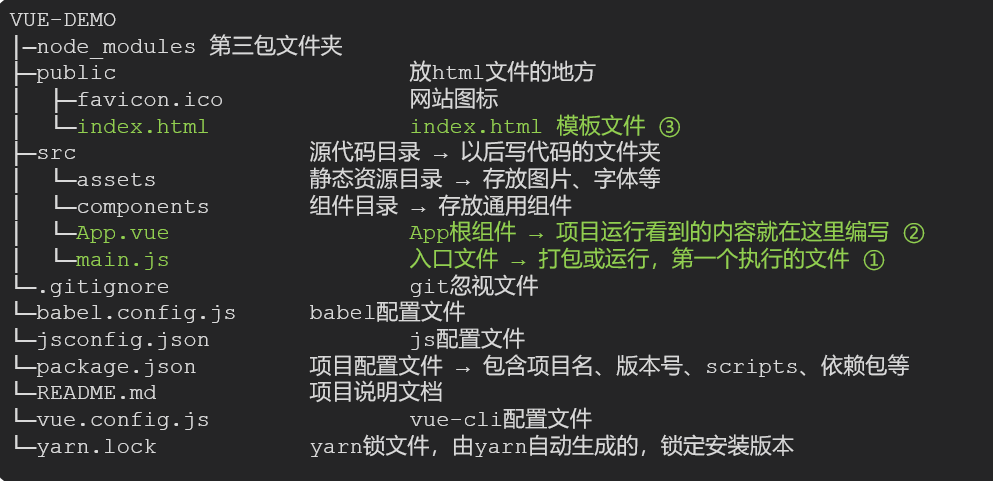
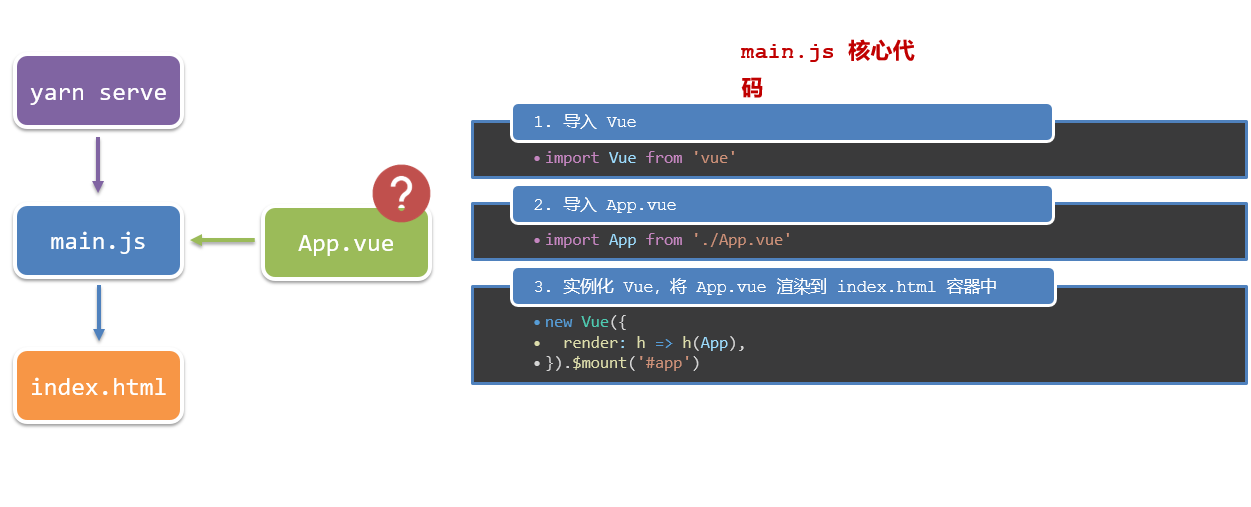
核心作用: 导入App.vue,基于App.vue 创建结构渲染index.html
- 导入vue核心包
Vue.config.productionTip = false
提示当前处于什么环境
main.js的内容
1
2
3
4
5
6
7
8
9
10
11
12
13
14
15
16
|
import Vue from 'vue'
import App from './App.vue'
Vue.config.productionTip = false
new Vue({
render: (createElement) =>{
return createElement(App)
}
}).$mount('#app')
|
运行流程
组件化开发
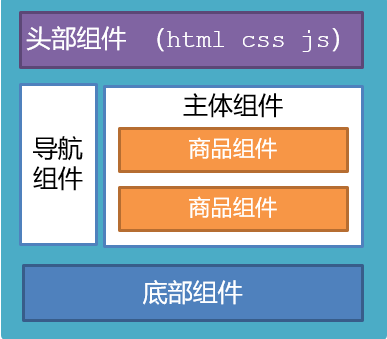
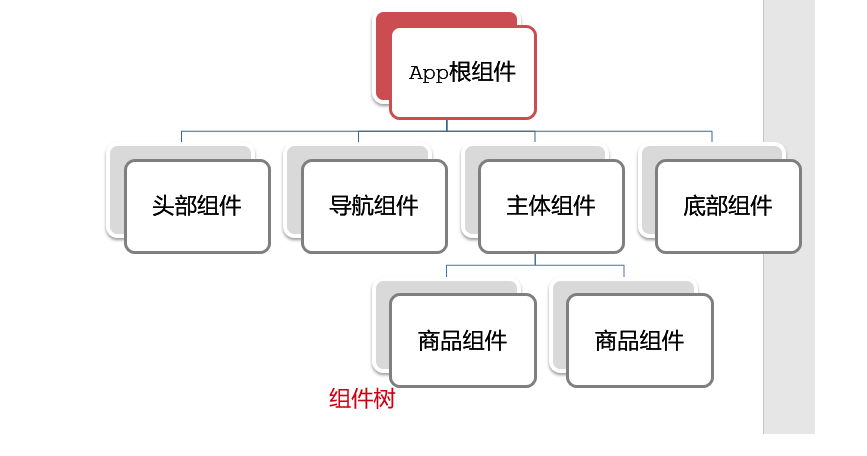
- 组件化:一个页面可以拆分成一个个组件,每个组件有着自己独立的结构、样式、行为。
- 好处:便于维护,利于复用 → 提升开发效率。
- 组件分类:普通组件、根组件。
比如:下面这个页面,可以把所有的代码都写在一个页面中,但是这样显得代码比较混乱,难易维护。咱们可以按模块进行组件划分
根组件
三个组成部分
- 三部分构成
- template:结构 (有且只能一个根元素)
- script: js逻辑
- style: 样式 (可支持less,需要装包)
- 让组件支持less(1) style标签,lang=”less” 开启less功能(2) 装包: yarn add less less-loader -D 或者npm i less less-loader -D
普通组件的注册使用- 局部组件
1.特点:
只能在注册的组件内使用
2.步骤:
- 创建.vue文件(三个组成部分)
- 在使用的组件内先导入再注册,最后使用
3.使用方式:
当成html标签使用即可 <组件名></组件名>
4.注意:
组件名规范 —> 大驼峰命名法, 如 Header
5.语法:
在App.vue中 使用
1
2
3
4
5
6
7
8
9
10
11
12
13
14
15
| <script>
import Head from "./components/Head.vue"
import Main from './components/Main.vue'
import Foot from './components/Foot.vue'
export default {
components: {
Head,
Main,
Foot
}
}
</script>
|
1
2
3
4
5
6
7
8
9
10
11
| <template>
<!-- 类名·最好和当前组件名同名 -->
<div class="App">
<Head>这里是Head</Head>
<Main>这里是main</Main>
<Foot>这里是Foot</Foot>
</div>
</template>
|
普通组件的注册使用-全局注册
1.特点:
全局注册的组件,在项目的任何组件中都能使用(相当于工具组件)
2.步骤
- 创建.vue组件(三个组成部分)
- main.js中进行全局注册
3.使用方式
当成HTML标签直接使用
<组件名></组件名>
4.注意
组件名规范 —> 大驼峰命名法, 如 HmHeader
5.语法
注册:
Vue.component('组件名', 组件对象)
1
2
3
4
|
import Button1 from './components/Button1.vue'
Vue.component('Button1', Button1)
|
1
2
3
4
5
6
| <template>
<div class="hm-header">
我是hm-header
<Button1>按钮</Button1>
</div>
</template>
|
工程化开发入门 综合案例
**实现思路: **
- 分析页面,按模块拆分组件,搭架子 (局部或全局注册)
- 根据设计图,编写组件 html 结构 css 样式 (已准备好)
- 拆分封装通用小组件 (局部或全局注册)将来 → 通过 js 动态渲染,实现功能